Build a Bestseller-to-Image Pipeline for E-Commerce with Nano Banana 2 + Milvus + Qwen 3.5
If you build AI tooling for e-commerce sellers, you’ve probably heard this request a thousand times: “I have a new product. Give me a promotional image that looks like it belongs in a bestseller listing. No photographer, no studio, and make it cheap.”
That’s the problem in a sentence. Sellers have flat-lay photos and a catalog of bestsellers that already convert. They want to bridge the two with AI, both fast and at scale.
When Google released Nano Banana 2 (Gemini 3.1 Flash Image) on February 26, 2026, we tested it the same day and integrated it into our existing Milvus-based retrieval pipeline. The result: total image generation cost dropped to roughly one-third of what was spent before, and throughput doubled. The per-image price cut (about 50% cheaper than Nano Banana Pro) accounts for part of that, but the larger savings come from eliminating rework cycles entirely.
This article covers what Nano Banana 2 gets right for e-commerce, where it still falls short, and then walks through a hands-on tutorial for the full pipeline: Milvus hybrid search to find visually similar bestsellers, Qwen 3.5 for style analysis, and Nano Banana 2 for final generation.
What’s New with Nano Banana 2?
Nano Banana 2 (Gemini 3.1 Flash Image) launched on February 26, 2026. It brings most of Nano Banana Pro’s capabilities to the Flash architecture, meaning faster generation at a lower price point. Here are the key upgrades:
- Pro-level quality at Flash speed. Nano Banana 2 delivers world-class knowledge, reasoning, and visual fidelity previously exclusive to Pro, but with the latency and throughput of Flash.
- 512px to 4K output. Four resolution tiers (512px, 1K, 2K, 4K) with native support. The 512px tier is new and unique to Nano Banana 2.
- 14 aspect ratios. Adds 4:1, 1:4, 8:1, and 1:8 to the existing set (1:1, 2:3, 3:2, 3:4, 4:3, 4:5, 5:4, 9:16, 16:9, 21:9).
- Up to 14 reference images. Maintains character resemblance for up to 5 characters and object fidelity for up to 14 objects in a single workflow.
- Improved text rendering. Generates legible, accurate in-image text across multiple languages, with support for translation and localization within a single generation.
- Image Search grounding. Pulls from real-time web data and images from Google Search to generate more accurate depictions of real-world subjects.
- ~50% cheaper per image. At 1K resolution: 0.134.
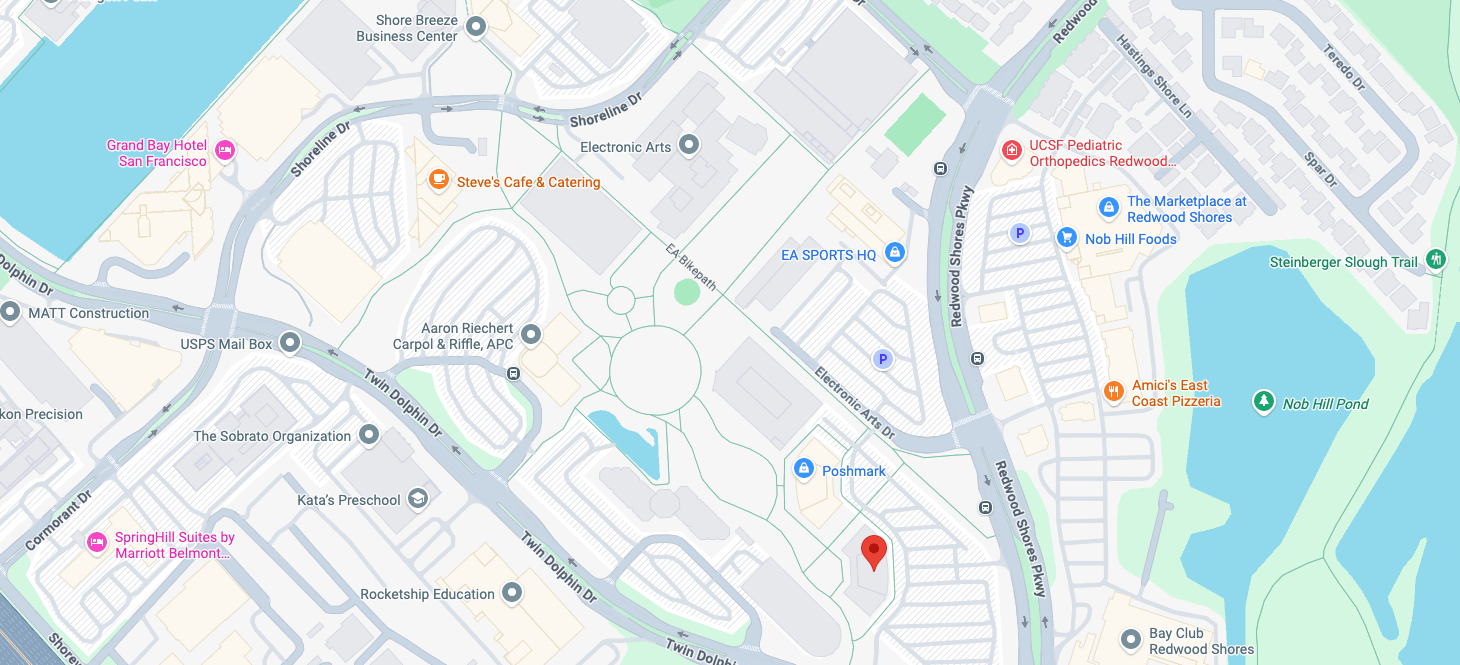
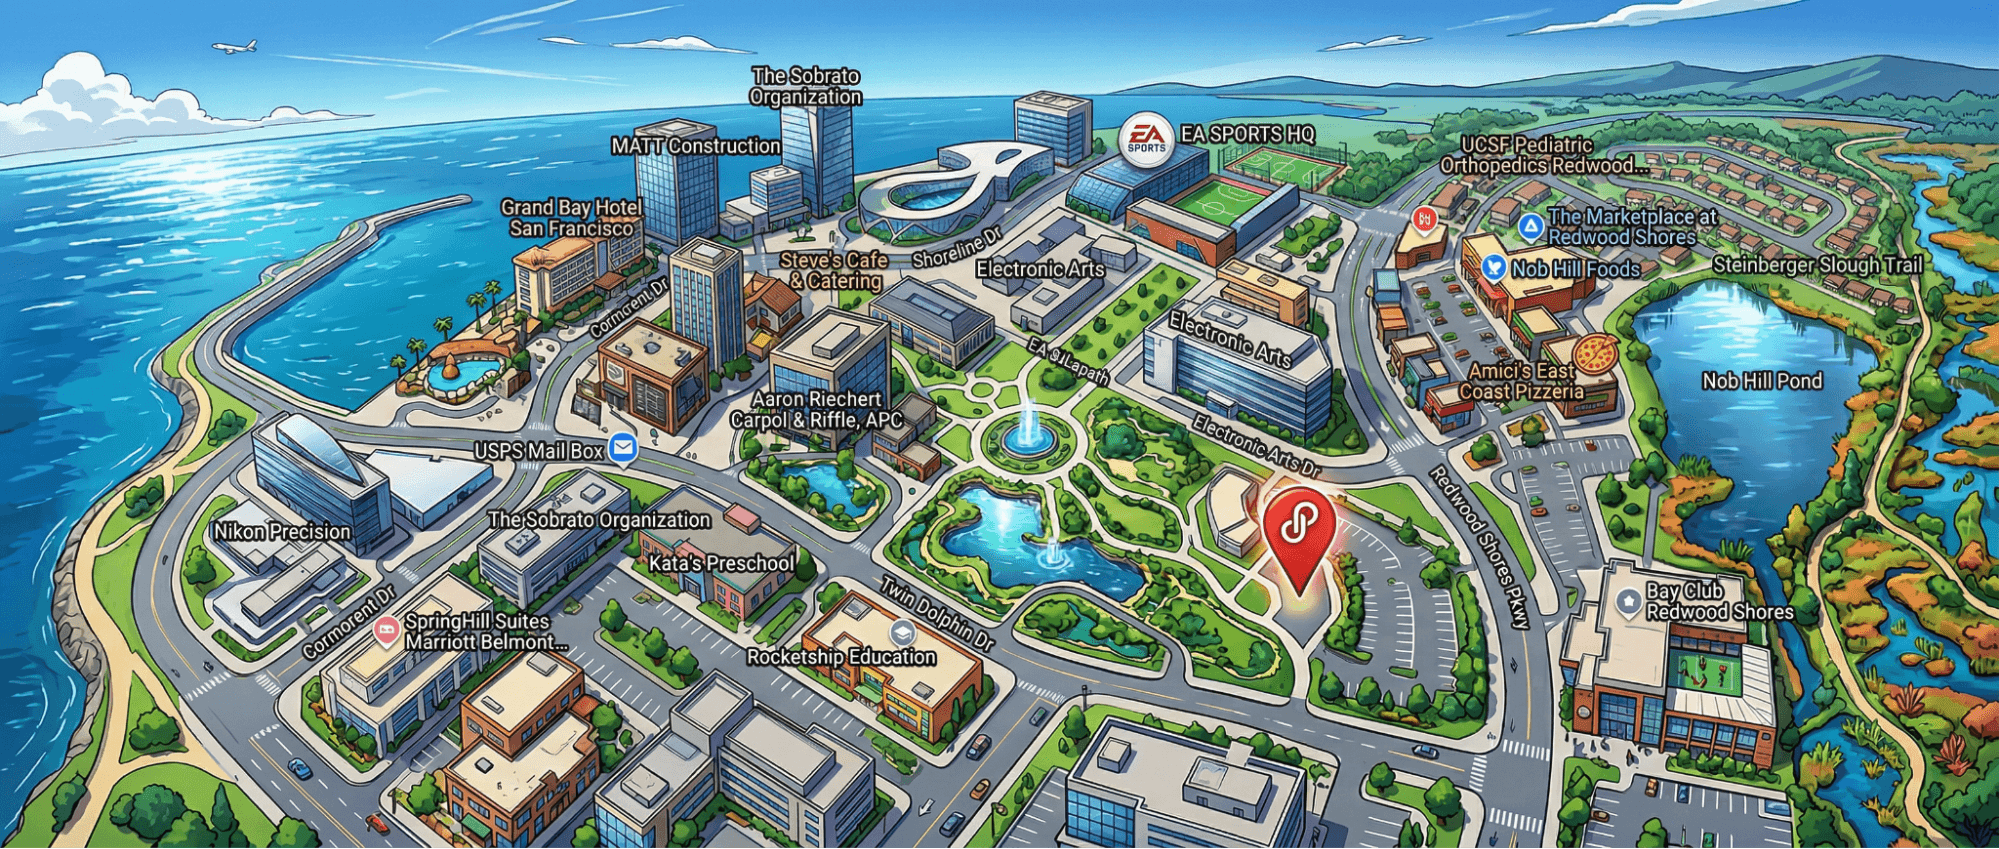
A Fun Use Case of Nano Banano 2: Generate a Location-Aware Panorama Based On a Simple Google Map Screenshot
Given a Google Maps screenshot and a style prompt, the model recognizes the geographic context and generates a panorama that preserves the correct spatial relationships. Useful for producing region-targeted ad creatives (a Parisian café backdrop, a Tokyo streetscape) without sourcing stock photography.
For the full feature set, see Google’s announcement blog and the developer documentation.
What Does This Nano Banana Update Mean For E-Commerce?
E-commerce is one of the most image-intensive industries. Product listings, marketplace ads, social creatives, banner campaigns, localized storefronts: every channel demands a constant stream of visual assets, each with its own specs.
The core requirements for AI image generation in e-commerce boil down to:
- Keep costs low – per-image cost has to work at catalog scale.
- Match the look of proven bestsellers – new images should align with the visual style of listings that already convert.
- Avoid infringement – no copying competitors’ creatives or reusing protected assets.
On top of that, cross-border sellers need:
- Multi-platform format support – different aspect ratios and specs for marketplaces, ads, and storefronts.
- Multilingual text rendering – clean, accurate in-image text across multiple languages.
Nano Banana 2 comes close to checking every box. The sections below break down what each upgrade means in practice: where it directly solves an e-commerce pain point, where it falls short, and what the actual cost impact looks like.
Cut Output Generation Costs by Up to 60%
At 1K resolution, Nano Banana 2 costs 0.134, which is a straight 50% cut. But the per-image price is only half the story. What used to kill user budgets was rework. Every marketplace enforces its own image spec (1:1 for Amazon, 3:4 for Shopify storefronts, ultrawide for banner ads), and producing each variant meant a separate generation pass with its own failure modes.
Nano Banana 2 collapses those extra passes into one.
Four native resolution tiers.
512px ($0.045)
1K ($0.067)
2K ($0.101)
4K ($0.151).
The 512px tier is new and unique to Nano Banana 2. Users can now generate low-cost 512px drafts for iteration and output the final asset at 2K or 4K without a separate upscaling step.
14 supported aspect ratios in total. Here are some examples:
4:1
1:4
8:1
1:8
These new ultra-wide and ultra-tall ratios join the existing set. One generation session can produce various formats like: Amazon main image (1:1), Storefront hero (3:4) and Banner ad (ultra-wide or other ratios.)
No cropping, no padding, no re-prompting required for these 4 ratios. The remaining 10 aspect ratios are included in the full set, making the process more flexible across different platforms.
The ~50% per-image savings alone would only halve the bill. Eliminating rework across resolutions and aspect ratios is what brought the total cost down to roughly one-third of what was spent before.
Support Up to 14 Reference Images with Bestseller Style
Of all the Nano Banana 2 updates, multi-reference blending has the biggest impact on our Milvus pipeline. Nano Banana 2 accepts up to 14 reference images in a single request, maintaining:
- Character resemblance for up to 5 characters
- Object fidelity for up to 14 objects
In practice, we retrieved multiple bestseller images from Milvus, passed them in as references, and the generated image inherited their scene composition, lighting, posing, and prop placement. There was no prompt engineering required to reconstruct those patterns by hand.
Previous models supported only one or two references, which forced users to pick a single bestseller to mimic. With 14 reference slots, we could blend characteristics from multiple top-performing listings and let the model synthesize a composite style. This is the capability that makes the retrieval-based pipeline in the tutorial below possible.

Produce Premium, Commercial-Ready Visuals Without Traditional Production Cost or Logistics
For consistent, reliable image generation, avoid dumping all your requirements into a single prompt. A more dependable approach is to work in stages: generate the background first, then the model separately, and finally composite them together.
We tested background generation across all three Nano Banana models with the same prompt: a 4:1 ultrawide rainy-day Shanghai skyline viewed through a window, with the Oriental Pearl Tower visible. This prompt stress-tests composition, architectural detail, and photorealism in a single pass.
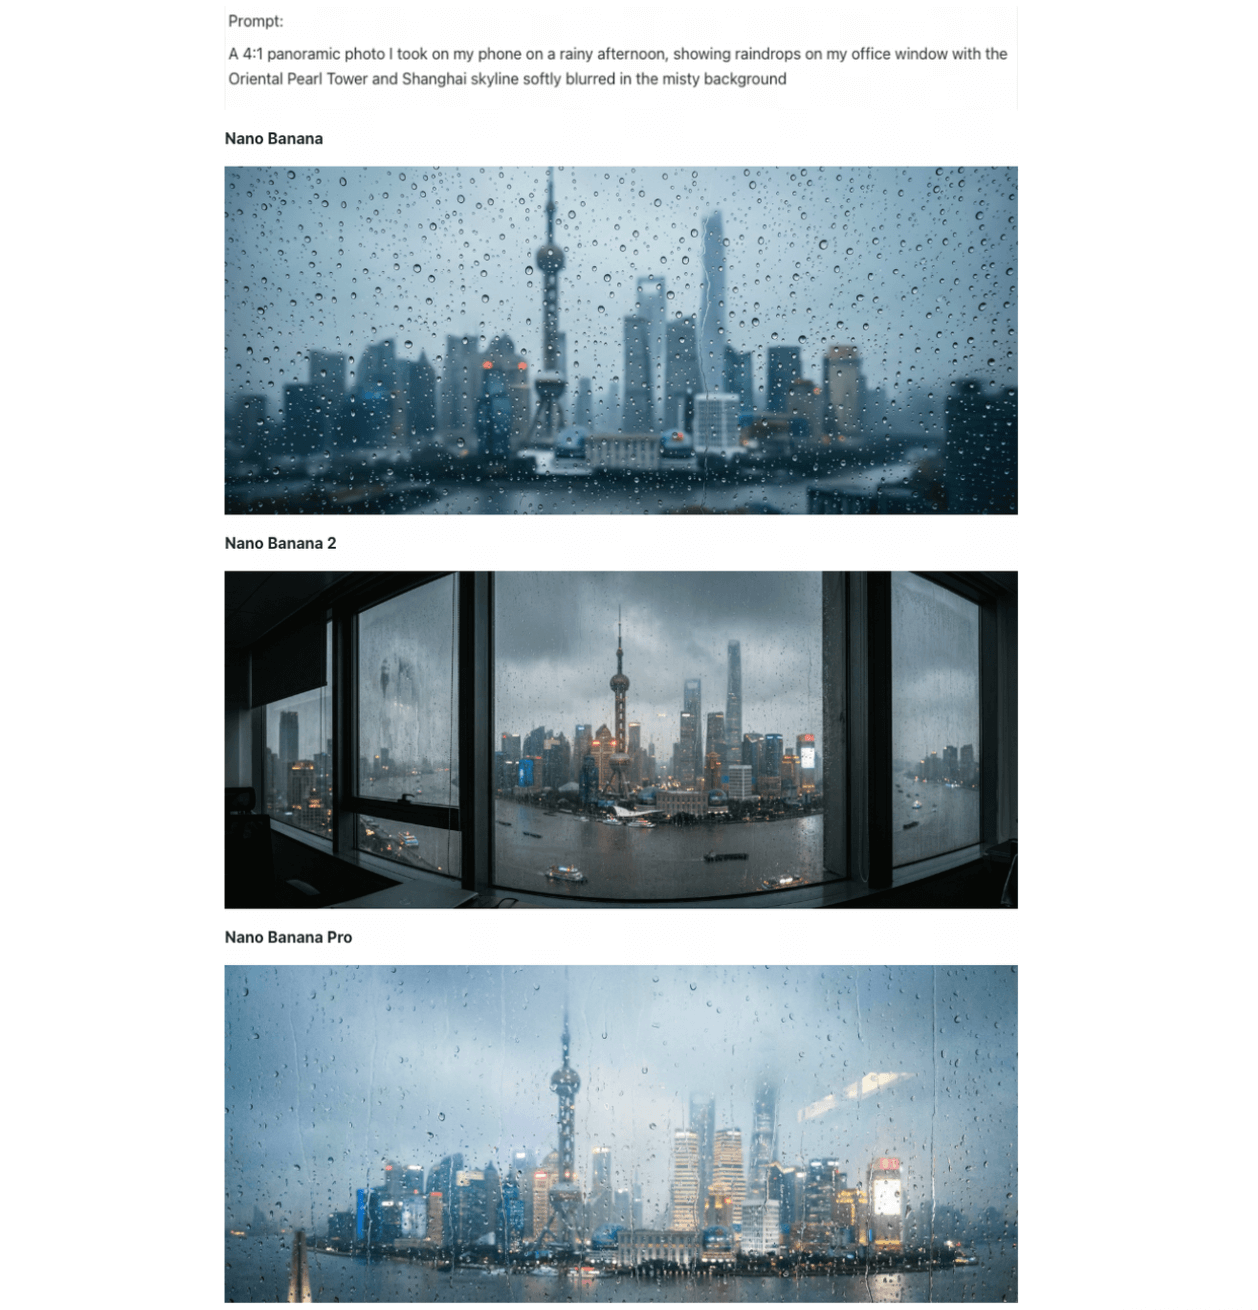
Original Nano Banana vs. Nano Banana Pro vs. Nano Banana 2
- Original Nano Banana. Natural rain texture with believable droplet distribution, but over-smoothed building details. The Oriental Pearl Tower was barely recognizable, and resolution fell short of production requirements.
- Nano Banana Pro. Cinematic atmosphere: warm interior lighting played against cold rain convincingly. However, it omitted the window frame entirely, flattening the image’s sense of depth. Usable as a supporting image, not a hero.
- Nano Banana 2. Rendered the full scene. The window frame in the foreground created depth. The Oriental Pearl Tower was clearly detailed. Ships appeared on the Huangpu River. Layered lighting distinguished interior warmth from exterior overcast. Rain and water-stain textures were near-photographic, and the 4:1 ultrawide ratio held the correct perspective with only minor distortion at the left window edge.
For most background generation tasks in product photography, we found the Nano Banana 2 output usable without post-processing.
Render In-Image Text Cleanly Across Languages
Price tags, promotional banners, and multilingual copy are unavoidable in e-commerce images, and they’ve historically been a breaking point for AI generation. Nano Banana 2 handles them significantly better, supporting in-image text rendering across multiple languages with translation and localization in a single generation.
Standard text rendering. In our testing, text output was error-free across every e-commerce format we tried: price labels, short marketing taglines, and bilingual product descriptions.
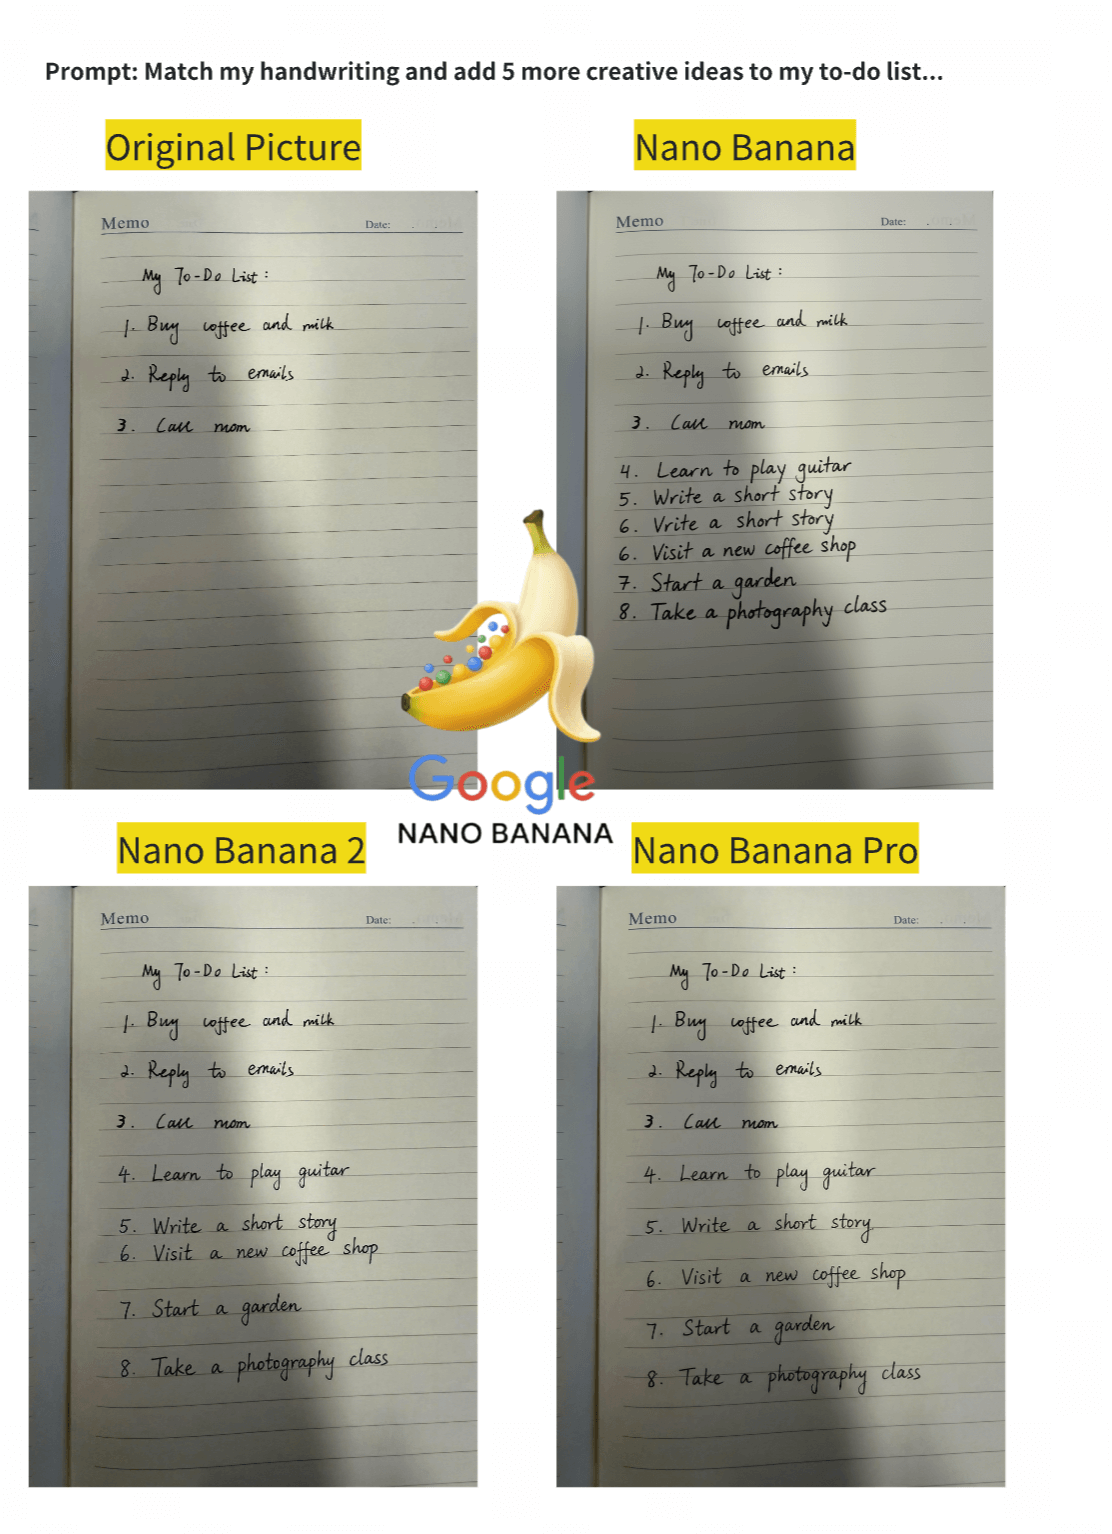
Handwriting continuation. Since e-commerce often requires handwritten elements like price tags and personalized cards, we tested whether the models could match an existing handwritten style and extend it — specifically, matching a handwritten to-do list and adding 5 new items in the same style. Results across three models:
- Original Nano Banana. Repeated sequence numbers, misunderstood structure.
- Nano Banana Pro. Correct layout, but poor font style reproduction.
- Nano Banana 2. Zero errors. Matched stroke weight and letterform style closely enough to be indistinguishable from the source.
However, Google’s own documentation notes that Nano Banana 2 “can still struggle with accurate spelling and fine details in images.” Our results were clean across the formats we tested, but any production workflow should include a text verification step before publishing.
Step-by-Step Tutorial: Build a Bestseller-to-Image Pipeline with Milvus, Qwen 3.5, and Nano Banana 2
Before we begin: Architecture and Model Setup
To avoid the randomness of single-prompt generation, we split the process into three controllable stages: retrieve what already works with Milvus hybrid search, analyze why it works with Qwen 3.5, then generate the final image with those constraints baked in with Nano Banana 2.
Quick primer on each tool if you haven’t worked with them before:
- Milvus: the most widely adopted open-source vector database. Stores your product catalog as vectors and runs hybrid search (dense + sparse + scalar filters) to find bestseller images most similar to a new product.
- Qwen 3.5: a popular multimodal LLM. Takes retrieved bestseller images and extracts the visual patterns behind them (scene layout, lighting, pose, mood) into a structured style prompt.
- Nano Banana 2: image generation model from Google (Gemini 3.1 Flash Image). Takes three inputs: the new product flat-lay, a bestseller reference, and Qwen 3.5’s style prompt. Outputs the final promotional photo.
The logic behind this architecture starts with one observation: the most valuable visual asset in any e-commerce catalog is the library of bestseller images that have already been converted. The poses, compositions, and lighting in those photos were refined through real ad spend. Retrieving those patterns directly is an order of magnitude faster than reverse-engineering them through prompt writing, and that retrieval step is exactly what a vector database handles.
Here is the full flow. We call every model through the OpenRouter API, so there is no local GPU requirement and no model weights to download.
New product flat-lay
│
│── Embed → Llama Nemotron Embed VL 1B v2
│
│── Search → Milvus hybrid search
│   ├── Dense vectors (visual similarity)
│   ├── Sparse vectors (keyword matching)
│   └── Scalar filters (category + sales volume)
│
│── Analyze → Qwen 3.5 extracts style from retrieved bestsellers
│   └── scene, lighting, pose, mood → style prompt
│
└── Generate → Nano Banana 2
    ├── Inputs: new product + bestseller reference + style prompt
    └── Output: promotional photo
We lean on three Milvus capabilities to make the retrieval stage work:
- Dense + sparse hybrid search. We run image embeddings and text TF-IDF vectors as parallel queries, then merge the two result sets with RRF (Reciprocal Rank Fusion) reranking.
- Scalar field filtering. We filter by metadata fields like category and sales_count before vector comparison, so results only include relevant, high-performing products.
- Multi-field schema. We store dense vectors, sparse vectors, and scalar metadata in a single Milvus collection, which keeps the entire retrieval logic in one query instead of scattered across multiple systems.
Data Preparation
Historical product catalog
We start with two assets: an images/ folder of existing product photos and a products.csv file containing their metadata.
images/
├── SKU001.jpg
├── SKU002.jpg
├── ...
└── SKU040.jpg
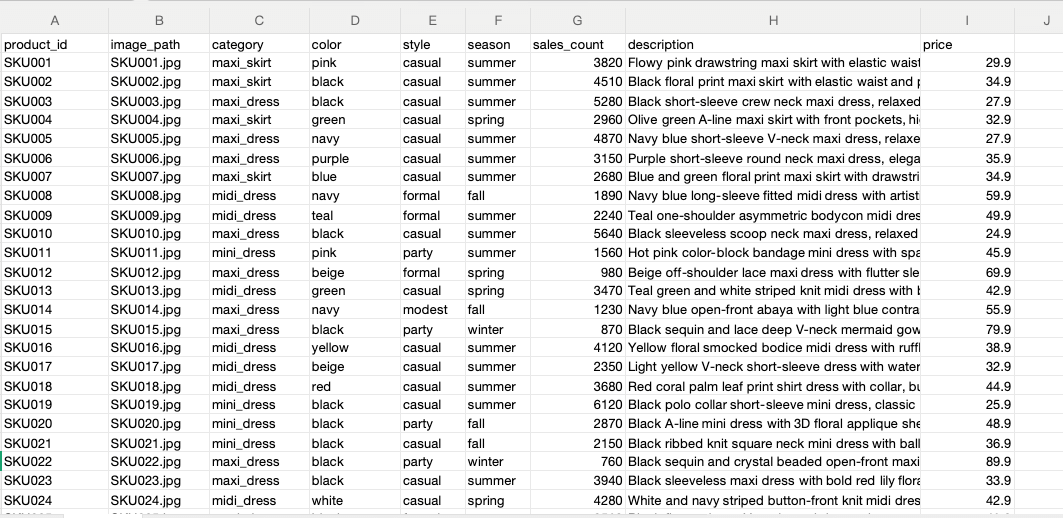
products.csv fields:
product_id, image_path, category, color, style, season, sales_count, description, price

New product data
For the products we want to generate promotional images for, we prepare a parallel structure: a new_products/ folder and new_products.csv.
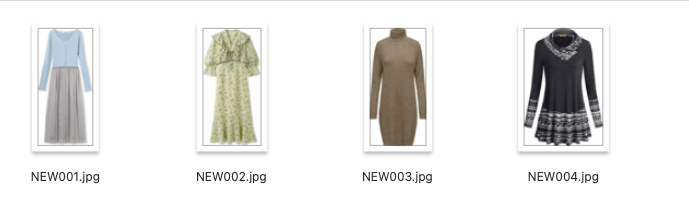
new_products/
├── NEW001.jpg # Blue knit cardigan + grey tulle skirt set
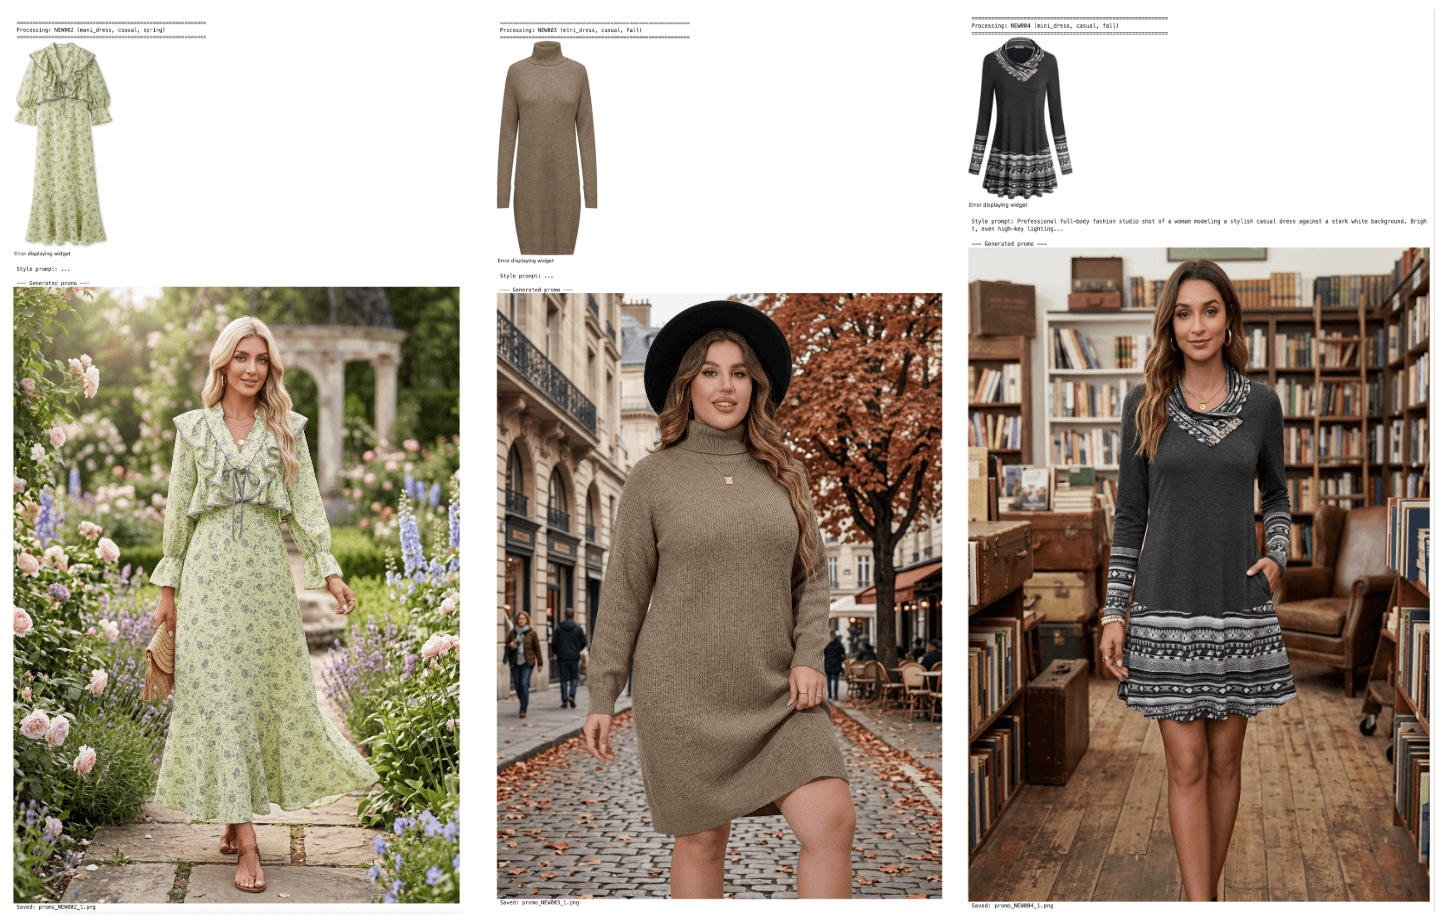
├── NEW002.jpg # Light green floral ruffle maxi dress
├── NEW003.jpg # Camel turtleneck knit dress
└── NEW004.jpg # Dark grey ethnic-style cowl neck top dress
new_products.csv fields:
new_id, image_path, category, style, season, prompt_hint

Step 1: Install Dependencies
!pip install pymilvus openai requests pillow scikit-learn tqdm
Step 2: Import Modules and Configurations
import os, io, base64, csv, time
import requests as req
import numpy as np
from PIL import Image
from tqdm.notebook import tqdm
from sklearn.feature_extraction.text import TfidfVectorizer
from IPython.display import display

from openai import OpenAI
from pymilvus import MilvusClient, DataType, AnnSearchRequest, RRFRanker
Configure all models and paths:
# -- Config --
OPENROUTER_API_KEY = os.environ.get(
    "OPENROUTER_API_KEY",
    "<YOUR_OPENROUTER_API_KEY>",
)

# Models (all via OpenRouter, no local download needed)
EMBED_MODEL = "nvidia/llama-nemotron-embed-vl-1b-v2"  # free, image+text → 2048d
EMBED_DIM = 2048
LLM_MODEL = "qwen/qwen3.5-397b-a17b"                 # style analysis
IMAGE_GEN_MODEL = "google/gemini-3.1-flash-image-preview"  # Nano Banana 2

# Milvus
MILVUS_URI = "./milvus_fashion.db"
COLLECTION = "fashion_products"
TOP_K = 3

# Paths
IMAGE_DIR = "./images"
NEW_PRODUCT_DIR = "./new_products"
PRODUCT_CSV = "./products.csv"
NEW_PRODUCT_CSV = "./new_products.csv"

# OpenRouter client (shared for LLM + image gen)
llm = OpenAI(api_key=OPENROUTER_API_KEY, base_url="https://openrouter.ai/api/v1")

print("Config loaded. All models via OpenRouter API.")
Utility functions
These helper functions handle image encoding, API calls, and response parsing:
- image_to_uri(): Converts a PIL image to a base64 data URI for API transport.
- get_image_embeddings(): Batch-encodes images into 2048-dimensional vectors via the OpenRouter Embedding API.
- get_text_embedding(): Encodes text into the same 2048-dimensional vector space.
- sparse_to_dict(): Converts a scipy sparse matrix row into the {index: value} format Milvus expects for sparse vectors.
- extract_images(): Extracts generated images from the Nano Banana 2 API response.
# -- Utility functions --

def image_to_uri(img, max_size=1024):
    """Convert PIL Image to base64 data URI."""
    img = img.copy()
    w, h = img.size
    if max(w, h) > max_size:
        r = max_size / max(w, h)
        img = img.resize((int(w * r), int(h * r)), Image.LANCZOS)
    buf = io.BytesIO()
    img.save(buf, format="JPEG", quality=85)
    return f"data:image/jpeg;base64,{base64.b64encode(buf.getvalue()).decode()}"

def get_image_embeddings(images, batch_size=5):
    """Encode images via OpenRouter embedding API."""
    all_embs = []
    for i in tqdm(range(0, len(images), batch_size), desc="Encoding images"):
        batch = images[i : i + batch_size]
        inputs = [
            {"content": [{"type": "image_url", "image_url": {"url": image_to_uri(img, max_size=512)}}]}
            for img in batch
        ]
        resp = req.post(
            "https://openrouter.ai/api/v1/embeddings",
            headers={"Authorization": f"Bearer {OPENROUTER_API_KEY}"},
            json={"model": EMBED_MODEL, "input": inputs},
            timeout=120,
        )
        data = resp.json()
        if "data" not in data:
            print(f"API error: {data}")
            continue
        for item in sorted(data["data"], key=lambda x: x["index"]):
            all_embs.append(item["embedding"])
        time.sleep(0.5)  # rate limit friendly
    return np.array(all_embs, dtype=np.float32)

def get_text_embedding(text):
    """Encode text via OpenRouter embedding API."""
    resp = req.post(
        "https://openrouter.ai/api/v1/embeddings",
        headers={"Authorization": f"Bearer {OPENROUTER_API_KEY}"},
        json={"model": EMBED_MODEL, "input": text},
        timeout=60,
    )
    return np.array(resp.json()["data"][0]["embedding"], dtype=np.float32)

def sparse_to_dict(sparse_row):
    """Convert scipy sparse row to Milvus sparse vector format {index: value}."""
    coo = sparse_row.tocoo()
    return {int(i): float(v) for i, v in zip(coo.col, coo.data)}

def extract_images(response):
    """Extract generated images from OpenRouter response."""
    images = []
    raw = response.model_dump()
    msg = raw["choices"][0]["message"]
    # Method 1: images field (OpenRouter extension)
    if "images" in msg and msg["images"]:
        for img_data in msg["images"]:
            url = img_data["image_url"]["url"]
            b64 = url.split(",", 1)[1]
            images.append(Image.open(io.BytesIO(base64.b64decode(b64))))
    # Method 2: inline base64 in content parts
    if not images and isinstance(msg.get("content"), list):
        for part in msg["content"]:
            if isinstance(part, dict) and part.get("type") == "image_url":
                url = part["image_url"]["url"]
                if url.startswith("data:image"):
                    b64 = url.split(",", 1)[1]
                    images.append(Image.open(io.BytesIO(base64.b64decode(b64))))
    return images

print("Utility functions ready.")
Step 3: Load the Product Catalog
Read products.csv and load the corresponding product images:
with open(PRODUCT_CSV, newline="", encoding="utf-8") as f:
products = list(csv.DictReader(f))
product_images = []
for p in products:
img = Image.open(os.path.join(IMAGE_DIR, p["image_path"])).convert("RGB")
product_images.append(img)
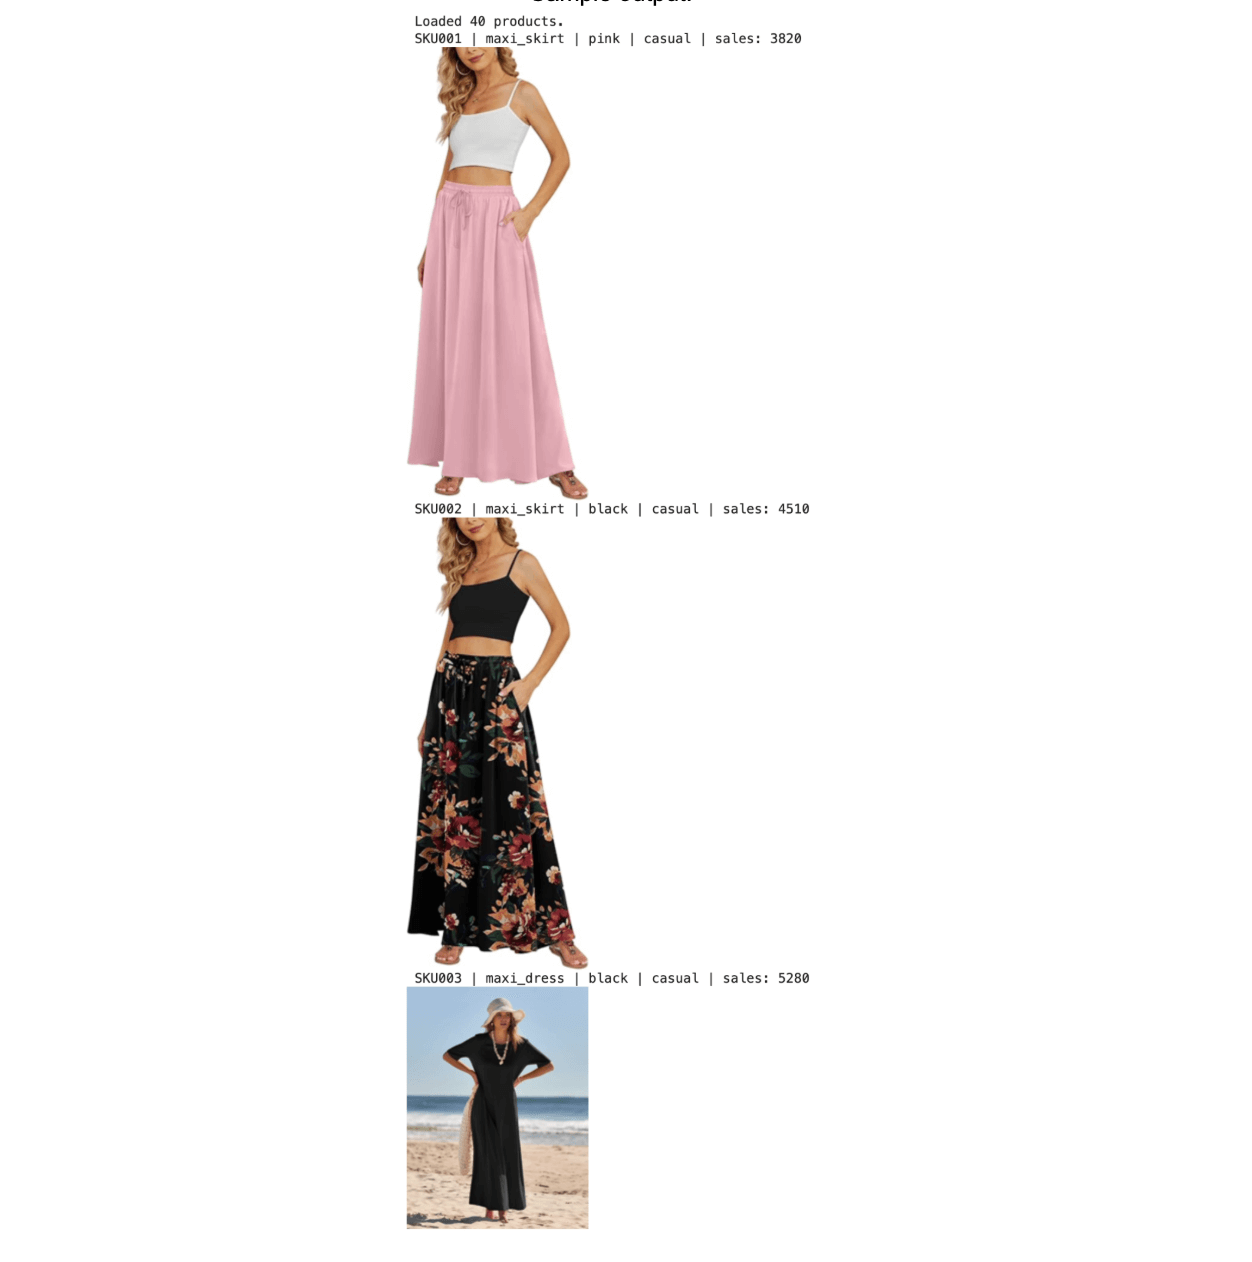
print(f"Loaded {len(products)} products.")
for i in range(3):
p = products[i]
print(f"{p['product_id']} | {p['category']} | {p['color']} | {p['style']} | sales: {p['sales_count']}")
display(product_images[i].resize((180, int(180 * product_images[i].height / product_images[i].width))))
Sample output:
Step 4: Generate Embeddings
Hybrid search requires two types of vectors for each product.
4.1 Dense vectors: image embeddings
The nvidia/llama-nemotron-embed-vl-1b-v2 model encodes each product image into a 2048-dimensional dense vector. Because this model supports both image and text inputs in a shared vector space, the same embeddings work for image-to-image and text-to-image retrieval.
# Dense embeddings: image → 2048-dim vector via OpenRouter API
dense_vectors = get_image_embeddings(product_images, batch_size=5)
print(f"Dense vectors: {dense_vectors.shape}  (products x {EMBED_DIM}d)")
Output:
Dense vectors: (40, 2048) (products x 2048d)
4.2 Sparse vectors: TF-IDF text embeddings
Product text descriptions are encoded into sparse vectors using scikit-learn’s TF-IDF vectorizer. These capture keyword-level matching that dense vectors can miss.
# Sparse embeddings: TF-IDF on product descriptions
descriptions = [p["description"] for p in products]
tfidf = TfidfVectorizer(stop_words="english", max_features=500)
tfidf_matrix = tfidf.fit_transform(descriptions)

sparse_vectors = [sparse_to_dict(tfidf_matrix[i]) for i in range(len(products))]
print(f"Sparse vectors: {len(sparse_vectors)} products, vocab size: {len(tfidf.vocabulary_)}")
print(f"Sample sparse vector (SKU001): {len(sparse_vectors[0])} non-zero terms")
Output:
Sparse vectors: 40 products, vocab size: 179
Sample sparse vector (SKU001): 11 non-zero terms
Why both vector types? Dense and sparse vectors complement each other. Dense vectors capture visual similarity: color palette, garment silhouette, overall style. Sparse vectors capture keyword semantics: terms like “floral,” “midi,” or “chiffon” that signal product attributes. Combining both produces significantly better retrieval quality than either approach alone.
Step 5: Create a Milvus Collection with Hybrid Schema
This step creates a single Milvus collection that stores dense vectors, sparse vectors, and scalar metadata fields together. This unified schema is what enables hybrid search in a single query.
| Field | Type | Purpose |
|---|---|---|
| dense_vector | FLOAT_VECTOR (2048d) | Image embedding, COSINE similarity |
| sparse_vector | SPARSE_FLOAT_VECTOR | TF-IDF sparse vector, inner product |
| category | VARCHAR | Category label for filtering |
| sales_count | INT64 | Historical sales volume for filtering |
| color, style, season | VARCHAR | Additional metadata labels |
| price | FLOAT | Product price |
milvus_client = MilvusClient(uri=MILVUS_URI)

if milvus_client.has_collection(COLLECTION):
    milvus_client.drop_collection(COLLECTION)

schema = milvus_client.create_schema(auto_id=True, enable_dynamic_field=True)
schema.add_field("id", DataType.INT64, is_primary=True)
schema.add_field("product_id", DataType.VARCHAR, max_length=20)
schema.add_field("category", DataType.VARCHAR, max_length=50)
schema.add_field("color", DataType.VARCHAR, max_length=50)
schema.add_field("style", DataType.VARCHAR, max_length=50)
schema.add_field("season", DataType.VARCHAR, max_length=50)
schema.add_field("sales_count", DataType.INT64)
schema.add_field("description", DataType.VARCHAR, max_length=500)
schema.add_field("price", DataType.FLOAT)
schema.add_field("dense_vector", DataType.FLOAT_VECTOR, dim=EMBED_DIM)
schema.add_field("sparse_vector", DataType.SPARSE_FLOAT_VECTOR)

index_params = milvus_client.prepare_index_params()
index_params.add_index(field_name="dense_vector", index_type="FLAT", metric_type="COSINE")
index_params.add_index(field_name="sparse_vector", index_type="SPARSE_INVERTED_INDEX", metric_type="IP")

milvus_client.create_collection(COLLECTION, schema=schema, index_params=index_params)
print(f"Milvus collection '{COLLECTION}' created with hybrid schema.")
Insert the product data:
# Insert all products
rows = []
for i, p in enumerate(products):
    rows.append({
        "product_id": p["product_id"],
        "category": p["category"],
        "color": p["color"],
        "style": p["style"],
        "season": p["season"],
        "sales_count": int(p["sales_count"]),
        "description": p["description"],
        "price": float(p["price"]),
        "dense_vector": dense_vectors[i].tolist(),
        "sparse_vector": sparse_vectors[i],
    })

milvus_client.insert(COLLECTION, rows)
stats = milvus_client.get_collection_stats(COLLECTION)
print(f"Inserted {stats['row_count']} products into Milvus.")
Output:
Inserted 40 products into Milvus.
Step 6: Hybrid Search to Find Similar Bestsellers
This is the core retrieval step. For each new product, the pipeline runs three operations simultaneously:
- Dense search: finds products with visually similar image embeddings.
- Sparse search: finds products with matching text keywords via TF-IDF.
- Scalar filtering: restricts results to the same category and products with sales_count > 1500.
- RRF reranking: merges the dense and sparse result lists using Reciprocal Rank Fusion.
Load the new product:
# Load new products
with open(NEW_PRODUCT_CSV, newline="", encoding="utf-8") as f:
new_products = list(csv.DictReader(f))
# Pick the first new product for demo
new_prod = new_products[0]
new_img = Image.open(os.path.join(NEW_PRODUCT_DIR, new_prod["image_path"])).convert("RGB")
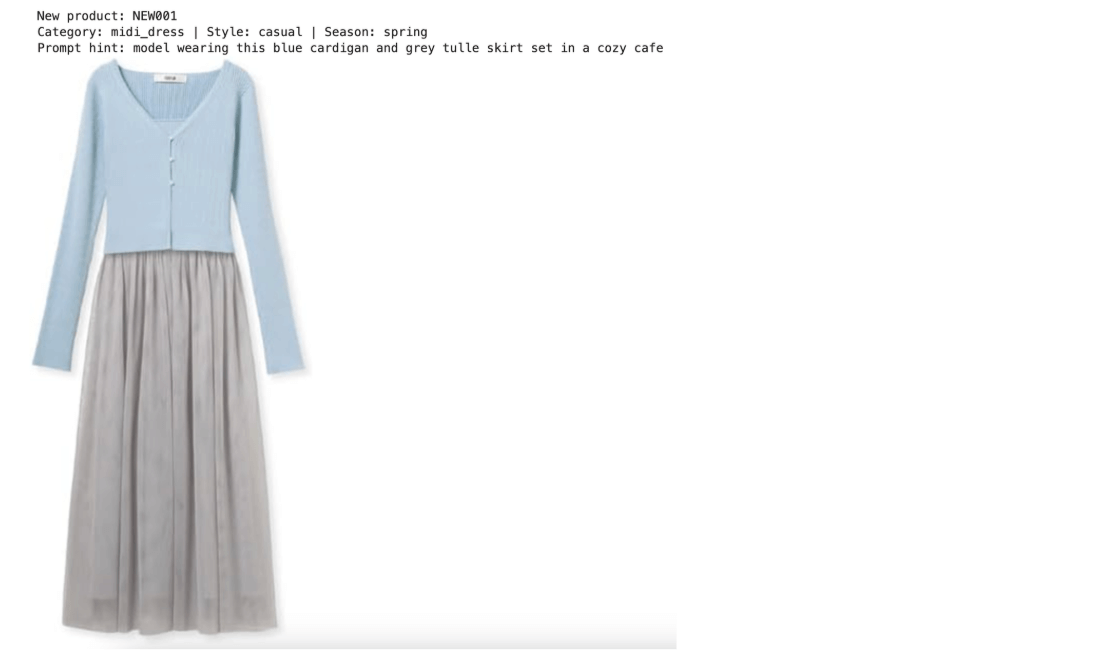
print(f"New product: {new_prod['new_id']}")
print(f"Category: {new_prod['category']} | Style: {new_prod['style']} | Season: {new_prod['season']}")
print(f"Prompt hint: {new_prod['prompt_hint']}")
display(new_img.resize((300, int(300 * new_img.height / new_img.width))))
Output:
Encode the new product:
# Encode new product
# Dense: image embedding via API
query_dense = get_image_embeddings([new_img], batch_size=1)[0]

# Sparse: TF-IDF from text query
query_text = f"{new_prod['category']} {new_prod['style']} {new_prod['season']} {new_prod['prompt_hint']}"
query_sparse = sparse_to_dict(tfidf.transform([query_text])[0])

# Scalar filter
filter_expr = f'category == "{new_prod["category"]}" and sales_count > 1500'

print(f"Dense query: {query_dense.shape}")
print(f"Sparse query: {len(query_sparse)} non-zero terms")
print(f"Filter: {filter_expr}")
Output:
Dense query: (2048,)
Sparse query: 6 non-zero terms
Filter: category == "midi_dress" and sales_count > 1500
Execute hybrid search
The key API calls here:
- AnnSearchRequest creates separate search requests for the dense and sparse vector fields.
- expr=filter_expr applies scalar filtering within each search request.
- RRFRanker(k=60) fuses the two ranked result lists using the Reciprocal Rank Fusion algorithm.
- hybrid_search executes both requests and returns merged, reranked results.
# Hybrid search: dense + sparse + scalar filter + RRF reranking
dense_req = AnnSearchRequest(
data=[query_dense.tolist()],
anns_field="dense_vector",
param={"metric_type": "COSINE"},
limit=20,
expr=filter_expr,
)
sparse_req = AnnSearchRequest(
data=[query_sparse],
anns_field="sparse_vector",
param={"metric_type": "IP"},
limit=20,
expr=filter_expr,
)
results = milvus_client.hybrid_search(
collection_name=COLLECTION,
reqs=[dense_req, sparse_req],
ranker=RRFRanker(k=60),
limit=TOP_K,
output_fields=["product_id", "category", "color", "style", "season",
"sales_count", "description", "price"],
)
# Display retrieved bestsellers
retrieved_products = []
retrieved_images = []
print(f"Top-{TOP_K} similar bestsellers:\n")
for hit in results[0]:
entity = hit["entity"]
pid = entity["product_id"]
img = Image.open(os.path.join(IMAGE_DIR, f"{pid}.jpg")).convert("RGB")
retrieved_products.append(entity)
retrieved_images.append(img)
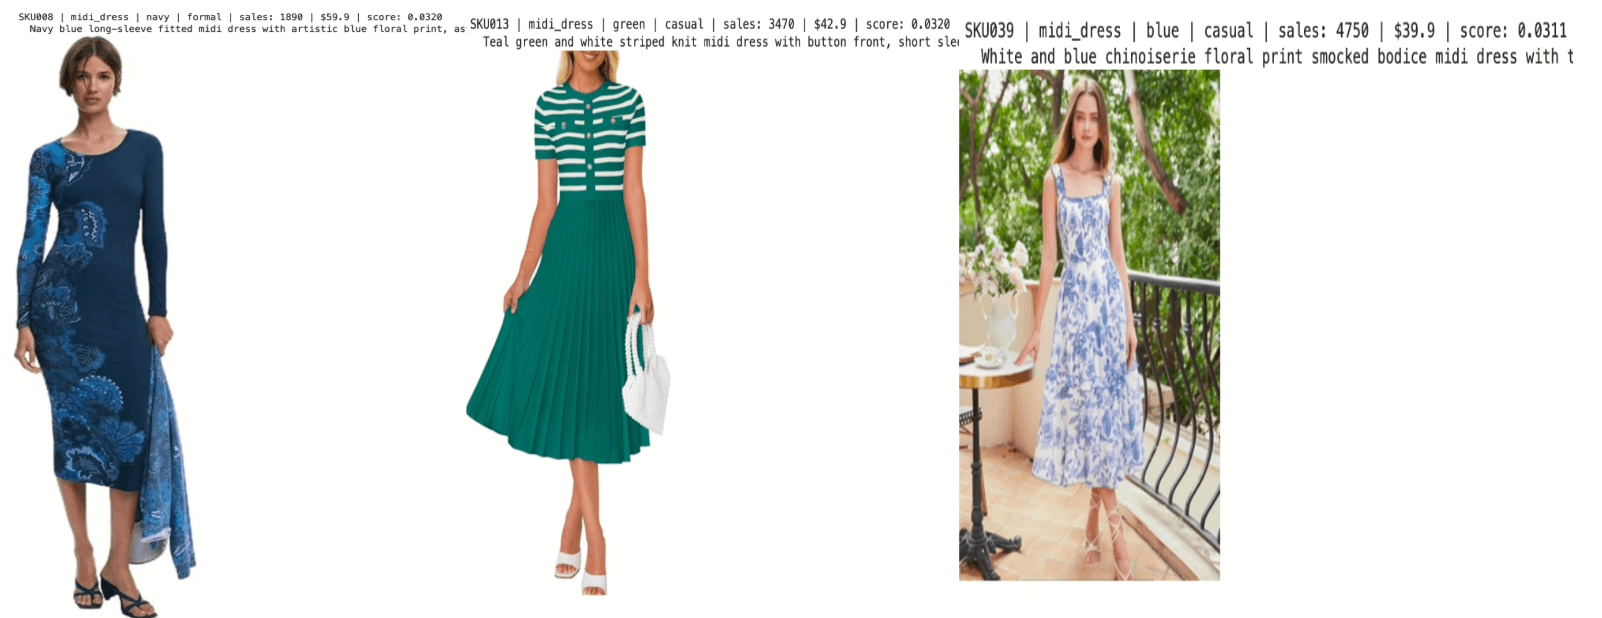
print(f"{pid} | {entity['category']} | {entity['color']} | {entity['style']} "
f"| sales: {entity['sales_count']} | ${entity['price']:.1f} | score: {hit['distance']:.4f}")
print(f" {entity['description']}")
display(img.resize((250, int(250 * img.height / img.width))))
print()
Output: the top 3 most similar bestsellers, ranked by fused score.
Step 7: Analyze Bestseller Style with Qwen 3.5
We feed the retrieved bestseller images into Qwen 3.5 and ask it to extract their shared visual DNA: scene composition, lighting setup, model pose, and overall mood. From that analysis, we get back a single generation prompt ready to hand off to Nano Banana 2.
content = [
    {"type": "image_url", "image_url": {"url": image_to_uri(img)}}
    for img in retrieved_images
]
content.append({
    "type": "text",
    "text": (
        "These are our top-selling fashion product photos.\n\n"
        "Analyze their common visual style in these dimensions:\n"
        "1. Scene / background setting\n"
        "2. Lighting and color tone\n"
        "3. Model pose and framing\n"
        "4. Overall mood and aesthetic\n\n"
        "Then, based on this analysis, write ONE concise image generation prompt "
        "(under 100 words) that captures this style. The prompt should describe "
        "a scene for a model wearing a new clothing item. "
        "Output ONLY the prompt, nothing else."
    ),
})

response = llm.chat.completions.create(
    model=LLM_MODEL,
    messages=[{"role": "user", "content": content}],
    max_tokens=512,
    temperature=0.7,
)
style_prompt = response.choices[0].message.content.strip()
print("Style prompt from Qwen3.5:\n")
print(style_prompt)
Sample output:
Style prompt from Qwen3.5:

Professional full-body fashion photograph of a model wearing a stylish new dress.
Bright, soft high-key lighting that illuminates the subject evenly. Clean,
uncluttered background, either stark white or a softly blurred bright outdoor
setting. The model stands in a relaxed, natural pose to showcase the garment's
silhouette and drape. Sharp focus, vibrant colors, fresh and elegant commercial aesthetic.
Step 8: Generate the Promotional Image with Nano Banana 2
We pass three inputs into Nano Banana 2: the new product’s flat-lay photo, the top-ranked bestseller image, and the style prompt we extracted in the previous step. The model composites these into a promotional photo that pairs the new garment with a proven visual style.
gen_prompt = (
    f"I have a new clothing product (Image 1: flat-lay photo) and a reference "
    f"promotional photo from our bestselling catalog (Image 2).\n\n"
    f"Generate a professional e-commerce promotional photograph of a female model "
    f"wearing the clothing from Image 1.\n\n"
    f"Style guidance: {style_prompt}\n\n"
    f"Scene hint: {new_prod['prompt_hint']}\n\n"
    f"Requirements:\n"
    f"- Full body shot, photorealistic, high quality\n"
    f"- The clothing should match Image 1 exactly\n"
    f"- The photo style and mood should match Image 2"
)

gen_content = [
    {"type": "image_url", "image_url": {"url": image_to_uri(new_img)}},
    {"type": "image_url", "image_url": {"url": image_to_uri(retrieved_images[0])}},
    {"type": "text", "text": gen_prompt},
]

print("Generating promotional photo with Nano Banana 2...")
gen_response = llm.chat.completions.create(
    model=IMAGE_GEN_MODEL,
    messages=[{"role": "user", "content": gen_content}],
    extra_body={
        "modalities": ["text", "image"],
        "image_config": {"aspect_ratio": "3:4", "image_size": "2K"},
    },
)
print("Done!")
Key parameters for the Nano Banana 2 API call:
- modalities: ["text", “image”]: declares that the response should include an image.
- image_config.aspect_ratio: controls the output aspect ratio (3:4 works well for portrait/fashion shots).
- image_config.image_size: sets the resolution. Nano Banana 2 supports 512px through 4K.
Extract the generated image:
generated_images = extract_images(gen_response)
text_content = gen_response.choices[0].message.content
if text_content:
print(f"Model response: {text_content[:300]}\n")
if generated_images:
for i, img in enumerate(generated_images):
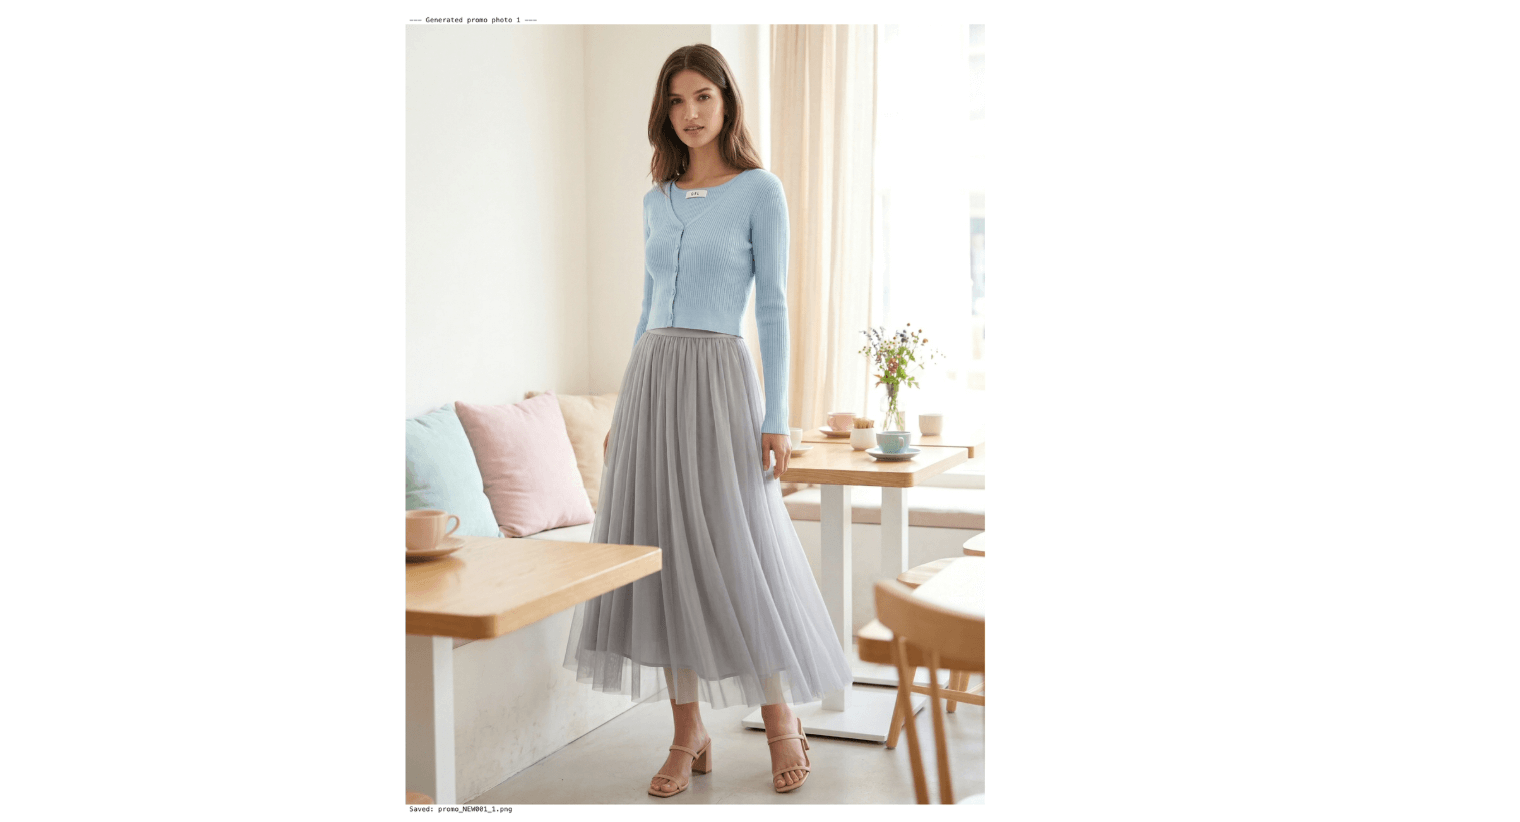
print(f"--- Generated promo photo {i+1} ---")
display(img)
img.save(f"promo_{new_prod['new_id']}_{i+1}.png")
print(f"Saved: promo_{new_prod['new_id']}_{i+1}.png")
else:
print("No image generated. Raw response:")
print(gen_response.model_dump())
Output:
Step 9: Side-by-Side Comparison
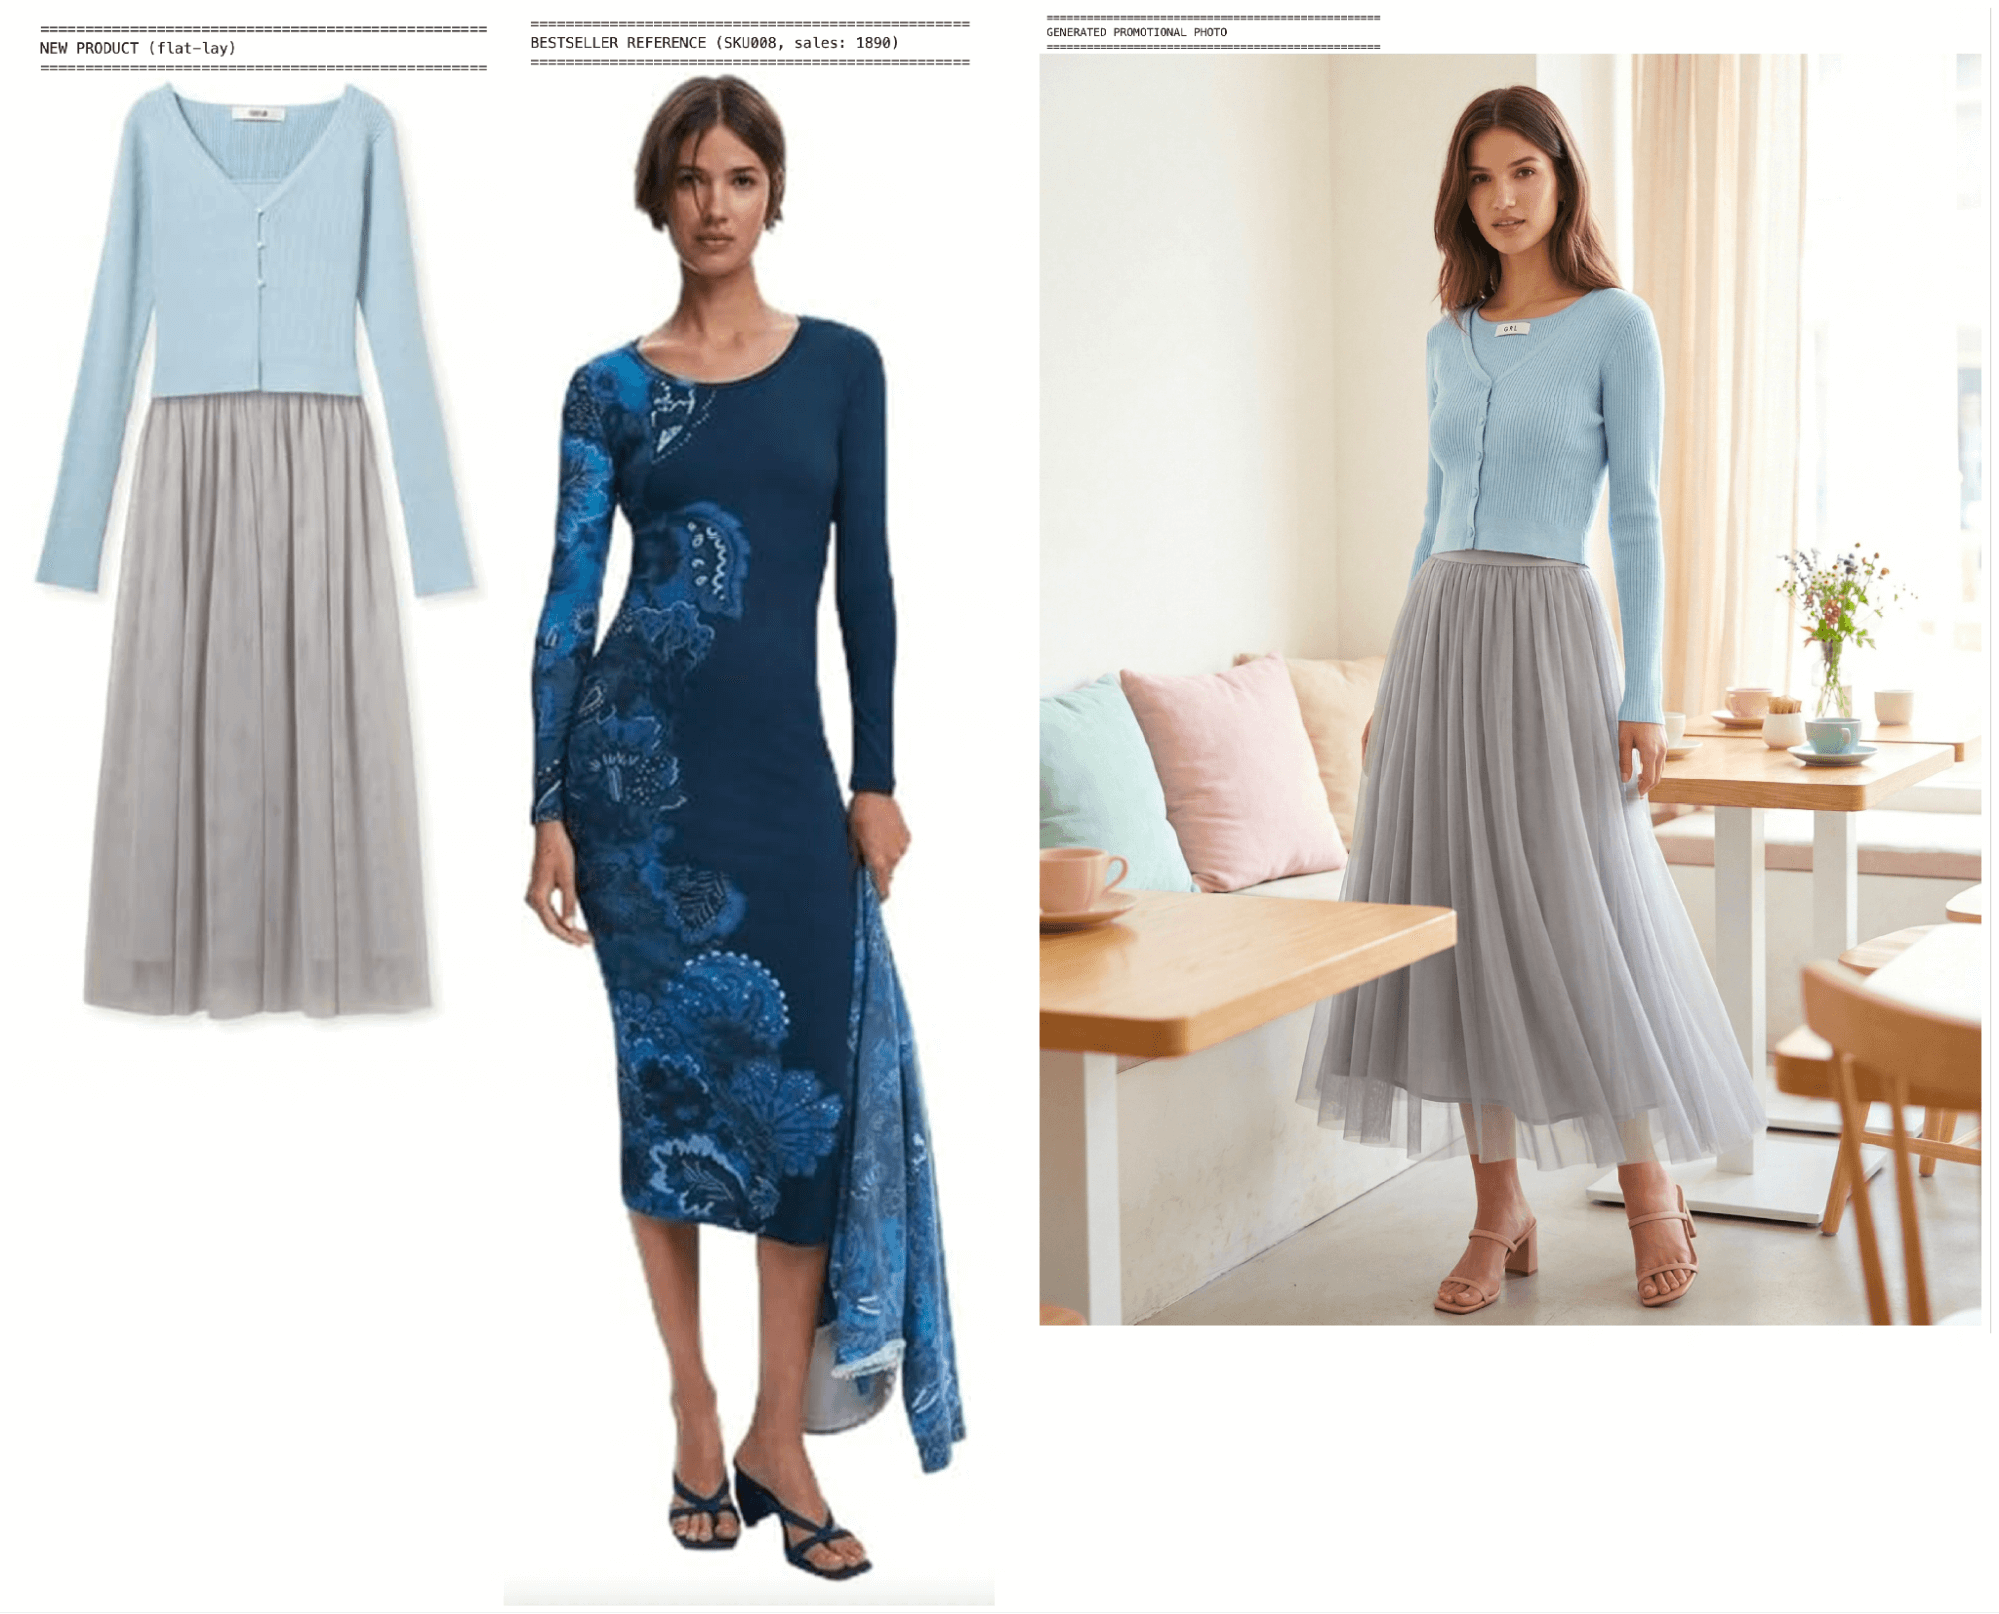
The output nails the broad strokes: lighting is soft and even, the model’s pose looks natural, and the mood matches the bestseller reference.
Where we see it fall short is garment blending. The cardigan looks pasted onto the model rather than worn, and a white neckline label bleeds through. Single-pass generation struggles with this kind of fine-grained clothing-to-body integration, so we address workarounds in the summary.
Step 10: Batch Generation for All New Products
We wrap the full pipeline into a single function and run it across the remaining new products. The batch code is omitted here for brevity; reach out if you need the complete implementation.
Two things stand out across the batch results. The style prompts we get from Qwen 3.5 adjust meaningfully per product: a summer dress and a winter knit receive genuinely different scene descriptions tailored to season, use case, and accessories. The images we get from Nano Banana 2, in turn, hold up against real studio photography in lighting, texture, and composition.
Conclusion
In this article, we covered what Nano Banana 2 brings to e-commerce image generation, compared it against the original Nano Banana and Pro across real production tasks, and walked through how to build a bestseller-to-image pipeline with Milvus, Qwen 3.5, and Nano Banana 2.
This pipeline has four practical advantages:
- Controlled cost, predictable budgets. The embedding model (Llama Nemotron Embed VL 1B v2) is free on OpenRouter. Nano Banana 2 runs at roughly half the per-image cost of Pro, and native multi-format output eliminates the rework cycles that used to double or triple the effective bill. For e-commerce teams managing thousands of SKUs per season, that predictability means image production scales with the catalog instead of blowing past budget.
- End-to-end automation, faster time to listing. The flow from flat-lay product photo to finished promotional image runs without manual intervention. A new product can go from warehouse photo to marketplace-ready listing image in minutes rather than days, which matters most during peak seasons when catalog turnover is highest.
- No local GPU required, lower barrier to entry. Every model runs through the OpenRouter API. A team with no ML infrastructure and no dedicated engineering headcount can run this pipeline from a laptop. There is nothing to provision, nothing to maintain, and no upfront hardware investment.
- Higher retrieval precision, stronger brand consistency. Milvus combines dense, sparse, and scalar filtering in a single query, consistently outperforming single-vector approaches for product matching. In practice, this means generated images more reliably inherit your brand’s established visual language: the lighting, composition, and styling that your existing bestsellers already proved converts. The output looks like it belongs in your store, not like generic AI stock art.
There are also limitations worth being upfront about:
- Garment-to-body blending. Single-pass generation can make clothing look composited rather than worn. Fine details like small accessories sometimes blur. Workaround: generate in stages (background first, then model pose, then composite). This multi-pass approach gives each step a narrower scope and significantly improves blending quality.
- Detail fidelity on edge cases. Accessories, patterns, and text-heavy layouts can lose sharpness. Workaround: add explicit constraints to the generation prompt (“clothing fits naturally on the body, no exposed labels, no extra elements, product details are sharp”). If quality still falls short on a specific product, switch to Nano Banana Pro for the final
Milvus is the open-source vector database powering the hybrid search step, and if you want to poke around or try swapping in your own product photos, the quickstart takes about ten minutes. We’ve got a pretty active community on Discord and Slack, and we’d love to see what people build with this. And if you end up running Nano Banana 2 against a different product vertical or a bigger catalog, please share the results! We’d love to hear about them.
Keep Reading
- Nano Banana + Milvus: Turning Hype into Enterprise-Ready Multimodal RAG
- What Is OpenClaw? Complete Guide to the Open-Source AI Agent
- OpenClaw Tutorial: Connect to Slack for Local AI Assistant
- We Extracted OpenClaw’s Memory System and Open-Sourced It (memsearch)
- Persistent Memory for Claude Code: memsearch ccplugin
- What’s New with Nano Banana 2?
- What Does This Nano Banana Update Mean For E-Commerce?
- Cut Output Generation Costs by Up to 60%
- Support Up to 14 Reference Images with Bestseller Style
- Produce Premium, Commercial-Ready Visuals Without Traditional Production Cost or Logistics
- Render In-Image Text Cleanly Across Languages
- Step-by-Step Tutorial: Build a Bestseller-to-Image Pipeline with Milvus, Qwen 3.5, and Nano Banana 2
- Before we begin: Architecture and Model Setup
- Data Preparation
- Step 1: Install Dependencies
- Step 2: Import Modules and Configurations
- Step 3: Load the Product Catalog
- Step 4: Generate Embeddings
- Step 5: Create a Milvus Collection with Hybrid Schema
- Step 6: Hybrid Search to Find Similar Bestsellers
- Step 7: Analyze Bestseller Style with Qwen 3.5
- Step 8: Generate the Promotional Image with Nano Banana 2
- Step 9: Side-by-Side Comparison
- Step 10: Batch Generation for All New Products
- Conclusion
- Keep Reading
On This Page
Try Managed Milvus for Free
Zilliz Cloud is hassle-free, powered by Milvus and 10x faster.
Get StartedLike the article? Spread the word