Deploying Milvus on Kubernetes Just Got Easier with the Milvus Operator
Setting up a production-ready Milvus cluster shouldn’t feel like defusing a bomb. Yet anyone who has manually configured Kubernetes deployments for vector databases knows the drill: dozens of YAML files, intricate dependency management, and that sinking feeling when something breaks at 2 AM and you’re not sure which of the 47 configuration files is the culprit.
The traditional approach to deploying Milvus involves orchestrating multiple services—etcd for metadata storage, Pulsar for message queuing, MinIO for object storage, and the various Milvus components themselves. Each service requires careful configuration, proper startup sequencing, and ongoing maintenance. Scale this across multiple environments or clusters, and the operational complexity becomes overwhelming.
This is where Milvus Operator fundamentally changes the game. Instead of managing infrastructure manually, you describe what you want, and the Operator handles the how.
What is the Milvus Operator?
Milvus Operator is a Kubernetes-native management tool that automates the complete lifecycle of Milvus vector database deployments. Built on the Kubernetes Operator pattern, it encapsulates years of operational knowledge about running Milvus in production and codifies that expertise into software that runs alongside your cluster.
Think of it as having an expert Milvus administrator who never sleeps, never makes typos, and has perfect memory of every configuration detail. The Operator continuously monitors your cluster’s health, automatically handles scaling decisions, manages upgrades without downtime, and recovers from failures faster than any human operator could.
At its core, the Operator provides four essential capabilities.
Automated Deployment: Set up a fully functional Milvus cluster with a single manifest.
Lifecycle Management: Automate upgrades, horizontal scaling, and resource teardown in a defined, safe order.
Built-in Monitoring and Health Checks: Continuously monitor the state of Milvus components and their related dependencies, including etcd, Pulsar, and MinIO.
Operational Best Practices by Default: Apply Kubernetes-native patterns that ensure reliability without requiring deep platform knowledge.
Understanding the Kubernetes Operator Pattern
Before we explore the advantages of the Milvus Operator, let’s first understand the foundation it’s built on: the Kubernetes Operator pattern.
The Kubernetes Operator pattern helps manage complex applications that need more than basic Kubernetes features. An Operator has three main parts:
Custom Resource Definitions let you describe your application using Kubernetes-style configuration files.
A Controller watches these configurations and makes the necessary changes to your cluster.
State Management ensures your cluster matches what you’ve requested and fixes any differences.
This means you can describe your Milvus deployment in a familiar way, and the Operator handles all the detailed work of creating pods, setting up networking, and managing the lifecycle…
How the Milvus Operator Works
Milvus Operator follows a straightforward process that makes database management much simpler. Let’s break down the core operational model of the Milvus Operator:
Custom Resource (CR): Users define a Milvus deployment using a CR (e.g., kind:
Milvus). This file includes configurations such as cluster mode, image version, resource requirements, and dependencies.Controller Logic: The Operator’s controller watches for new or updated CRs. Once it detects a change, it orchestrates the creation of required components—Milvus services and dependencies like etcd, Pulsar, and MinIO.
Automated Lifecycle Management: When changes occur—like updating the version or modifying storage—the Operator performs rolling updates or reconfigures components without disrupting the cluster.
Self-Healing: The controller continuously checks the health of each component. If something crashes, it automatically replaces the pod or restores service state to ensure uptime.
This approach is much more powerful than traditional YAML or Helm deployments because it provides ongoing management instead of just initial setup.
Why Use Milvus Operator Instead of Helm or YAML?
When deploying Milvus, you can choose between manual YAML files, Helm charts, or the Milvus Operator. Each has its place, but the Operator offers significant advantages for ongoing operations.
Operation Automation
Traditional methods require manual work for routine tasks. Scaling means updating several configuration files and coordinating the changes. Upgrades need careful planning to avoid service interruptions. The Operator handles these tasks automatically. It can detect when scaling is needed and perform the changes safely. Upgrades become simple configuration updates that the Operator executes with proper sequencing and rollback capabilities if needed.
Better State Visibility
YAML files tell Kubernetes what you want, but they don’t show you the current health of your system. Helm helps with configuration management but doesn’t monitor your application’s runtime state. The Operator continuously watches your entire cluster. It can detect issues like resource problems or slow responses and take action before they become serious problems. This proactive monitoring significantly improves reliability.
Easier Long-term Management
Managing multiple environments with YAML files means keeping many configuration files synchronized. Even with Helm templates, complex operations still require significant manual coordination.
The Operator encapsulates Milvus management knowledge in its code. This means teams can manage clusters effectively without becoming experts in every component. The operational interface stays consistent as your infrastructure scales.
Using the Operator means choosing a more automated approach to Milvus management. It reduces manual work while improving reliability through built-in expertise—valuable benefits as vector databases become more critical for applications.
The Architecture of Milvus Operation
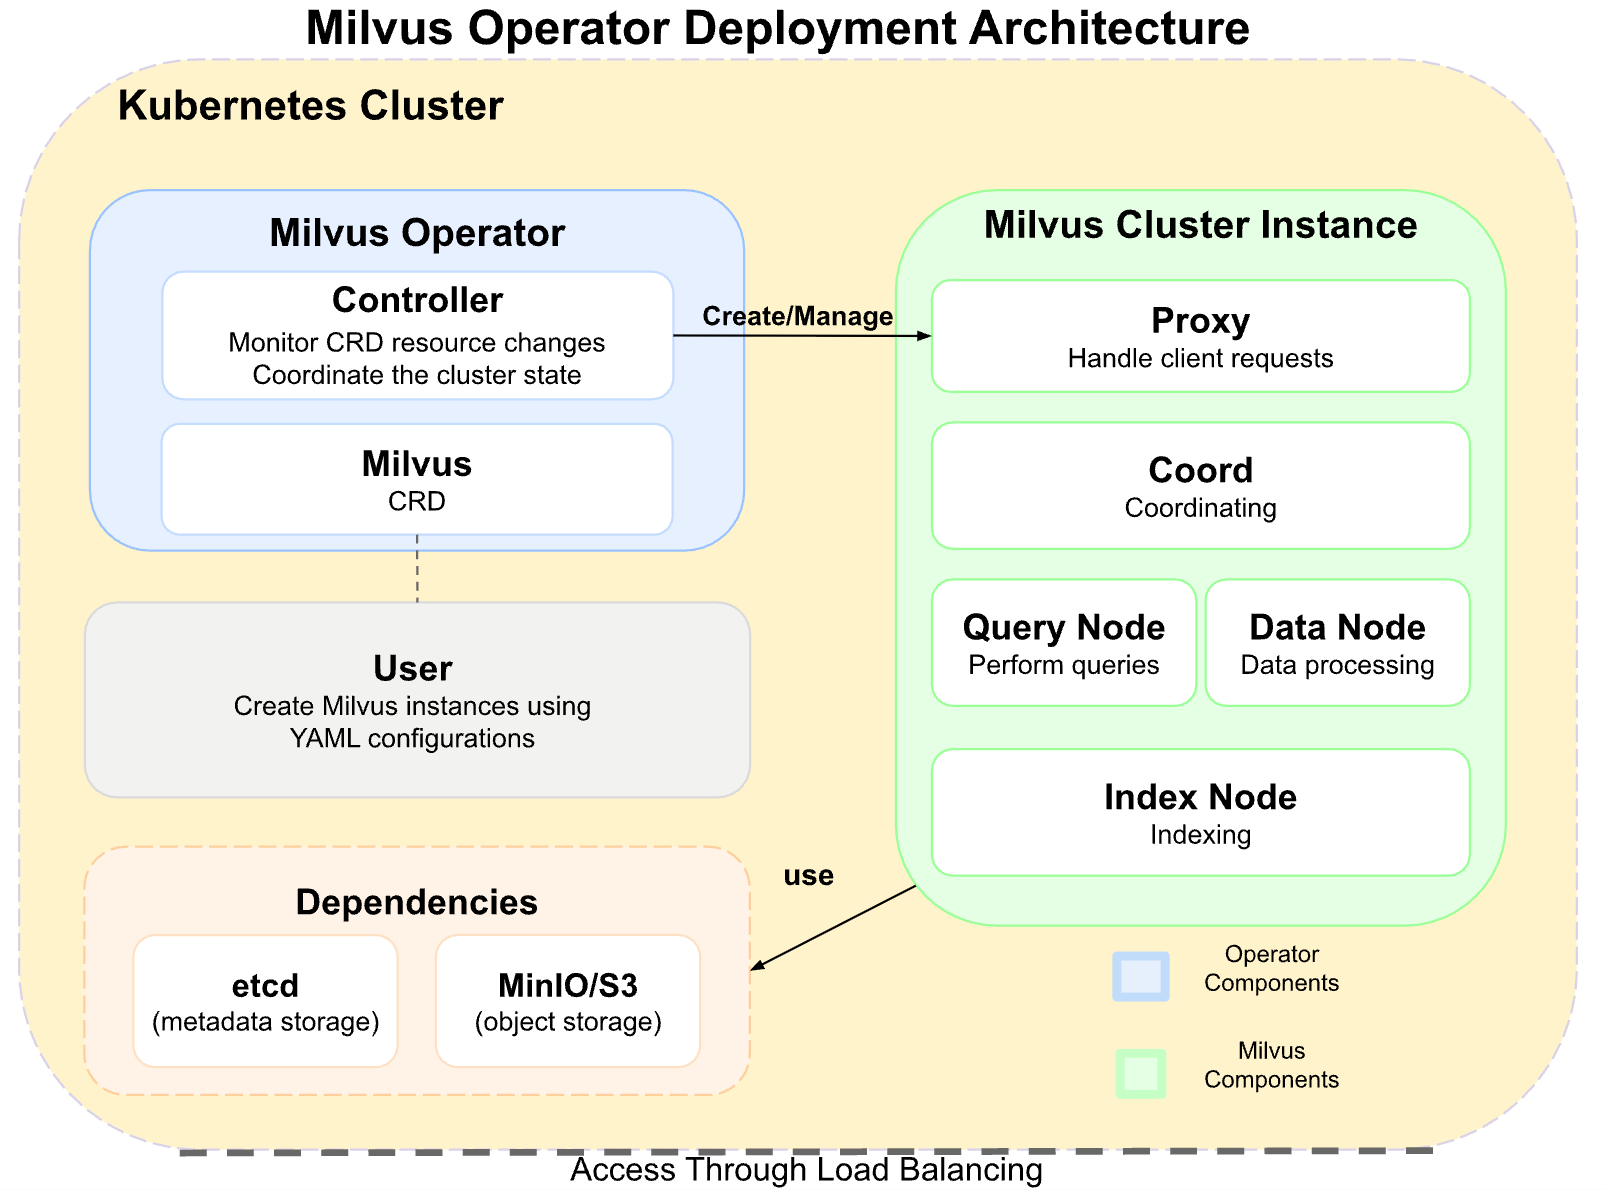
The diagram clearly depicts the deployment structure of Milvus Operator within a Kubernetes cluster:
Left (Blue Area): Core components of the Operator, including the Controller and the Milvus-CRD.
Right (Green Area): Various components of the Milvus cluster, such as the Proxy, Coordinator, and Node.
Center (Arrows – “create/manage”): The flow of operations showing how the Operator manages the Milvus cluster.
Bottom (Orange Area): Dependent services such as etcd and MinIO/S3/MQ.
This visual structure, with distinct colored blocks and directional arrows, effectively clarifies the interactions and data flow between different components.
Getting Started with Milvus Operator
This walkthrough shows you how to deploy Milvus using the Operator. We’ll use these versions in thi s guide.
Operating System: openEuler 22.03 LTS SP3 x86_64
Kubernetes: v1.28.8
Milvus: v2.5.4
(1) Prerequisites
Your Kubernetes cluster needs at least one StorageClass configured. You can check what’s available:
kubectl get sc
In our example, we have two options:
local(default) - uses local disksnfs-sc- uses NFS storage (fine for testing, but avoid in production)
RECLAIMPOLICY   VOLUMEBINDINGMODE      ALLOWVOLUMEEXPANSION   AGE
local (default)   openebs.io/local      Delete    WaitForFirstConsumer   false    284d
nfs-sc            k8s-sigs.io/nfs-...   Delete    Immediate              false    230d
(2) Installing Milvus Operator
You can install the Operator with Helm or kubectl. We’ll use kubectl since it’s simpler.
Download the Operator deployment manifest:
wget https://raw.githubusercontent.com/zilliztech/milvus-operator/main/deploy/manifests/deployment.yaml
Replace the image address (optional):
Optional: Use a different image registry If you can’t access DockerHub or prefer your own registry:
Note: The image repository address provided here is for testing purposes. Replace it with your actual repository address as needed.
sed -i 's#milvusdb/milvus-operator:v1.2.1#registry.milvus-mirror.cn/&#g' deployment.yaml
Install Milvus Operator:
kubectl apply -f deployment.yaml
After installation, you should see output similar to:
namespace/milvus-operator created
serviceaccount/milvus-operator created
customresourcedefinition.apiextensions.k8s.io/milvusclusters.milvus.io created
customresourcedefinition.apiextensions.k8s.io/milvuses.milvus.io created
customresourcedefinition.apiextensions.k8s.io/milvusupgrades.milvus.io created
clusterrole.rbac.authorization.k8s.io/milvus-operator-manager-role created
clusterrolebinding.rbac.authorization.k8s.io/milvus-operator-manager-rolebinding created
role.rbac.authorization.k8s.io/milvus-operator-leader-election-role created
rolebinding.rbac.authorization.k8s.io/milvus-operator-leader-election-rolebinding created
service/milvus-operator-metrics-service created
service/milvus-operator-webhook-service created
deployment.apps/milvus-operator created
Verify the Milvus Operator deployment and pod resources:
kubectl get deployment,pod -n milvus-operator
NAME                              READY   UP-TO-DATE   AVAILABLE   AGE
deployment.apps/milvus-operator   1/1     1            1           10m
NAME                                   READY   STATUS        RESTARTS   AGE
pod/milvus-operator-54d4fb854b-7hprh   1/1     Running       0          97s
(3) Deploying the Milvus Cluster
Once the Milvus Operator pod is running, you can deploy the Milvus cluster with the following steps.
Download the Milvus cluster deployment manifest:
wget https://raw.githubusercontent.com/zilliztech/milvus-operator/main/config/samples/milvus_cluster_default.yaml
The default config is minimal:
# This is a sample to deploy a milvus cluster in milvus-operator's default configurations.
apiVersion: milvus.io/v1beta1
kind: Milvus
metadata:
  name: my-release
  labels:
    app: milvus
spec:
  mode: cluster
  dependencies: {}
  components: {}
  config: {}
For a real deployment, you’ll want to customize:
Custom Cluster Name:
milvus-release-v25Custom Image: (to use a different online image or a local offline image)
registry.milvus-mirror.cn/milvusdb/milvus:v2.5.4Custom StorageClass Name: In environments with multiple storage classes, you might need to specify the StorageClass for persistent components like MinIO and etcd. In this example,
nfs-scis used.Custom Resources: Set CPU and memory limits for Milvus components. By default, no limits are set, which might overload your Kubernetes nodes.
Automatic Deletion of Related Resources: By default, when the Milvus cluster is deleted, associated resources are retained.
For additional parameter configuration, refer to:
The modified manifest is:
apiVersion: milvus.io/v1beta1
kind: Milvus
metadata:
  name: milvus-release-v25
  labels:
    app: milvus
spec:
  mode: cluster
  config: {}
  components:
    image: registry.milvus-mirror.cn/milvusdb/milvus:v2.5.4
    resources:
      limits:
        cpu: 2
        memory: 8Gi
  dependencies:
    etcd:
      inCluster:
        deletionPolicy: Delete
        pvcDeletion: true
        values:
          global:
            imageRegistry: registry.milvus-mirror.cn
            storageClass: nfs-sc
    storage:
      inCluster:
        deletionPolicy: Delete
        pvcDeletion: true
        values:
          resources:
            limits:
              cpu: 2
              memory: 8Gi
          image:
            repository: registry.milvus-mirror.cn/milvusdb/minio
            tag: RELEASE.2023-03-20T20-16-18Z
          persistence:
            storageClass: nfs-sc
            accessMode: ReadWriteOnce
            size: 10Gi
    pulsar:
      inCluster:
        chartVersion: pulsar-v3
        deletionPolicy: Delete
        pvcDeletion: true
        values:
          existingStorageClassName: nfs-sc
          pulsar_metadata:
            image:
              repository: registry.milvus-mirror.cn/apachepulsar/pulsar
              tag: 3.0.7
          zookeeper:
            replicaCount: 3
            volumes:
              data:
                size: 5Gi
                storageClassName: nfs-sc
          bookkeeper:
            volumes:
              journal:
                size: 5Gi
                storageClassName: nfs-sc
              ledgers:
                size: 5Gi
                storageClassName: nfs-sc
          images:
            zookeeper:
              repository: registry.milvus-mirror.cn/apachepulsar/pulsar
              tag: 3.0.7
            proxy:
              repository: registry.milvus-mirror.cn/apachepulsar/pulsar
              tag: 3.0.7
            broker:
              repository: registry.milvus-mirror.cn/apachepulsar/pulsar
              tag: 3.0.7
            bookie:
              repository: registry.milvus-mirror.cn/apachepulsar/pulsar
              tag: 3.0.7
            autorecovery:
              repository: registry.milvus-mirror.cn/apachepulsar/pulsar
              tag: 3.0.7
Deploy the Milvus cluster:
kubectl apply -f milvus_cluster_default.yaml
Verifying Milvus Cluster Status
Milvus Operator first sets up the middleware dependencies for Milvus—such as etcd, Zookeeper, Pulsar, and MinIO—before deploying the Milvus components (e.g., proxy, coordinator, and nodes).
View Deployments:
kubectl get deployment
NAME                                    READY   UP-TO-DATE   AVAILABLE   AGE
milvus-release-v25-milvus-datanode      1/1     1            1           52m
milvus-release-v25-milvus-indexnode     1/1     1            1           52m
milvus-release-v25-milvus-mixcoord      1/1     1            1           52m
milvus-release-v25-milvus-proxy         1/1     1            1           52m
milvus-release-v25-milvus-querynode-0   1/1     1            1           52m
milvus-release-v25-milvus-querynode-1   0/0     0            0           52m
milvus-release-v25-milvus-standalone    0/0     0            0           52m
Special Note:
You may notice that the Milvus Operator creates a standalone and a querynode-1 deployment with 0 replicas.
This is intentional. We submitted an issue to the Milvus Operator repository, the official response is:
a. The deployments work as expected. The standalone version is retained to allow seamless transitions from a cluster to a standalone deployment without service interruption.
b. Having both
querynode-0andquerynode-1is useful during rolling upgrades. In the end, only one of them will be active.
Verifying That All Pods Are Running Correctly
Once your Milvus cluster is ready, verify that all pods are running as expected:
kubectl get pods
NAME                                                    READY   STATUS      RESTARTS        AGE
milvus-release-v25-etcd-0                               1/1     Running     0               7m15s
milvus-release-v25-etcd-1                               1/1     Running     0               7m15s
milvus-release-v25-etcd-2                               1/1     Running     0               7m15s
milvus-release-v25-milvus-datanode-65bff7b4d9-9h2xv     1/1     Running     0               4m35s
milvus-release-v25-milvus-indexnode-5b5cbb4cdc-cxvwj    1/1     Running     0               4m35s
milvus-release-v25-milvus-mixcoord-64488898b5-r76rw     1/1     Running     0               4m35s
milvus-release-v25-milvus-proxy-5c7fbcb69-cqmq4         1/1     Running     0               4m35s
milvus-release-v25-milvus-querynode-0-bc6f57d64-k2wnt   1/1     Running     0               4m35s
milvus-release-v25-minio-0                              1/1     Running     0               7m14s
milvus-release-v25-minio-1                              1/1     Running     0               7m14s
milvus-release-v25-minio-2                              1/1     Running     0               7m14s
milvus-release-v25-minio-3                              1/1     Running     0               7m14s
milvus-release-v25-pulsar-bookie-0                      1/1     Running     0               7m12s
milvus-release-v25-pulsar-bookie-1                      1/1     Running     0               7m12s
milvus-release-v25-pulsar-bookie-2                      1/1     Running     0               7m12s
milvus-release-v25-pulsar-bookie-init-5zf2z             0/1     Completed   0               7m12s
milvus-release-v25-pulsar-broker-0                      1/1     Running     0               7m12s
milvus-release-v25-pulsar-broker-1                      1/1     Running     0               7m12s
milvus-release-v25-pulsar-proxy-0                       1/1     Running     0               7m12s
milvus-release-v25-pulsar-proxy-1                       1/1     Running     0               7m12s
milvus-release-v25-pulsar-pulsar-init-twznd             0/1     Completed   0               7m12s
milvus-release-v25-pulsar-recovery-0                    1/1     Running     1 (6m25s ago)   7m12s
milvus-release-v25-pulsar-zookeeper-0                   1/1     Running     0               7m12s
milvus-release-v25-pulsar-zookeeper-1                   1/1     Running     0               7m12s
milvus-release-v25-pulsar-zookeeper-2                   1/1     Running     0               7m12s
Verifying the StorageClass
Ensure that your custom StorageClass (nfs-sc) and the specified storage capacities have been correctly applied:
kubectl get pvc
NAME                                                                             STATUS   VOLUME                                     CAPACITY   ACCESS MODES   STORAGECLASS   AGE
data-milvus-release-v25-etcd-0                                                   Bound    pvc-3273f9ec-819f-4e84-bdbe-3cd9df697a5f   10Gi       RWO            nfs-sc         36m
data-milvus-release-v25-etcd-1                                                   Bound    pvc-01743e13-a989-4aea-8fd0-632ea8b13f98   10Gi       RWO            nfs-sc         36m
data-milvus-release-v25-etcd-2                                                   Bound    pvc-594f1a63-efba-4993-89e6-3ee5e333073d   10Gi       RWO            nfs-sc         36m
export-milvus-release-v25-minio-0                                                Bound    pvc-477d4e3b-69d7-4bbe-80f7-b747dc4c79f7   10Gi       RWO            nfs-sc         36m
export-milvus-release-v25-minio-1                                                Bound    pvc-b12e46fa-8d29-48fb-9ac1-98f80d67b543   10Gi       RWO            nfs-sc         36m
export-milvus-release-v25-minio-2                                                Bound    pvc-2e67893e-9611-43dd-9550-b3a7705699ae   10Gi       RWO            nfs-sc         36m
export-milvus-release-v25-minio-3                                                Bound    pvc-572c4565-bc38-4215-a13c-061d9199fdea   10Gi       RWO            nfs-sc         36m
milvus-release-v25-pulsar-bookie-journal-milvus-release-v25-pulsar-bookie-0      Bound    pvc-183eff99-7a87-406d-9f17-b0fb30c7c0b3   5Gi        RWO            nfs-sc         36m
milvus-release-v25-pulsar-bookie-journal-milvus-release-v25-pulsar-bookie-1      Bound    pvc-ebe32304-7d92-44d1-b6fb-4cbaf3207d25   5Gi        RWO            nfs-sc         36m
milvus-release-v25-pulsar-bookie-journal-milvus-release-v25-pulsar-bookie-2      Bound    pvc-2ead9186-3d44-4faa-9ae7-784be7ecf6d2   5Gi        RWO            nfs-sc         36m
milvus-release-v25-pulsar-bookie-ledgers-milvus-release-v25-pulsar-bookie-0      Bound    pvc-ff1b632d-0a66-4c13-a3bb-2550f9307614   5Gi        RWO            nfs-sc         36m
milvus-release-v25-pulsar-bookie-ledgers-milvus-release-v25-pulsar-bookie-1      Bound    pvc-57159e85-bb48-48a9-9706-7a95af8da157   5Gi        RWO            nfs-sc         36m
milvus-release-v25-pulsar-bookie-ledgers-milvus-release-v25-pulsar-bookie-2      Bound    pvc-eb235f29-afbd-4a40-9a7d-0340a9686053   5Gi        RWO            nfs-sc         36m
milvus-release-v25-pulsar-zookeeper-data-milvus-release-v25-pulsar-zookeeper-0   Bound    pvc-40e02974-3b7d-4f42-bfa7-3252b7615a36   5Gi        RWO            nfs-sc         36m
milvus-release-v25-pulsar-zookeeper-data-milvus-release-v25-pulsar-zookeeper-1   Bound    pvc-75904229-3bbf-458e-b0e3-3982e430621b   5Gi        RWO            nfs-sc         36m
milvus-release-v25-pulsar-zookeeper-data-milvus-release-v25-pulsar-zookeeper-2   Bound    pvc-2e068b79-75ac-4aa9-9e90-423ff399bad0   5Gi        RWO            nfs-sc         36m
Verifying Milvus Resource Limits
For example, to verify that the resource limits for the mixcoord component have been applied correctly, run:
kubectl get deployment milvus-release-v25-milvus-mixcoord -o jsonpath='{.spec.template.spec.containers[*].resources.limits}' | jq
{
  "cpu": "2",
  "memory": "8Gi"
}
Verifying the Custom Image
Confirm that the correct custom image is in use:
kubectl get deployment milvus-release-v25-milvus-mixcoord -o jsonpath='{.spec.template.spec.containers[0].image}'
registry.milvus-mirror.cn/milvusdb/milvus:v2.5.4
(4) Accessing Your Cluster from Outside
A common question is: How can you access Milvus services from outside your Kubernetes cluster?
By default, the Milvus service deployed by the Operator is of type ClusterIP, meaning it is only accessible within the cluster. To expose it externally, you must define an external access method. This guide opts for the simplest approach: using a NodePort.
Create and edit the service manifest for external access:
vi milvus-external-svc.yaml
Include the following content:
kind: Service
apiVersion: v1
metadata:
  name: milvus-release-v25-external-svc
  namespace: default
  labels:
    app: dmilvus-release-v25-external-svc
spec:
  ports:
    - name: milvus
      protocol: TCP
      port: 19530
      targetPort: 19530
      nodePort: 31530
    - name: milvus-web
      protocol: TCP
      port: 9091
      targetPort: 9091
      nodePort: 31531
  selector:
    app.kubernetes.io/component: proxy
    app.kubernetes.io/instance: milvus-release-v25
    app.kubernetes.io/name: milvus
  clusterIP:
  type: NodePort
- Apply the external service manifest:
kubectl apply -f milvus-external-svc.yaml
- Check the status of the external service:
kubectl get svc
NAME                                  TYPE        CLUSTER-IP      EXTERNAL-IP   PORT(S)                                                       AGE
milvus-release-v25-external-svc       NodePort    10.233.8.166    <none>        19530:31530/TCP,9091:31531/TCP                                43s
milvus-release-v25-etcd               ClusterIP   10.233.27.134   <none>        2379/TCP,2380/TCP                                             16m
milvus-release-v25-etcd-headless      ClusterIP   None            <none>        2379/TCP,2380/TCP                                             16m
milvus-release-v25-milvus             ClusterIP   10.233.55.194   <none>        19530/TCP,9091/TCP                                            13m
milvus-release-v25-minio              ClusterIP   10.233.1.56     <none>        9000/TCP                                                      16m
milvus-release-v25-minio-svc          ClusterIP   None            <none>        9000/TCP                                                      16m
milvus-release-v25-pulsar-bookie      ClusterIP   None            <none>        3181/TCP,8000/TCP                                             16m
milvus-release-v25-pulsar-broker      ClusterIP   None            <none>        8080/TCP,6650/TCP                                             16m
milvus-release-v25-pulsar-proxy       ClusterIP   10.233.30.132   <none>        80/TCP,6650/TCP                                               16m
milvus-release-v25-pulsar-recovery    ClusterIP   None            <none>        8000/TCP                                                      16m
milvus-release-v25-pulsar-zookeeper   ClusterIP   None            <none>        8000/TCP,2888/TCP,3888/TCP,2181/TCP                           16m
- Accessing Milvus WebUI
Milvus provides a built-in GUI—the Milvus WebUI—which enhances observability with an intuitive interface. Use it to monitor metrics for Milvus components and their dependencies, review detailed information on databases and collections, and inspect complete configuration details. For additional details, refer to the official Milvus WebUI documentation.
After deployment, open the following URL in your browser (replace <any_k8s_node_IP> with the IP address of any Kubernetes node):
http://<any_k8s_node_IP>:31531/webui/
This will launch the WebUI interface.
Conclusion
The Milvus Operator is more than a deployment tool—it’s a strategic investment in operational excellence for vector database infrastructure. By automating routine tasks and embedding best practices into your Kubernetes environment, it frees teams to focus on what matters most: building and improving AI-driven applications.
Adopting Operator-based management does require some upfront effort, including changes to workflows and team processes. But for organizations operating at scale—or planning to—the long-term gains are significant: increased reliability, lower operational overhead, and faster, more consistent deployment cycles.
As AI becomes core to modern business operations, the need for robust, scalable vector database infrastructure only grows. The Milvus Operator supports that evolution by offering a mature, automation-first approach that scales with your workload and adapts to your specific needs.
If your team is facing operational complexity, anticipating growth, or simply wants to reduce manual infrastructure management, adopting the Milvus Operator early can help avoid future technical debt and improve overall system resilience.
The future of infrastructure is intelligent, automated, and developer-friendly. Milvus Operator brings that future to your database layer—today.
- What is the Milvus Operator?
- Understanding the Kubernetes Operator Pattern
- How the Milvus Operator Works
- Why Use Milvus Operator Instead of Helm or YAML?
- Operation Automation
- Better State Visibility
- Easier Long-term Management
- The Architecture of Milvus Operation
- Getting Started with Milvus Operator
- (1) Prerequisites
- (2) Installing Milvus Operator
- (3) Deploying the Milvus Cluster
- (4) Accessing Your Cluster from Outside
- Conclusion
On This Page
Try Managed Milvus for Free
Zilliz Cloud is hassle-free, powered by Milvus and 10x faster.
Get StartedLike the article? Spread the word