Build a Production-Grade Chatbot with Kimi K2 and Milvus
Kimi K2 has been making waves lately—and for good reason. Hugging Face co-founders and other industry leaders have praised it as an open-source model that performs on par with top closed models, such as GPT-4 and Claude, in many areas.

Two breakthrough advantages set Kimi K2 apart:
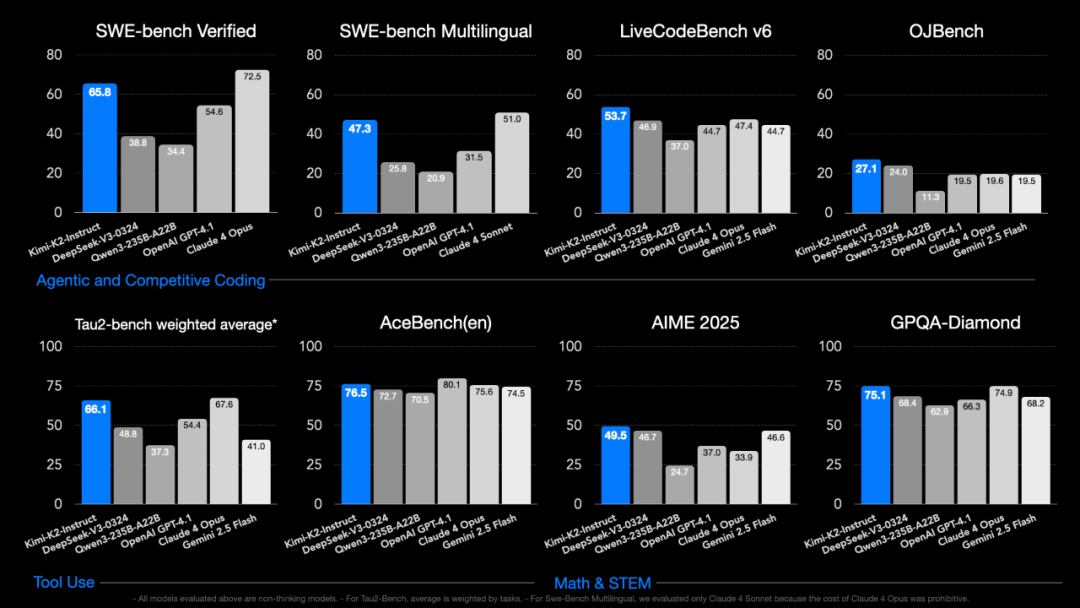
State-of-the-art performance: K2 achieves top results on key benchmarks, such as AIME2025, and consistently outperforms models like Grok-4 across most dimensions.
Robust agent capabilities: K2 doesn’t just call tools—it knows when to use them, how to switch between them mid-task, and when to stop using them. That opens up serious real-world use cases.
User testing shows that Kimi K2’s coding abilities are already comparable to Claude 4—at about 20% of the cost. More importantly, it supports autonomous task planning and tool usage. You define available tools, and K2 handles when and how to use them—no fine-tuning or orchestration layer required.
It also supports OpenAI and Anthropic-compatible APIs, allowing anything built for those ecosystems—such as Claude Code—to be integrated with Kimi K2 directly. It’s clear that Moonshot AI is targeting agent workloads.
In this tutorial, I’ll show how to build a production-grade chatbot using Kimi K2 and Milvus. The chatbot will be able to upload files, run intelligent Q&A, and manage data through vector search, eliminating the need for manual chunking, embedding scripts, or fine-tuning.
What We’ll Build
We’re building an intelligent chatbot by combining Kimi K2’s reasoning capabilities with Milvus’s vector database performance. The system handles three core workflows that engineers actually need:
Automatic file processing and chunking - Upload documents in various formats and let the system intelligently break them into searchable chunks
Semantic search - Find relevant information using natural language queries, not keyword matching
Intelligent decision-making - The assistant understands context and automatically chooses the right tools for each task
The entire system is built around just two main classes, making it easy to understand, modify, and extend:
VectorDatabase class: This is your data processing workhorse. It handles everything related to the Milvus vector database—from connecting and creating collections to chunking files and running similarity searches.
SmartAssistant class: Think of this as the system’s brain. It understands what users want and determines which tools to use to get the job done.
Here’s how it works in practice: users chat with the SmartAssistant using natural language. The assistant leverages Kimi K2’s reasoning capabilities to break down requests, then orchestrates 7 specialized tool functions to interact with the Milvus vector database. It’s like having a smart coordinator that knows exactly which database operations to run based on what you’re asking for.

Prerequisites and Setup
Before diving into the code, ensure you have the following ready:
System Requirements:
Python 3.8 or higher
Milvus server (we’ll use the local instance on port 19530)
At least 4GB RAM for processing documents
API Keys Required:
Kimi API key from Moonshot AI
OpenAI API key for text embeddings (we’ll use the text-embedding-3-small model)
Quick Installation:
pip install pymilvus openai numpy
Start Milvus locally:
# Using Docker (recommended)
docker run -d --name milvus -p 19530:19530 milvusdb/milvus:latest

# Or download and run the standalone version from milvus.io
Import Libraries and Basic Configuration
Here, pymilvus is the library for Milvus vector database operations, and openai is used to call Kimi and OpenAI APIs (the benefit of Kimi K2’s API compatibility with OpenAI and Anthropic is evident here).
import json
import numpy as np
from typing import List, Dict
from pymilvus import MilvusClient, DataType
from openai import OpenAI
import time
import os
import re
Data Processing: VectorDatabase Class
This is the data processing core of the entire system, responsible for all interactions with the vector database. It can be divided into two major modules: Milvus vector database operations and file processing system.
The design philosophy here is the separation of concerns—this class focuses purely on data operations while leaving the intelligence to the SmartAssistant class. This makes the code more maintainable and testable.
Milvus Vector Database Operations
Initialization Method
Creates an OpenAI client for text vectorization, using the text-embedding-3-small model with vector dimension set to 1536.
Also initializes the Milvus client as None, creating the connection when needed.
def __init__(self, openai_api_key: str):
    print("🔧 Initializing vector database components...")

    # OpenAI client for generating text vectors
    self.openai_client = OpenAI(api_key=openai_api_key)
    self.vector_dimension = 1536  # Vector dimension for OpenAI text-embedding-3-small

    # Milvus client
    self.milvus_client = None

    print("✅ Vector database component initialization complete")
Text Vectorization
Calls OpenAI’s embedding API to vectorize text, returning a 1536-dimensional vector array.
def generate_vector(self, text: str) -> List[float]:
    """Convert text to vector"""
    response = self.openai_client.embeddings.create(
        input=[text],
        model="text-embedding-3-small"
    )
    return response.data[0].embedding
Database Connection
Creates a MilvusClient connection to the local database on port 19530 and returns a unified result dictionary format.
def connect_database(self) -> dict:
    """Connect to Milvus vector database"""
    try:
        self.milvus_client = MilvusClient(
            uri="http://localhost:19530"
        )
        return {"success": True, "message": "Successfully connected to Milvus vector database"}
    except Exception as e:
        return {"success": False, "message": f"Connection failed: {str(e)}"}
Create Collection
Duplicate Check: Avoids creating collections with the same name
Define Structure: Three fields: id (primary key), text (text), vector (vector)
Create Index: Uses
IVF_FLATalgorithm and cosine similarity to improve search efficiencyAuto ID: System automatically generates unique identifiers
def create_collection(self, collection_name: str, description: str = "") -> dict:
    """Create document collection"""
    try:
        # Check if database is connected
        if self.milvus_client is None:
            return {"success": False, "message": "Please connect to database first"}

        # Check if collection already exists
        if self.milvus_client.has_collection(collection_name):
            return {"success": False, "message": f"Collection {collection_name} already exists"}

        # Define collection structure
        schema = self.milvus_client.create_schema(
            auto_id=True,
            enable_dynamic_field=False,
            description=description
        )

        # Add fields
        schema.add_field(field_name="id", datatype=DataType.INT64, is_primary=True)
        schema.add_field(field_name="text", datatype=DataType.VARCHAR, max_length=2000)
        schema.add_field(field_name="vector", datatype=DataType.FLOAT_VECTOR, dim=self.vector_dimension)

        # Create index parameters
        index_params = self.milvus_client.prepare_index_params()
        index_params.add_index(
            field_name="vector",
            index_type="IVF_FLAT",
            metric_type="COSINE",
            params={"nlist": 128}
        )

        # Create collection
        self.milvus_client.create_collection(
            collection_name=collection_name,
            schema=schema,
            index_params=index_params
        )

        return {"success": True, "message": f"Successfully created collection {collection_name}"}
    except Exception as e:
        return {"success": False, "message": f"Failed to create collection: {str(e)}"}
Add Documents to Collection
Generates vector representations for all documents, assembles them into the dictionary format required by Milvus, then performs batch data insertion, finally returning insertion count and status information.
def add_documents(self, collection_name: str, documents: List[str]) -> dict:
    """Add documents to collection"""
    try:
        # Check if database is connected
        if self.milvus_client is None:
            return {"success": False, "message": "Please connect to database first"}

        # Generate vectors for each document
        print(f"📝 Generating vectors for {len(documents)} documents...")
        vectors = []
        for doc in documents:
            vector = self.generate_vector(doc)
            vectors.append(vector)

        # Prepare insertion data
        data = []
        for i, (doc, vector) in enumerate(zip(documents, vectors)):
            data.append({
                "text": doc,
                "vector": vector
            })

        # Insert data
        result = self.milvus_client.insert(
            collection_name=collection_name,
            data=data
        )

        return {
            "success": True,
            "message": f"Successfully added {len(documents)} documents to collection {collection_name}",
            "inserted_count": len(result["insert_count"]) if "insert_count" in result else len(documents)
        }
    except Exception as e:
        return {"success": False, "message": f"Failed to add documents: {str(e)}"}
Search Similar Documents
Converts user questions to 1536-dimensional vectors, uses Cosine to calculate semantic similarity, and returns the most relevant documents in descending order of similarity.
def search_documents(self, collection_name: str, query: str, limit: int = 5) -> dict:
    """Search similar documents"""
    try:
        # Check if database is connected
        if self.milvus_client is None:
            return {"success": False, "message": "Please connect to database first"}

        # Convert query text to vector
        query_vector = self.generate_vector(query)

        # Search parameters
        search_params = {
            "metric_type": "COSINE",
            "params": {"nprobe": 10}
        }

        # Execute search
        results = self.milvus_client.search(
            collection_name=collection_name,
            data=[query_vector],
            anns_field="vector",
            search_params=search_params,
            limit=limit,
            output_fields=["text"]
        )

        # Organize search results
        found_docs = []
        for result in results[0]:  # Take results from first query
            found_docs.append({
                "text": result["entity"]["text"],
                "similarity": f"{(1 - result['distance']) * 100:.1f}%"
            })

        return {
            "success": True,
            "message": f"Found {len(found_docs)} relevant documents",
            "query": query,
            "results": found_docs
        }
    except Exception as e:
        return {"success": False, "message": f"Search failed: {str(e)}"}
Query Collections
Gets collection name, document count, and description information.
def list_all_collections(self) -> dict:
    """Query all collections in database"""
    try:
        # Check if database is connected
        if self.milvus_client is None:
            return {"success": False, "message": "Please connect to database first"}

        # Get all collection names
        collections = self.milvus_client.list_collections()

        if not collections:
            return {
                "success": True,
                "message": "No collections in database",
                "collections": []
            }

        # Get detailed information for each collection
        collection_details = []
        for collection_name in collections:
            try:
                # Get collection statistics
                stats = self.milvus_client.get_collection_stats(collection_name)
                doc_count = stats.get("row_count", 0)

                # Get collection description
                desc_result = self.milvus_client.describe_collection(collection_name)
                description = desc_result.get("description", "No description")

                collection_details.append({
                    "name": collection_name,
                    "document_count": doc_count,
                    "description": description
                })
            except Exception as e:
                collection_details.append({
                    "name": collection_name,
                    "document_count": "Failed to retrieve",
                    "description": f"Error: {str(e)}"
                })

        return {
            "success": True,
            "message": f"Database contains {len(collections)} collections total",
            "total_collections": len(collections),
            "collections": collection_details
        }
    except Exception as e:
        return {"success": False, "message": f"Failed to query collections: {str(e)}"}
3.2 File Processing System
Intelligent Text Chunking
Chunking Strategy:
Paragraph Priority: First split by double line breaks to maintain paragraph integrity
Long Paragraph Processing: Split overly long paragraphs by periods, question marks, exclamation marks
Size Control: Ensure each chunk doesn’t exceed limits, with maximum chunk size of 500 characters and overlap of 50 characters to avoid losing important information at split boundaries
Semantic Preservation: Avoid breaking sentences in the middle
def split_text_into_chunks(self, text: str, chunk_size: int = 500, overlap: int = 50) -> List[str]:
    """Split long text into chunks"""
    # Clean text
    text = text.strip()

    # Split by paragraphs
    paragraphs = [p.strip() for p in text.split('\n\n') if p.strip()]

    chunks = []
    current_chunk = ""

    for paragraph in paragraphs:
        # If current paragraph is too long, needs further splitting
        if len(paragraph) > chunk_size:
            # Save current chunk first
            if current_chunk:
                chunks.append(current_chunk.strip())
                current_chunk = ""

            # Split long paragraph by sentences
            sentences = re.split(r'[。!?.!?]', paragraph)
            temp_chunk = ""

            for sentence in sentences:
                sentence = sentence.strip()
                if not sentence:
                    continue

                if len(temp_chunk + sentence) <= chunk_size:
                    temp_chunk += sentence + "。"
                else:
                    if temp_chunk:
                        chunks.append(temp_chunk.strip())
                    temp_chunk = sentence + "。"

            if temp_chunk:
                chunks.append(temp_chunk.strip())

        # If adding this paragraph won't exceed limit
        elif len(current_chunk + paragraph) <= chunk_size:
            current_chunk += paragraph + "\n\n"

        # If it would exceed limit, save current chunk first, then start new one
        else:
            if current_chunk:
                chunks.append(current_chunk.strip())
            current_chunk = paragraph + "\n\n"

    # Save last chunk
    if current_chunk:
        chunks.append(current_chunk.strip())

    # Add overlapping content to improve context coherence
    if overlap > 0 and len(chunks) > 1:
        overlapped_chunks = []
        for i, chunk in enumerate(chunks):
            if i == 0:
                overlapped_chunks.append(chunk)
            else:
                # Take part of previous chunk as overlap
                prev_chunk = chunks[i-1]
                overlap_text = prev_chunk[-overlap:] if len(prev_chunk) > overlap else prev_chunk
                overlapped_chunk = overlap_text + "\n" + chunk
                overlapped_chunks.append(overlapped_chunk)
        chunks = overlapped_chunks

    return chunks
File Reading and Chunking
Supports user file uploads (txt, md, py and other formats), automatically tries different encoding formats, and provides detailed error feedback.
Metadata Enhancement: source_file records document source, chunk_index records chunk sequence index, total_chunks records total number of chunks, facilitating integrity tracking.
def read_and_chunk_file(self, file_path: str, chunk_size: int = 500, overlap: int = 50) -> dict:
    """Read local file and chunk into pieces"""
    try:
        # Check if file exists
        if not os.path.exists(file_path):
            return {"success": False, "message": f"File does not exist: {file_path}"}

        # Get file information
        file_size = os.path.getsize(file_path)
        file_name = os.path.basename(file_path)

        # Choose reading method based on file extension
        file_ext = os.path.splitext(file_path)[1].lower()

        if file_ext in ['.txt', '.md', '.py', '.js', '.html', '.css', '.json']:
            # Text file, try multiple encodings
            encodings = ['utf-8', 'gbk', 'gb2312', 'latin-1']
            content = None
            used_encoding = None

            for encoding in encodings:
                try:
                    with open(file_path, 'r', encoding=encoding) as f:
                        content = f.read()
                    used_encoding = encoding
                    break
                except UnicodeDecodeError:
                    continue

            if content is None:
                return {"success": False, "message": "Cannot read file, encoding format not supported"}

            # Split text
            chunks = self.split_text_into_chunks(content, chunk_size, overlap)

            # Add metadata to each chunk
            chunk_data = []
            for i, chunk in enumerate(chunks):
                chunk_data.append({
                    "text": chunk,
                    "source_file": file_name,
                    "chunk_index": i,
                    "total_chunks": len(chunks)
                })

            return {
                "success": True,
                "message": f"Successfully read and chunked file {file_name}",
                "total_chunks": len(chunks),
                "chunks": chunk_data
            }

    except Exception as e:
        return {"success": False, "message": f"Failed to read file: {str(e)}"}
Upload File to Collection
Calls read_and_chunk_file to chunk user uploaded files and generates vectors to store in specified collection.
def upload_file_to_collection(self, file_path: str, collection_name: str, chunk_size: int = 500, overlap: int = 50) -> dict:
    """Upload file to specified collection"""
    try:
        # Check if database is connected
        if self.milvus_client is None:
            return {"success": False, "message": "Please connect to database first"}

        # First read and chunk file
        result = self.read_and_chunk_file(file_path, chunk_size, overlap)
        if not result["success"]:
            return result

        chunk_data = result["chunks"]
        print(f"📝 Generating vectors for {len(chunk_data)} text chunks...")

        # Generate vectors for each chunk
        vectors = []
        texts = []
        for chunk_info in chunk_data:
            vector = self.generate_vector(chunk_info["text"])
            vectors.append(vector)

            # Create text with metadata
            enriched_text = f"[File: {chunk_info['source_file']} | Chunk: {chunk_info['chunk_index']+1}/{chunk_info['total_chunks']}]\n{chunk_info['text']}"
            texts.append(enriched_text)

        # Prepare insertion data
        data = []
        for i, (text, vector) in enumerate(zip(texts, vectors)):
            data.append({
                "text": text,
                "vector": vector
            })

        # Insert data into collection
        insert_result = self.milvus_client.insert(
            collection_name=collection_name,
            data=data
        )

        return {
            "success": True,
            "message": f"Successfully uploaded file {result['file_name']} to collection {collection_name}",
            "file_name": result["file_name"],
            "file_size": result["file_size"],
            "total_chunks": result["total_chunks"],
            "average_chunk_size": result["average_chunk_size"],
            "inserted_count": len(data),
            "collection_name": collection_name
        }

    except Exception as e:
        return {"success": False, "message": f"Failed to upload file: {str(e)}"}
Intelligent Decision-Making: SmartAssistant Class
This is the brain of the system, also called the intelligent decision center. This is where Kimi K2’s autonomous reasoning capabilities really shine—it doesn’t just execute predefined workflows, but actually understands user intent and makes intelligent decisions about which tools to use and when.
The design philosophy here is to create a natural language interface that feels like talking to a knowledgeable assistant, not operating a database through voice commands.
Initialization and Tool Definition
The tool definition structure follows OpenAI’s function calling format, which Kimi K2 supports natively. This makes the integration seamless and allows for complex tool orchestration without custom parsing logic.
Basic Tools (4):
connect_database - Database connection management
create_collection - Collection creation
add_documents - Batch document addition
list_all_collections - Collection management
Search Tools (1):
search_documents - Search in specified collection
File Tools (2):
read_and_chunk_file - File preview and chunking
upload_file_to_collection - File upload processing
def __init__(self, kimi_api_key: str, openai_api_key: str):
    """Initialize intelligent assistant"""
    print("🚀 Starting intelligent assistant...")

    # Kimi client
    self.kimi_client = OpenAI(
        api_key=kimi_api_key,
        base_url="https://api.moonshot.cn/v1"
    )

    # Vector database
    self.vector_db = VectorDatabase(openai_api_key)

    # Define available tools
    self.available_tools = [
        {
            "type": "function",
            "function": {
                "name": "connect_database",
                "description": "Connect to vector database",
                "parameters": {"type": "object", "properties": {}, "required": []}
            }
        },
        {
            "type": "function",
            "function": {
                "name": "create_collection",
                "description": "Create new document collection",
                "parameters": {
                    "type": "object",
                    "properties": {
                        "collection_name": {"type": "string", "description": "Collection name"},
                        "description": {"type": "string", "description": "Collection description"}
                    },
                    "required": ["collection_name"]
                }
            }
        },
        {
            "type": "function",
            "function": {
                "name": "add_documents",
                "description": "Add documents to collection",
                "parameters": {
                    "type": "object",
                    "properties": {
                        "collection_name": {"type": "string", "description": "Collection name"},
                        "documents": {"type": "array", "items": {"type": "string"}, "description": "Document list"}
                    },
                    "required": ["collection_name", "documents"]
                }
            }
        },
        {
            "type": "function",
            "function": {
                "name": "search_documents",
                "description": "Search similar documents",
                "parameters": {
                    "type": "object",
                    "properties": {
                        "collection_name": {"type": "string", "description": "Collection name"},
                        "query": {"type": "string", "description": "Search content"},
                        "limit": {"type": "integer", "description": "Number of results", "default": 5}
                    },
                    "required": ["collection_name", "query"]
                }
            }
        },
        {
            "type": "function",
            "function": {
                "name": "list_all_collections",
                "description": "Query information about all collections in database",
                "parameters": {"type": "object", "properties": {}, "required": []}
            }
        },
        {
            "type": "function",
            "function": {
                "name": "read_and_chunk_file",
                "description": "Read local file and chunk into text blocks",
                "parameters": {
                    "type": "object",
                    "properties": {
                        "file_path": {"type": "string", "description": "File path"},
                        "chunk_size": {"type": "integer", "description": "Size of each text chunk", "default": 500},
                        "overlap": {"type": "integer", "description": "Overlapping characters between text chunks", "default": 50}
                    },
                    "required": ["file_path"]
                }
            }
        },
        {
            "type": "function",
            "function": {
                "name": "upload_file_to_collection",
                "description": "Upload local file to specified collection, automatically chunk and vectorize",
                "parameters": {
                    "type": "object",
                    "properties": {
                        "file_path": {"type": "string", "description": "File path"},
                        "collection_name": {"type": "string", "description": "Target collection name"},
                        "chunk_size": {"type": "integer", "description": "Size of each text chunk", "default": 500},
                        "overlap": {"type": "integer", "description": "Overlapping characters between text chunks", "default": 50}
                    },
                    "required": ["file_path", "collection_name"]
                }
            }
        }
    ]

    print("✅ Intelligent assistant startup complete")
4.2 Tool Mapping and Execution
All tools are executed uniformly through _execute_tool.
def _execute_tool(self, tool_name: str, args: dict) -> dict:
    """Execute specific tool"""
    if tool_name == "connect_database":
        return self.vector_db.connect_database()
    elif tool_name == "create_collection":
        return self.vector_db.create_collection(**args)
    elif tool_name == "add_documents":
        return self.vector_db.add_documents(**args)
    elif tool_name == "search_documents":
        return self.vector_db.search_documents(**args)
    elif tool_name == "list_all_collections":
        return self.vector_db.list_all_collections()
    elif tool_name == "read_and_chunk_file":
        return self.vector_db.read_and_chunk_file(**args)
    elif tool_name == "upload_file_to_collection":
        return self.vector_db.upload_file_to_collection(**args)
    else:
        return {"success": False, "message": f"Unknown tool: {tool_name}"}
4.3 Core Conversation Engine
This is where the magic happens. The method calls Kimi’s latest model: kimi-k2-0711-preview to analyze user intent, automatically select needed tools and execute them, then return results to Kimi, finally generating final answers based on tool results.
What makes this particularly powerful is the conversational loop—Kimi K2 can chain multiple tool calls together, learn from intermediate results, and adapt its strategy based on what it discovers. This enables complex workflows that would require multiple manual steps in traditional systems.
Parameter Configuration:
temperature=0.3: Lower temperature ensures stable tool callingtool_choice="auto": Lets Kimi autonomously decide whether to use tools
def execute_command(self, user_command: str) -> str:
    """Execute user command"""
    print(f"\n📝 User command: {user_command}")
    print("=" * 60)

    # Prepare conversation messages
    messages = [
        {
            "role": "system",
            "content": """You are an intelligent assistant that can help users manage vector databases and answer questions.

Intelligent Decision Principles:
1. Prioritize answer speed and quality, choose optimal response methods
2. For general knowledge questions, directly use your knowledge for quick responses
3. Only use database search in the following situations:
   - User explicitly requests searching database content
   - Questions involve user-uploaded specific documents or professional materials
   - Need to find specific, specialized information
4. You can handle file uploads, database management and other tasks
5. Always aim to provide the fastest, most accurate answers

Important Reminders:
- Before executing any database operations, please first call connect_database to connect to the database
- If encountering API limit errors, the system will automatically retry, please be patient

Remember: Don't use tools just to use tools, but solve user problems in the optimal way."""
        },
        {
            "role": "user",
            "content": user_command
        }
    ]

    # Start conversation and tool calling loop
    while True:
        try:
            # Call Kimi model - Add retry mechanism to handle API limits
            max_retries = 5
            retry_delay = 20  # seconds

            for attempt in range(max_retries):
                try:
                    response = self.kimi_client.chat.completions.create(
                        model="kimi-k2-0711-preview", #moonshot-v1-8k
                        messages=messages,
                        temperature=0.3,
                        tools=self.available_tools,
                        tool_choice="auto"
                    )
                    break  # Success, break out of retry loop
                except Exception as e:
                    if "rate_limit" in str(e).lower() or "429" in str(e) and attempt < max_retries - 1:
                        print(f"⏳ Kimi API limit, waiting {retry_delay} seconds before retry... (attempt {attempt + 1}/{max_retries})")
                        time.sleep(retry_delay)
                        retry_delay *= 1.5  # Moderately increase delay
                        continue
                    else:
                        raise e
            else:
                raise Exception("Failed to call Kimi API: exceeded maximum retry attempts")

            choice = response.choices[0]

            # If need to call tools
            if choice.finish_reason == "tool_calls":
                messages.append(choice.message)

                # Execute each tool call
                for tool_call in choice.message.tool_calls:
                    tool_name = tool_call.function.name
                    tool_args = json.loads(tool_call.function.arguments)

                    print(f"🔧 Calling tool: {tool_name}")
                    print(f"📋 Parameters: {tool_args}")

                    # Execute tool
                    result = self._execute_tool(tool_name, tool_args)
                    print(f"✅ Result: {result}")
                    print("-" * 40)

                    # Add tool result to conversation
                    messages.append({
                        "role": "tool",
                        "tool_call_id": tool_call.id,
                        "name": tool_name,
                        "content": json.dumps(result)
                    })

            # If task completed
            else:
                final_response = choice.message.content
                print(f"🎯 Task completed: {final_response}")
                return final_response

        except Exception as e:
            error_msg = f"Execution error: {str(e)}"
            print(f"❌ {error_msg}")
            return error_msg
Main Program and Usage Demonstration
This main program sets up the interactive environment. For production use, you’d want to replace the hardcoded API keys with environment variables and add proper logging and monitoring.
Get KIMI_API_KEY and OPENAI_API_KEY from the official website to start using.
python
def main():
    """Main program"""
    print("🌟 Kimi K2 Intelligent Vector Database Assistant")
    print("=" * 60)

    # API key configuration
    KIMI_API_KEY = "sk-xxxxxxxxxxxxxxxx"
    OPENAI_API_KEY = "sk-proj-xxxxxxxxxxxxxxxx"

    # Create intelligent assistant
    assistant = SmartAssistant(KIMI_API_KEY, OPENAI_API_KEY)

    # Interactive mode
    print("\n🎮 Interactive mode (enter 'quit' to exit)")
    while True:
        try:
            user_input = input("\nPlease enter command: ").strip()
            if user_input.lower() in ['quit', 'exit']:
                print("👋 Goodbye!")
                break

            if user_input:
                assistant.execute_command(user_input)
                print("\n" + "=" * 60)

        except KeyboardInterrupt:
            print("\n👋 Goodbye!")
            break

if __name__ == "__main__":
    main()
Usage Examples
These examples demonstrate the system’s capabilities in realistic scenarios that engineers would encounter in production environments.
Upload file example
This example shows how the system handles a complex workflow autonomously. Notice how Kimi K2 breaks down the user’s request and executes the necessary steps in the correct order.
User Input: Upload ./The Adventures of Sherlock Holmes.txt to the database
What’s remarkable here is that from the tool call chain, you can see that Kimi K2 parses the command and knows to connect to the database (connect_database function) first, and then upload the file to the collection (upload_file_to_collection function).
When encountering an error, Kimi K2 also knows to promptly correct it based on the error message, knowing that it should first create the collection (create_collection) and then upload the file to the collection (upload_file_to_collection). This autonomous error recovery is a key advantage over traditional scripted approaches.
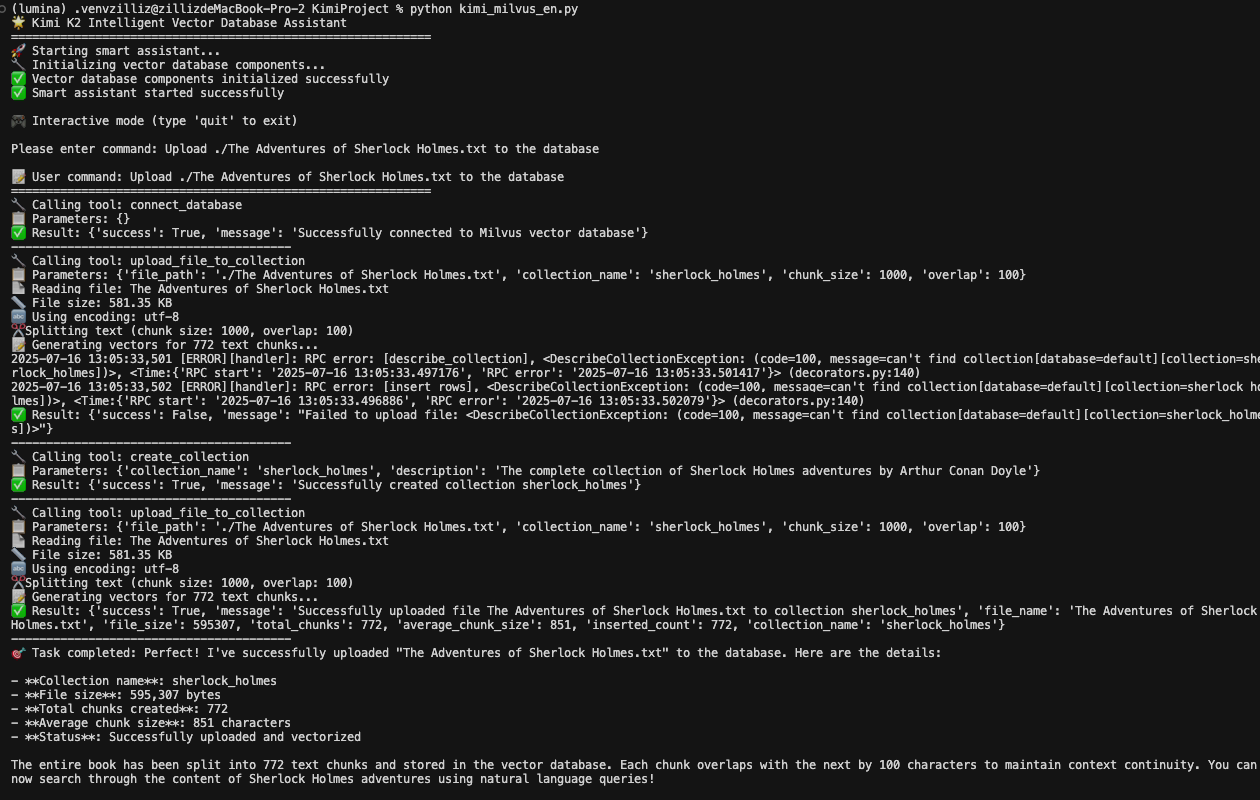
The system automatically handles:
Database connection
Collection creation (if needed)
File reading and chunking
Vector generation
Data insertion
Status reporting
Question-answer example
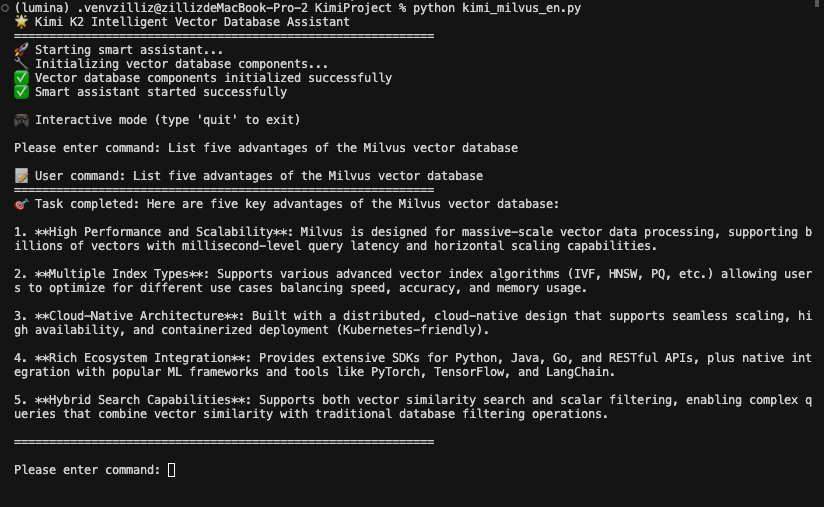
This section demonstrates the system’s intelligence in deciding when to use tools versus when to rely on existing knowledge.
User Input: List five advantages of the Milvus vector database
From the image, we can see that Kimi K2 answered the user’s question directly without calling any functions. This demonstrates the system’s efficiency—it doesn’t perform unnecessary database operations for questions it can answer from its training data.
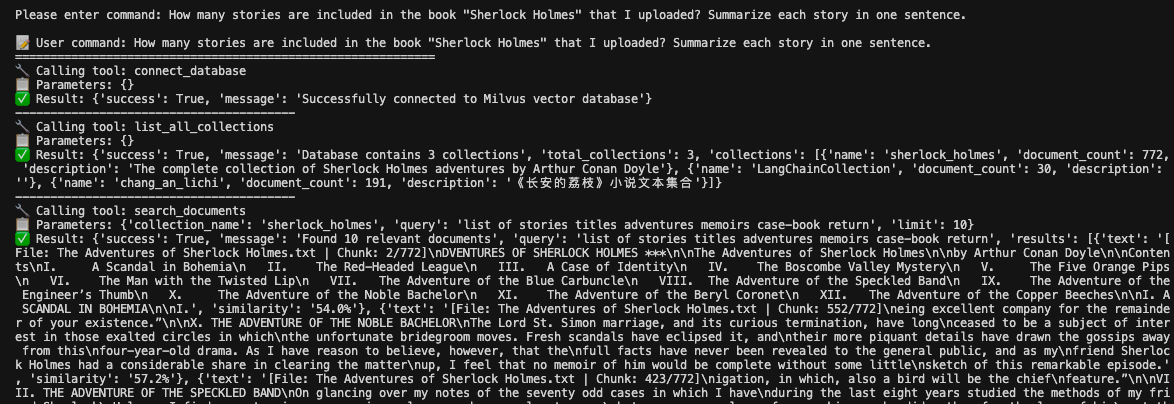
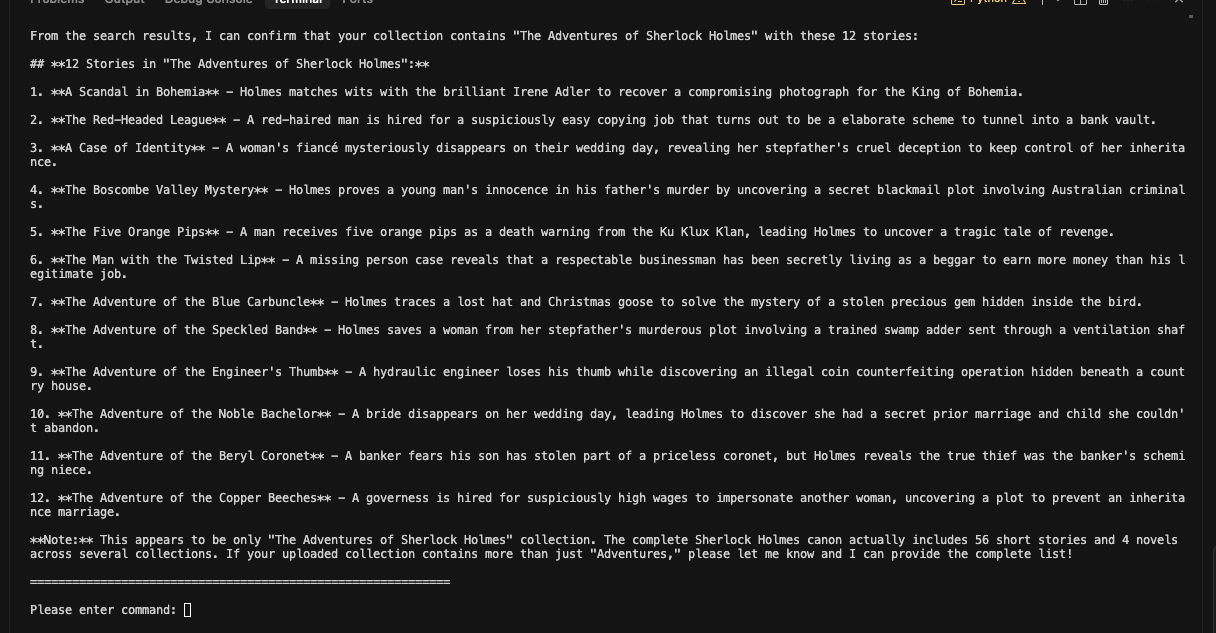
How many stories are included in the book "Sherlock Holmes" that I uploaded? Summarize each story in one sentence.
For this query, Kimi correctly identifies that it needs to search the uploaded document content. The system:
Recognizes this requires document-specific information
Calls the search_documents function
Analyzes the retrieved content
Provides a comprehensive answer based on the actual uploaded content
Database Management Example
Administrative tasks are handled just as smoothly as content queries.
list all the collections
Kimi K2 utilizes the appropriate tools to answer this question correctly, demonstrating that it understands both administrative and content operations.
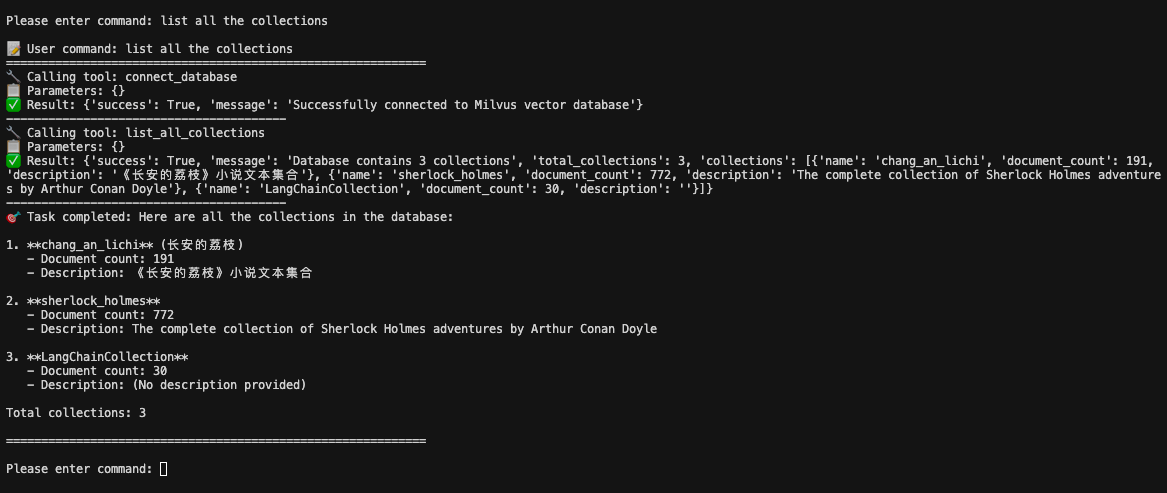
The system provides comprehensive information including:
Collection names
Document counts
Descriptions
Overall database statistics
The Dawn of Production AI Agents
By connecting Kimi K2 with Milvus, we’ve moved beyond traditional chatbots or basic semantic search. What we’ve built is a real production agent—one that can interpret complex instructions, break them down into tool-based workflows, and execute end-to-end tasks like file handling, semantic search, and intelligent Q&A with minimal overhead.
This architecture reflects a broader shift in AI development, moving from isolated models to composable systems, where reasoning, memory, and action work in tandem. LLMs like Kimi K2 provide flexible reasoning, while vector databases like Milvus offer long-term, structured memory; and tool calling enables real-world execution.
For developers, the question is no longer if these components can work together, but how well they can generalize across domains, scale with data, and respond to increasingly complex user needs.
Looking ahead, one pattern is becoming clear:LLM (reasoning) + Vector DB (knowledge) + Tools (action) = Real AI agents.
This system we built is just one example, but the principles apply broadly. As LLMs continue improving and tool ecosystems mature, Milvus is positioned to remain a core part of the production AI stack—powering intelligent systems that can reason over data, not just retrieve it.
- What We’ll Build
- Prerequisites and Setup
- Import Libraries and Basic Configuration
- Data Processing: VectorDatabase Class
- Milvus Vector Database Operations
- 3.2 File Processing System
- Intelligent Decision-Making: SmartAssistant Class
- Initialization and Tool Definition
- 4.2 Tool Mapping and Execution
- 4.3 Core Conversation Engine
- Main Program and Usage Demonstration
- Usage Examples
- Upload file example
- Question-answer example
- Database Management Example
- The Dawn of Production AI Agents
On This Page
Try Managed Milvus for Free
Zilliz Cloud is hassle-free, powered by Milvus and 10x faster.
Get StartedLike the article? Spread the word