How to Build Multimodal RAG with ColQwen2, Milvus, and Qwen3.5
Nowadays, you can upload a PDF to any modern LLM and ask questions about it. For a handful of documents, that works fine. But most LLMs cap out at a few hundred pages of context, so a large corpus simply won’t fit. Even when it does fit, you’re paying to process every page on every query. Ask a hundred questions about the same 500-page document set, and you pay for 500 pages a hundred times over. That gets expensive fast.
Retrieval-augmented generation (RAG) solves this by separating indexing from answering. You encode your documents once, store the representations in a vector database, and at query time you retrieve only the most relevant pages to send to the LLM. The model reads three pages per query, not your entire corpus. That makes it practical to build document Q&A over collections that keep growing.
This tutorial walks you through building a multimodal RAG pipeline with three openly licensed components:
- ColQwen2 encodes each PDF page as an image into multi-vector embeddings, replacing the traditional OCR and text chunking step.
- Milvus stores those vectors and handles similarity search at query time, retrieving only the most relevant pages.
- Qwen3.5-397B-A17B reads the retrieved page images and generates an answer based on what it sees.
By the end, you’ll have a working system that takes a PDF and a question, finds the most relevant pages, and returns an answer grounded in what the model sees.
What is Multimodal RAG?
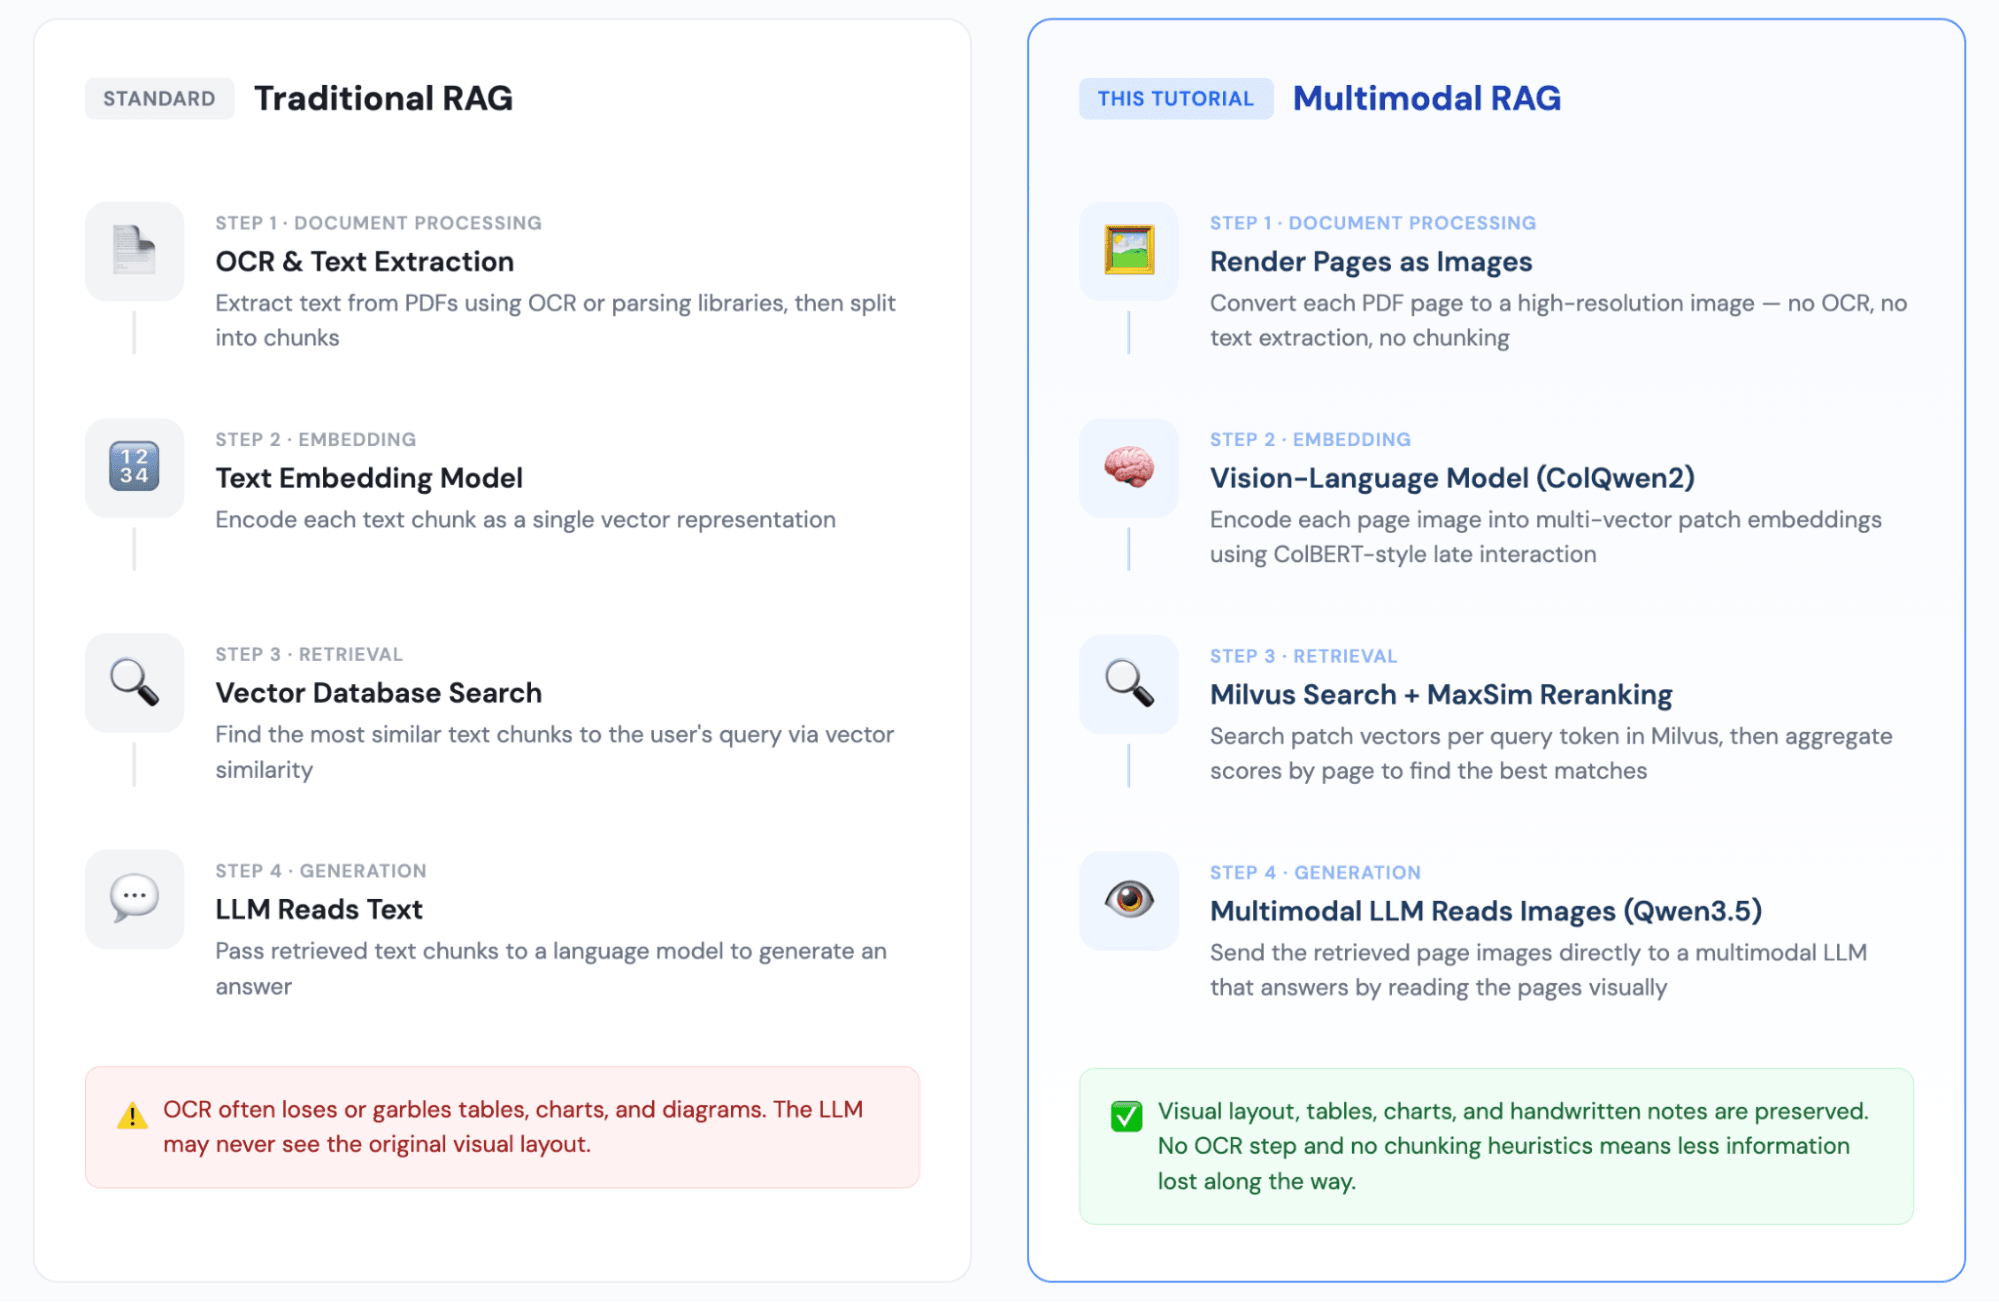
The intro covered why RAG matters at scale. The next question is what kind of RAG you need, because the traditional approach has a blind spot.
Traditional RAG extracts text from documents, embeds it as vectors, retrieves the closest matches at query time, and passes those text chunks to an LLM. That works well for text-heavy content with clean formatting. It breaks when your documents contain:
- Tables, where meaning depends on the relationship between rows, columns, and headers.
- Charts and diagrams, where information is entirely visual and has no text equivalent.
- Scanned documents or handwritten notes, where OCR output is unreliable or incomplete.
Multimodal RAG replaces text extraction with image encoding. You render each page as an image, encode it with a vision-language model, and retrieve page images at query time. The LLM sees the original page — tables, figures, formatting and all — and answers based on what it sees.
Structure of Multimodal RAG Pipeline: ColQwen2 for Encoding, Milvus for Search, Qwen3.5 for Generation
How the Pipeline Works
Tech Stack
| Component | Choice | Role |
|---|---|---|
| PDF processing | pdf2image + poppler | Renders PDF pages as high-resolution images |
| Embedding model | colqwen2-v1.0 | Vision-language model; encodes each page into ~755 128-dim patch vectors |
| Vector database | Milvus Lite | Stores patch vectors and handles similarity search; runs locally with no server setup |
| Generation model | Qwen3.5-397B-A17B | Multimodal LLM called via OpenRouter API; reads retrieved page images to generate answers |
Step-by-Step Implementation for Multi-Modal RAG with ColQwen2+ Milvus+ Qwen3.5-397B-A17B
Environment Setup
- Install Python Dependencies
pip install colpali-engine pymilvus openai pdf2image torch pillow tqdm
- Install Poppler, the PDF Rendering Engine
# macOS
brew install poppler

# Ubuntu/Debian
sudo apt-get install poppler-utils

# Windows: download from https://github.com/oschwartz10612/poppler-windows
- Download the Embedding Model, ColQwen2
Download vidore/colqwen2-v1.0-merged from HuggingFace (~4.4 GB) and save it locally:
mkdir -p ~/models/colqwen2-v1.0-merged
# Download all model files to this directory
- Get an OpenRouter API Key
Sign up and generate a key at https://openrouter.ai/settings/keys.
Step 1: Import Dependencies and Configure
import os, io, base64
import torch
import numpy as np
from PIL import Image
from tqdm import tqdm
from pdf2image import convert_from_path

from openai import OpenAI
from pymilvus import MilvusClient, DataType
from colpali_engine.models import ColQwen2, ColQwen2Processor

# --- Configuration ---
EMBED_MODEL = os.path.expanduser("~/models/colqwen2-v1.0-merged")
EMBED_DIM = 128              # ColQwen2 output vector dimension
MILVUS_URI = "./milvus_demo.db"  # Milvus Lite local file
COLLECTION = "doc_patches"
TOP_K = 3                    # Number of pages to retrieve
CANDIDATE_PATCHES = 300      # Candidate patches per query token

# OpenRouter LLM config
OPENROUTER_API_KEY = os.environ.get(
    "OPENROUTER_API_KEY",
    "<your-api-key-here>",
)
GENERATION_MODEL = "qwen/qwen3.5-397b-a17b"

# Device selection
DEVICE = "cuda" if torch.cuda.is_available() else "cpu"
DTYPE = torch.bfloat16 if DEVICE == "cuda" else torch.float32
print(f"Device: {DEVICE}")
Output: Device: cpu
Step 2: Load the Embedding Model
ColQwen2 is a vision-language model that encodes document images into ColBERT-style multi-vector representations. Each page produces several hundred 128-dimensional patch vectors.
print(f"Loading embedding model: {EMBED_MODEL}")
emb_model = ColQwen2.from_pretrained(
    EMBED_MODEL,
    torch_dtype=DTYPE,
    attn_implementation="flash_attention_2" if DEVICE == "cuda" else None,
    device_map=DEVICE,
).eval()
emb_processor = ColQwen2Processor.from_pretrained(EMBED_MODEL)
print(f"Embedding model ready on {DEVICE}")
Output:

Step 3: Initialize Milvus
This tutorial uses Milvus Lite, which runs as a local file with zero configuration — no separate server process needed.
Database schema:
id: INT64, auto-increment primary key
doc_id: INT64, page number (which page of the PDF)
patch_idx: INT64, patch index within that page
vector: FLOAT_VECTOR(128), the patch’s 128-dimensional embedding
milvus_client = MilvusClient(uri=MILVUS_URI)

if milvus_client.has_collection(COLLECTION):
    milvus_client.drop_collection(COLLECTION)

schema = milvus_client.create_schema(auto_id=True, enable_dynamic_field=True)
schema.add_field("id", DataType.INT64, is_primary=True)
schema.add_field("doc_id", DataType.INT64)
schema.add_field("patch_idx", DataType.INT64)
schema.add_field("vector", DataType.FLOAT_VECTOR, dim=EMBED_DIM)

index = milvus_client.prepare_index_params()
index.add_index(field_name="vector", index_type="FLAT", metric_type="IP")
milvus_client.create_collection(COLLECTION, schema=schema, index_params=index)
print("Milvus collection created.")
Output: Milvus collection created.
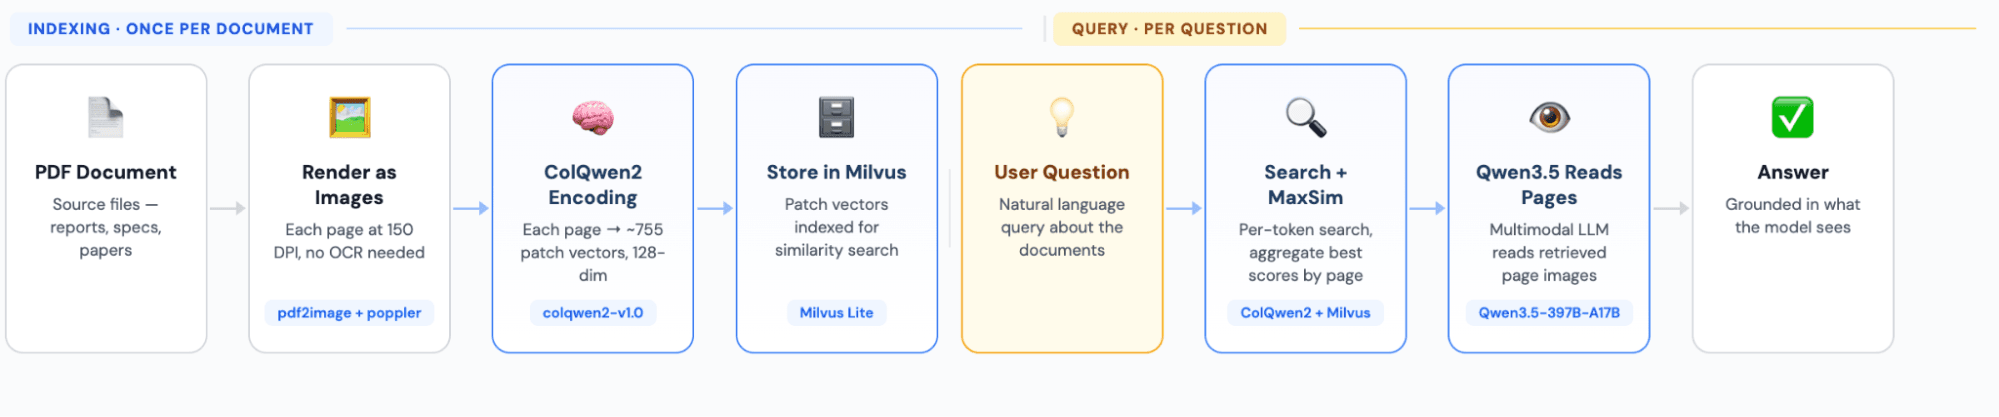
Step 4: Convert PDF Pages to Images
You render each page at 150 DPI. No text extraction happens here — the pipeline treats every page purely as an image.
PDF_PATH = "Milvus vs Zilliz.pdf"  # Replace with your own PDF
images = [p.convert("RGB") for p in convert_from_path(PDF_PATH, dpi=150)]
print(f"{len(images)} pages loaded.")

# Preview the first page
images[0].resize((400, int(400 * images[0].height / images[0].width)))
Output:
Step 5: Encode Images and Insert into Milvus
ColQwen2 encodes each page into multi-vector patch embeddings. You then insert every patch as a separate row in Milvus.
# Encode all pages
all_page_embs = []
with torch.no_grad():
    for i in tqdm(range(0, len(images), 2), desc="Encoding pages"):
        batch = images[i : i + 2]
        inputs = emb_processor.process_images(batch).to(emb_model.device)
        embs = emb_model(**inputs)
        for e in embs:
            all_page_embs.append(e.cpu().float().numpy())

print(f"Encoded {len(all_page_embs)} pages, ~{all_page_embs[0].shape[0]} patches per page, dim={all_page_embs[0].shape[1]}")
Output: Encoded 17 pages, ~755 patches per page, dim=128
# Insert into Milvus
for doc_id, patch_vecs in enumerate(all_page_embs):
    rows = [
        {"doc_id": doc_id, "patch_idx": j, "vector": v.tolist()}
        for j, v in enumerate(patch_vecs)
    ]
    milvus_client.insert(COLLECTION, rows)

total = milvus_client.get_collection_stats(COLLECTION)["row_count"]
print(f"Indexed {len(all_page_embs)} pages, {total} patches total.")
Output: Indexed 17 pages, 12835 patches total.
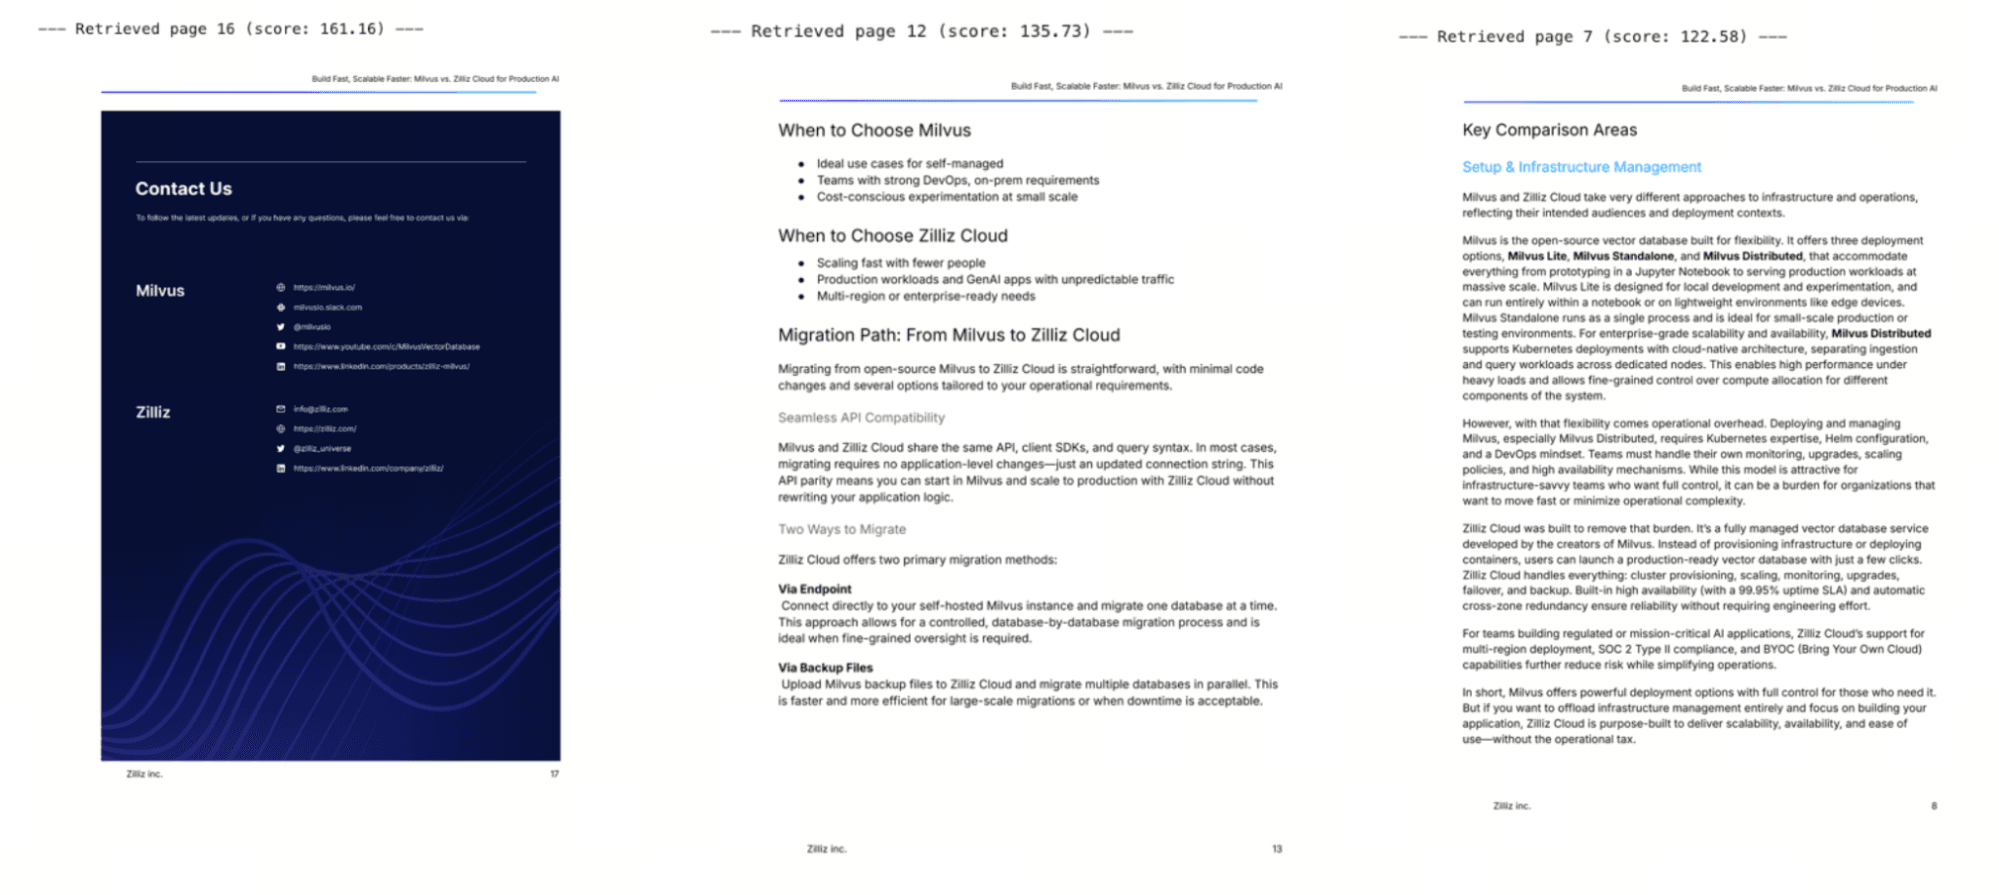
A 17-page PDF produces 12,835 patch vector records — roughly 755 patches per page.
Step 6: Retrieve — Query Encoding + MaxSim Reranking
This is the core retrieval logic. It works in three stages:
Encode the query into multiple token vectors.
Search Milvus for each token vector’s closest patches.
Aggregate by page using MaxSim: for each query token, take the highest-scoring patch in each page, then sum those scores across all tokens. The page with the highest total score is the best match.
How MaxSim works: For each query token vector, you find the document patch with the highest inner product (the “max” in MaxSim). You then sum these maximum scores across all query tokens to get a total relevance score per page. Higher score = stronger semantic match between the query and the page’s visual content.
question = "What is the difference between Milvus and Zilliz Cloud?"

# 1. Encode the query
with torch.no_grad():
    query_inputs = emb_processor.process_queries([question]).to(emb_model.device)
    query_vecs = emb_model(**query_inputs)[0].cpu().float().numpy()
print(f"Query encoded: {query_vecs.shape[0]} token vectors")

# 2. Search Milvus for each query token vector
doc_patch_scores = {}
for qv in query_vecs:
    hits = milvus_client.search(
        COLLECTION, data=[qv.tolist()], limit=CANDIDATE_PATCHES,
        output_fields=["doc_id", "patch_idx"],
        search_params={"metric_type": "IP"},
    )[0]
    for h in hits:
        did = h["entity"]["doc_id"]
        pid = h["entity"]["patch_idx"]
        score = h["distance"]
        doc_patch_scores.setdefault(did, {})[pid] = max(
            doc_patch_scores.get(did, {}).get(pid, 0), score
        )

# 3. MaxSim aggregation: total score per page = sum of all matched patch scores
doc_scores = {d: sum(ps.values()) for d, ps in doc_patch_scores.items()}
ranked = sorted(doc_scores.items(), key=lambda x: x[1], reverse=True)[:TOP_K]
print(f"Top-{TOP_K} retrieved pages: {[(d, round(s, 2)) for d, s in ranked]}")
Output:
Query encoded: 24 token vectors
Top-3 retrieved pages: [(16, 161.16), (12, 135.73), (7, 122.58)]
# Display the retrieved pages
context_images = [images[d] for d, _ in ranked if d < len(images)]
for i, img in enumerate(context_images):
    print(f"--- Retrieved page {ranked[i][0]} (score: {ranked[i][1]:.2f}) ---")
    display(img.resize((500, int(500 * img.height / img.width))))
Step 7: Generate an Answer with the Multimodal LLM
You send the retrieved page images — not extracted text — along with the user’s question to Qwen3.5. The LLM reads the images directly to produce an answer.
def image_to_uri(img):
    """Convert an image to a base64 data URI for sending to the LLM."""
    img = img.copy()
    w, h = img.size
    if max(w, h) > 1600:
        r = 1600 / max(w, h)
        img = img.resize((int(w * r), int(h * r)), Image.LANCZOS)
    buf = io.BytesIO()
    img.save(buf, format="PNG")
    return f"data:image/png;base64,{base64.b64encode(buf.getvalue()).decode()}"

# Build the multimodal prompt
context_images = [images[d] for d, _ in ranked if d < len(images)]
content = [
    {"type": "image_url", "image_url": {"url": image_to_uri(img)}}
    for img in context_images
]
content.append({
    "type": "text",
    "text": (
        f"Above are {len(context_images)} retrieved document pages.\n"
        f"Read them carefully and answer the following question:\n\n"
        f"Question: {question}\n\n"
        f"Be concise and accurate. If the documents don't contain "
        f"relevant information, say so."
    ),
})

# Call the LLM
llm = OpenAI(api_key=OPENROUTER_API_KEY, base_url="https://openrouter.ai/api/v1")
response = llm.chat.completions.create(
    model=GENERATION_MODEL,
    messages=[{"role": "user", "content": content}],
    max_tokens=1024,
    temperature=0.7,
)
answer = response.choices[0].message.content.strip()
print(f"Question: {question}\n")
print(f"Answer: {answer}")
Results:

Conclusion
In this tutorial, we built a multimodal RAG pipeline that takes a PDF, converts each page into an image, encodes those images into multi-vector patch embeddings with ColQwen2, stores them in Milvus, and retrieves the most relevant pages at query time using MaxSim scoring. Instead of extracting text and hoping OCR preserves the layout, the pipeline sends the original page images to Qwen3.5, which reads them visually and generates an answer.
This tutorial is a starting point, not a production deployment. A few things to keep in mind as you take it further.
On tradeoffs:
- Storage scales with page count. Each page produces ~755 vectors, so a 1,000-page corpus means roughly 755,000 rows in Milvus. The FLAT index used here works for demos but you’d want IVF or HNSW for larger collections.
- Encoding is slower than text embedding. ColQwen2 is a 4.4 GB vision model. Encoding images takes longer per page than embedding text chunks. For a batch indexing job that runs once, this is usually fine. For real-time ingestion it’s worth benchmarking.
- This approach works best for visually rich documents. If your PDFs are mostly clean, single-column text with no tables or figures, traditional text-based RAG may retrieve more precisely and cost less to run.
On what to try next:
- Swap in a different multimodal LLM. This tutorial uses Qwen3.5 via OpenRouter, but the retrieval pipeline is model-agnostic. You could point the generation step at GPT-4o, Gemini, or any multimodal model that accepts image inputs.
- Scale up Milvus. Milvus Lite runs as a local file, which is great for prototyping. For production workloads, Milvus on Docker/Kubernetes or Zilliz Cloud (fully managed Milvus) handles larger corpora without you managing infrastructure.
- Experiment with different document types. The pipeline here uses a comparison PDF, but it works the same way on scanned contracts, engineering drawings, financial statements, or research papers with dense figures.
To get started, install Milvus Lite with pip install pymilvus and grab the ColQwen2 weights from HuggingFace.
Got questions, or want to show off what you’ve built? The Milvus Slack is the fastest way to get help from the community and the team. If you’d prefer a one-on-one conversation, you can book time at our office hours.
Keep Reading
What If You Could See Why RAG Fails? Debugging RAG in 3D with Project_Golem and Milvus
Is RAG Becoming Outdated Now That Long-Running Agents Like Claude Cowork Are Emerging?
How We Built a Semantic Highlighting Model for RAG Context Pruning and Token Saving
AI Code Review Gets Better When Models Debate: Claude vs Gemini vs Codex vs Qwen vs MiniMax
- What is Multimodal RAG?
- Structure of Multimodal RAG Pipeline: ColQwen2 for Encoding, Milvus for Search, Qwen3.5 for Generation
- How the Pipeline Works 
- Tech Stack
- Step-by-Step Implementation for Multi-Modal RAG with ColQwen2+ Milvus+ Qwen3.5-397B-A17B
- Environment Setup
- Step 1: Import Dependencies and Configure
- Step 2: Load the Embedding Model
- Step 3: Initialize Milvus
- Step 4: Convert PDF Pages to Images
- Step 5: Encode Images and Insert into Milvus
- Step 6: Retrieve — Query Encoding + MaxSim Reranking
- Step 7: Generate an Answer with the Multimodal LLM
- Conclusion
- Keep Reading
On This Page
Try Managed Milvus for Free
Zilliz Cloud is hassle-free, powered by Milvus and 10x faster.
Get StartedLike the article? Spread the word