How to Deploy the Open-Source Milvus Vector Database on Amazon EKS
This post was originally published on the AWS website and is translated, edited, and reposted here with permission.
An Overview of Vector Embeddings and Vector Databases
The rise of Generative AI (GenAI), particularly large language models (LLMs), has significantly boosted interest in vector databases, establishing them as an essential component within the GenAI ecosystem. As a result, vector databases are being adopted in increasing use cases.
An IDC Report predicts that by 2025, over 80% of business data will be unstructured, existing in formats such as text, images, audio, and videos. Understanding, processing, storing, and querying this vast amount of unstructured data at scale presents a significant challenge. The common practice in GenAI and deep learning is to transform unstructured data into vector embeddings, store, and index them in a vector database like Milvus or Zilliz Cloud (the fully managed Milvus) for vector similarity or semantic similarity searches.
But what exactly are vector embeddings? Simply put, they are numerical representations of floating-point numbers in a high-dimensional space. The distance between two vectors indicates their relevance: the closer they are, the more relevant they are to each other, and vice versa. This means that similar vectors correspond to similar original data, which differs from traditional keyword or exact searches.
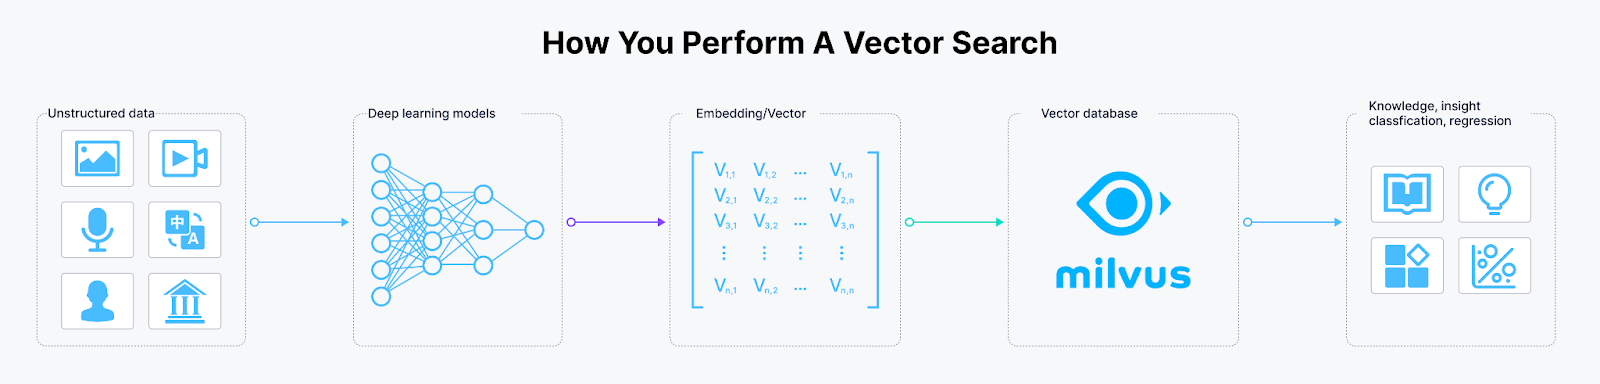 How to perform a vector similarity search
Figure 1: How to perform a vector similarity search
The ability to store, index, and search vector embeddings is the core functionality of vector databases. Currently, mainstream vector databases fall into two categories. The first category extends existing relational database products, such as Amazon OpenSearch Service with the KNN plugin and Amazon RDS for PostgreSQL with the pgvector extension. The second category comprises specialized vector database products, including well-known examples like Milvus, Zilliz Cloud (the fully managed Milvus), Pinecone, Weaviate, Qdrant, and Chroma.
Embedding techniques and vector databases have broad applications across various AI-driven use cases, including image similarity search, video deduplication and analysis, natural language processing, recommendation systems, targeted advertising, personalized search, intelligent customer service, and fraud detection.
Milvus is one of the most popular open-source options among the numerous vector databases. This post introduces Milvus and explores the practice of deploying Milvus on AWS EKS.
What is Milvus?
Milvus is a highly flexible, reliable, and blazing-fast cloud-native, open-source vector database. It powers vector similarity search and AI applications and strives to make vector databases accessible to every organization. Milvus can store, index, and manage a billion+ vector embeddings generated by deep neural networks and other machine learning (ML) models.
Milvus was released under the open-source Apache License 2.0 in October 2019. It is currently a graduate project under LF AI & Data Foundation. At the time of writing this blog, Milvus had reached more than 50 million Docker pull downloads and was used by many customers, such as NVIDIA, AT&T, IBM, eBay, Shopee, and Walmart.
Milvus Key Features
As a cloud-native vector database, Milvus boasts the following key features:
High performance and millisecond search on billion-scale vector datasets.
Multi-language support and toolchain.
Horizontal scalability and high reliability even in the event of a disruption.
Hybrid search, achieved by pairing scalar filtering with vector similarity search.
Milvus Architecture
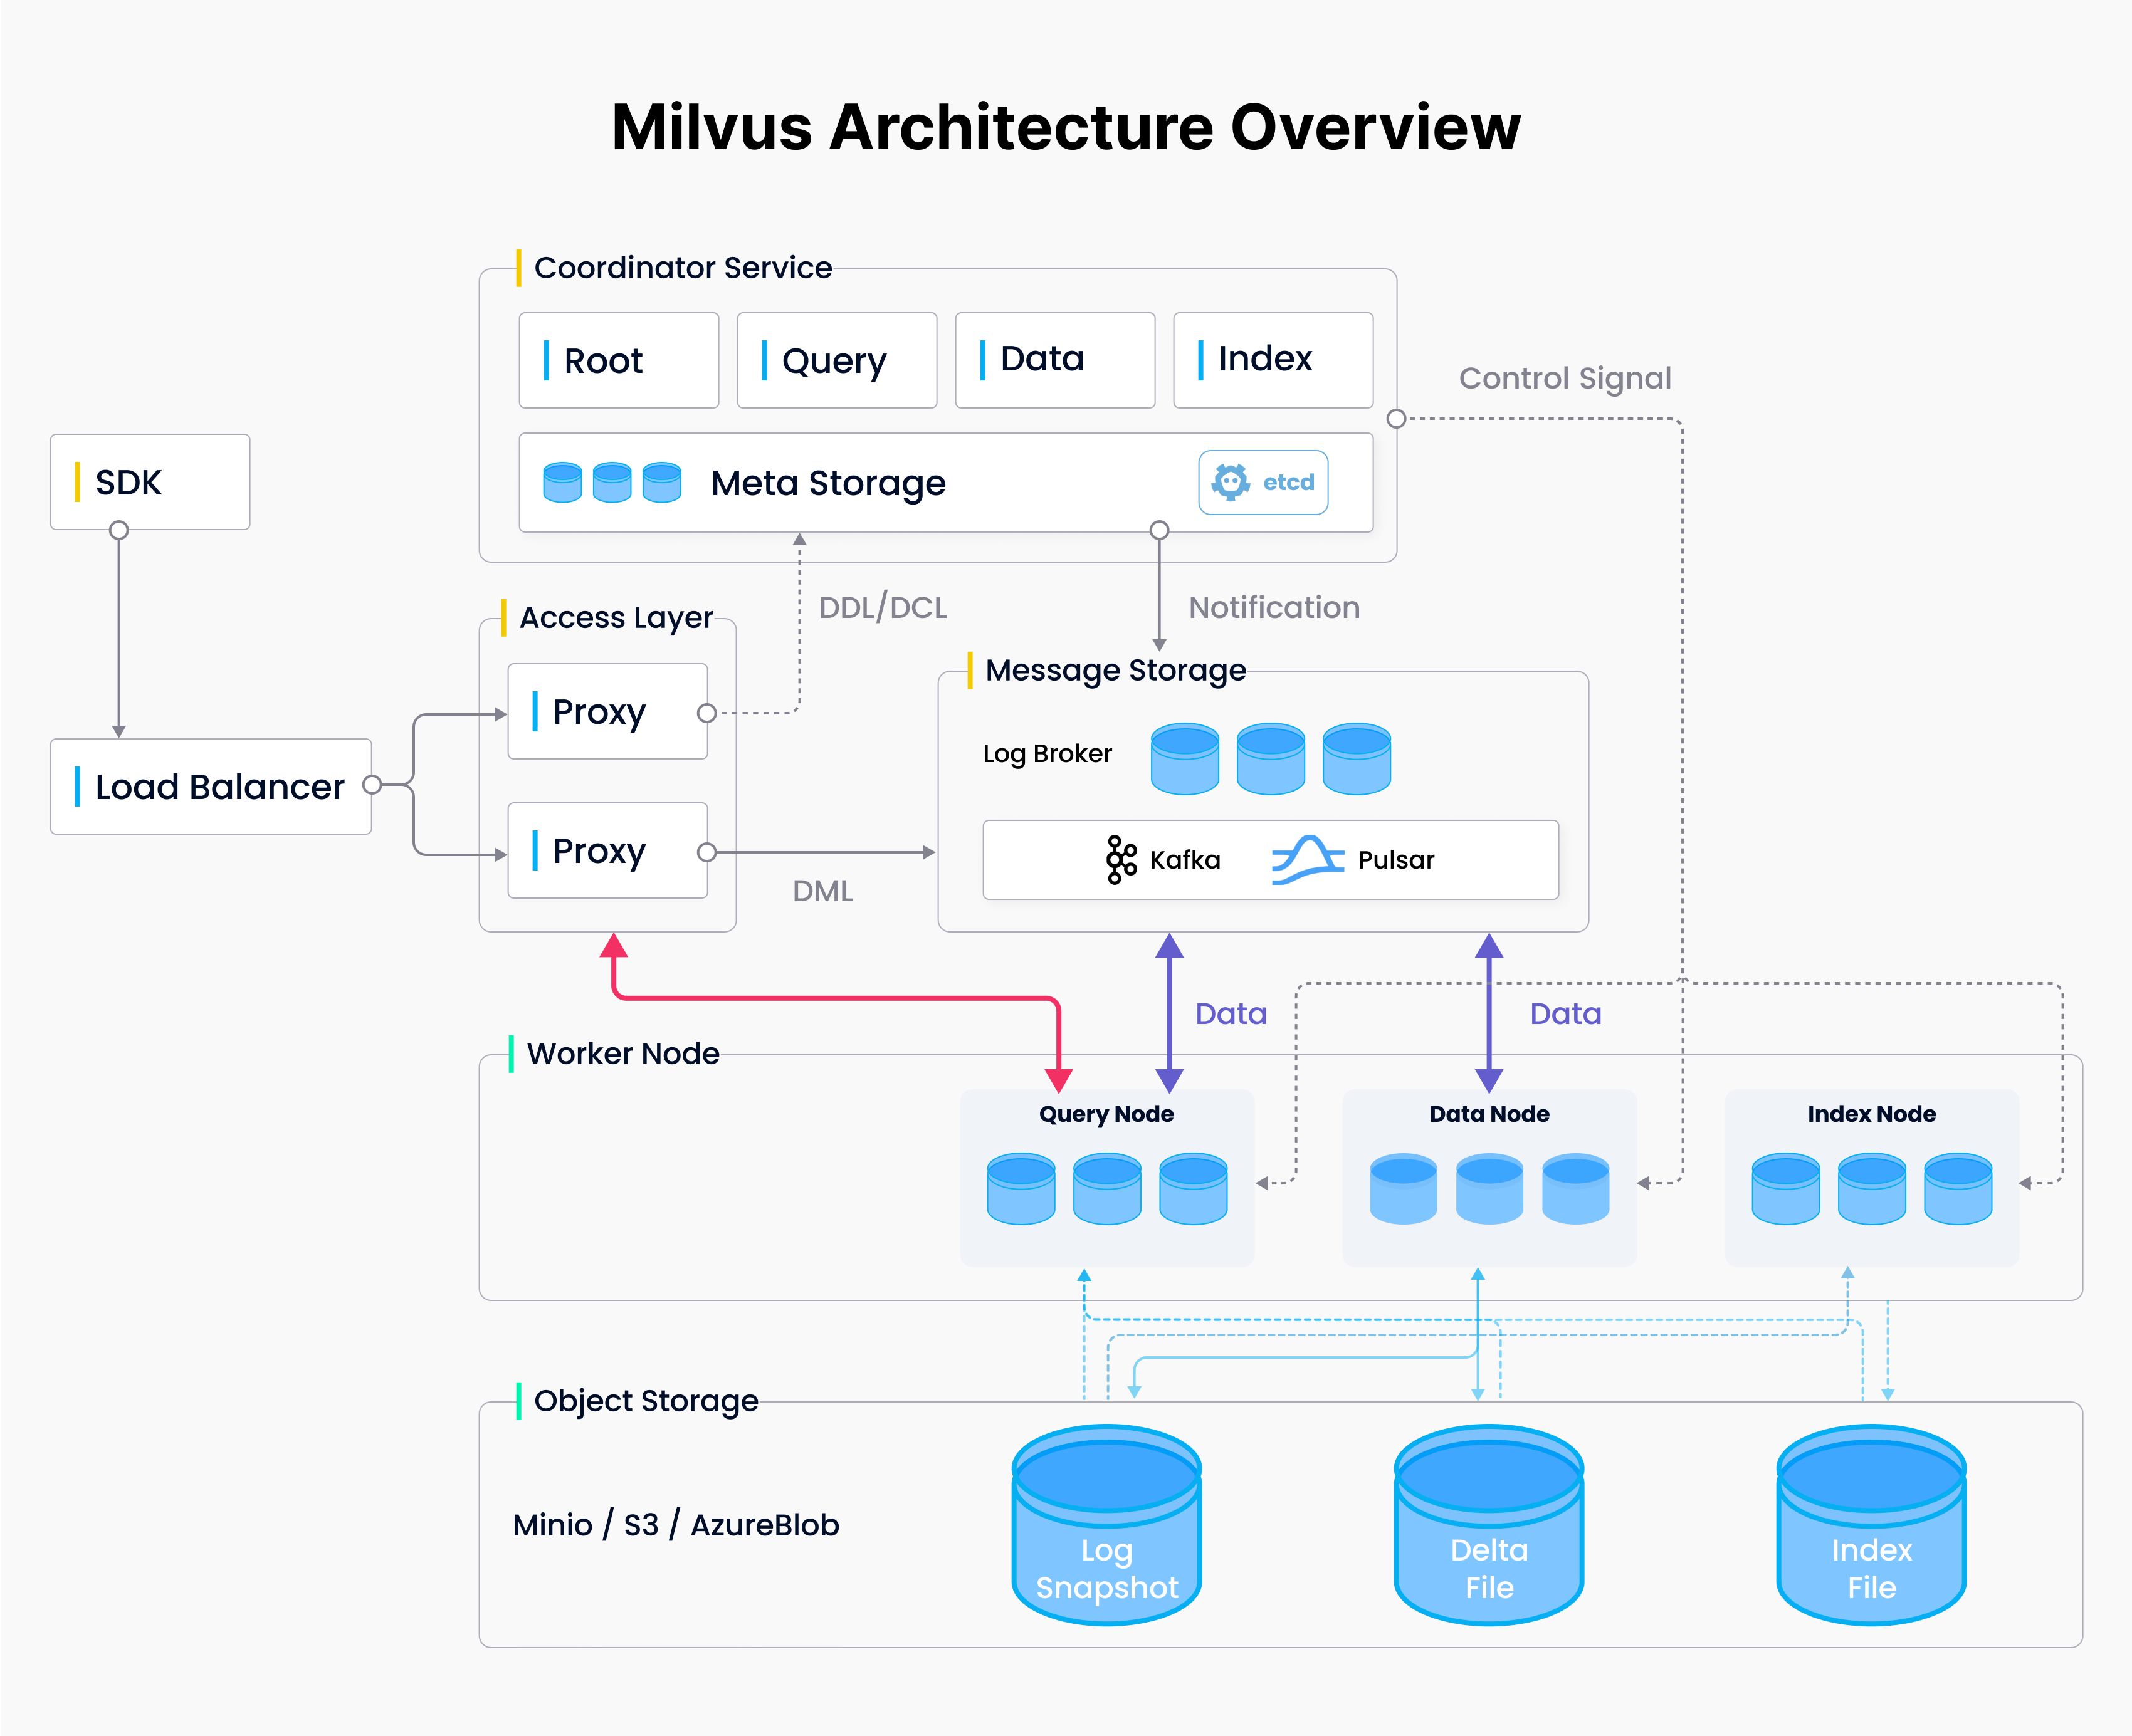
Milvus follows the principle of separating data flow and control flow. The system breaks down into four levels, as shown in the diagram:
 Milvus Architecture
Figure 2 Milvus Architecture
Access layer: The access layer is composed of a group of stateless proxies and serves as the system’s front layer and endpoint to users.
Coordinator service: The coordinator service assigns tasks to the worker nodes.
Worker nodes: The worker nodes are dumb executors that follow instructions from the coordinator service and execute user-triggered DML/DDL commands.
Storage: Storage is responsible for data persistence. It comprises a meta storage, log broker, and object storage.
Milvus Deployment Options
Milvus supports three running modes: Milvus Lite, Standalone, and Distributed.
Milvus Lite is a Python library that can be imported into local applications. As a lightweight version of Milvus, it is ideal for quick prototyping in Jupyter Notebooks or running on smart devices with limited resources.
Milvus Standalone is a single-machine server deployment. If you have a production workload but prefer not to use Kubernetes, running Milvus Standalone on a single machine with sufficient memory is a good option.
Milvus Distributed can be deployed on Kubernetes clusters. It supports larger datasets, higher availability, and scalability, and is more suitable for production environments.
Milvus is designed from the start to support Kubernetes, and can be easily deployed on AWS. We can use Amazon Elastic Kubernetes Service (Amazon EKS) as the managed Kubernetes, Amazon S3 as the Object Storage, Amazon Managed Streaming for Apache Kafka (Amazon MSK) as the Message storage, and Amazon Elastic Load Balancing (Amazon ELB) as the Load Balancer to build a reliable, elastic Milvus database cluster.
Next, we’ll provide step-by-step guidance on deploying a Milvus cluster using EKS and other services.
Deploying Milvus on AWS EKS
Prerequisites
We’ll use AWS CLI to create an EKS cluster and deploy a Milvus database. The following prerequisites are required:
A PC/Mac or Amazon EC2 instance with AWS CLI installed and configured with appropriate permissions. The AWS CLI tools are installed by default if you use Amazon Linux 2 or Amazon Linux 2023.
EKS tools installed, including Helm, Kubectl, eksctl, etc.
An Amazon S3 bucket.
An Amazon MSK instance.
Considerations when creating MSK
- The latest stable version of Milvus (v2.3.13) depends on Kafka’s
autoCreateTopicsfeature. So when creating MSK, we need to use a custom configuration and change theauto.create.topics.enableproperty from the defaultfalsetotrue. In addition, to increase the message throughput of MSK, it is recommended that the values ofmessage.max.bytesandreplica.fetch.max.bytesbe increased. See Custom MSK configurations for details.
auto.create.topics.enable=true
message.max.bytes=10485880
replica.fetch.max.bytes=20971760
- Milvus does not support MSK’s IAM role-based authentication. So, when creating MSK, enable
SASL/SCRAM authenticationoption in the security configuration, and configureusernameandpasswordin the AWS Secrets Manager. See Sign-in credentials authentication with AWS Secrets Manager for details.
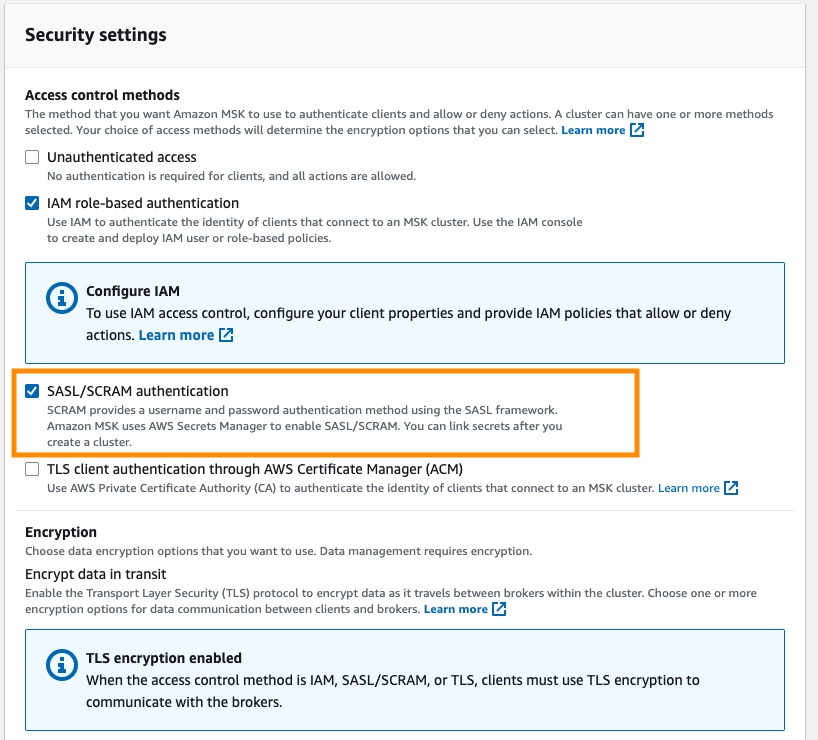 Figure 3 Security settings enable SASL SCRAM authentication.png
Figure 3: Security settings: enable SASL/SCRAM authentication
- We need to enable access to the MSK security group from the EKS cluster’s security group or IP address range.
Creating an EKS Cluster
There are many ways to create an EKS cluster, such as via the console, CloudFormation, eksctl, etc. This post will show how to create an EKS cluster using eksctl.
eksctl is a simple command-line tool for creating and managing Kubernetes clusters on Amazon EKS. It provides the fastest and easiest way to create a new cluster with nodes for Amazon EKS. See eksctl’s website for more information.
- First, create an
eks_cluster.yamlfile with the following code snippet. Replacecluster-namewith your cluster name, replaceregion-codewith the AWS region where you want to create the cluster and replaceprivate-subnet-idxwith your private subnets. Note: This configuration file creates an EKS cluster in an existing VPC by specifying private subnets. If you want to create a new VPC, remove the VPC and subnets configuration, and then theeksctlwill automatically create a new one.
apiVersion: eksctl.io/v1alpha5
kind: ClusterConfig

metadata:
 name: <cluster-name>
 region: <region-code>
 version: "1.26"

iam:
 withOIDC: true

 serviceAccounts:
 - metadata:
     name: aws-load-balancer-controller
     namespace: kube-system
   wellKnownPolicies:
     awsLoadBalancerController: true
 - metadata:
     name: milvus-s3-access-sa
     # if no namespace is set, "default" will be used;
     # the namespace will be created if it doesn't exist already
     namespace: milvus
     labels: {aws-usage: "milvus"}
   attachPolicyARNs:
   - "arn:aws:iam::aws:policy/AmazonS3FullAccess"

# Use existed VPC to create EKS.
# If you don't config vpc subnets, eksctl will automatically create a brand new VPC
vpc:
 subnets:
   private:
     us-west-2a: { id: <private-subnet-id1> }
     us-west-2b: { id: <private-subnet-id2> }
     us-west-2c: { id: <private-subnet-id3> }

managedNodeGroups:
 - name: ng-1-milvus
   labels: { role: milvus }
   instanceType: m6i.2xlarge
   desiredCapacity: 3
   privateNetworking: true

addons:
- name: vpc-cni # no version is specified so it deploys the default version
 attachPolicyARNs:
   - arn:aws:iam::aws:policy/AmazonEKS_CNI_Policy
- name: coredns
 version: latest # auto discovers the latest available
- name: kube-proxy
 version: latest
- name: aws-ebs-csi-driver
 wellKnownPolicies:      # add IAM and service account
   ebsCSIController: true
- Then, run the
eksctlcommand to create the EKS cluster.
eksctl create cluster -f eks_cluster.yaml
This command will create the following resources:
An EKS cluster with the specified version.
A managed node group with three m6i.2xlarge EC2 instances.
An IAM OIDC identity provider and a ServiceAccount called
aws-load-balancer-controller, which we will use later when installing the AWS Load Balancer Controller.A namespace
milvusand a ServiceAccountmilvus-s3-access-sawithin this namespace. This namespace will be used later when configuring S3 as the object storage for Milvus.Note: For simplicity, the
milvus-s3-access-sahere is granted full S3 access permissions. In production deployments, it’s recommended to follow the principle of least privilege and only grant access to the specific S3 bucket used for Milvus.Multiple add-ons, where
vpc-cni,coredns,kube-proxyare core add-ons required by EKS.aws-ebs-csi-driveris the AWS EBS CSI driver that allows EKS clusters to manage the lifecycle of Amazon EBS volumes.
Now, we just need to wait for the cluster creation to complete.
Wait for the cluster creation to complete. During the cluster creation process, the kubeconfig file will be automatically created or updated. You can also manually update it by running the following command. Make sure to replace region-code with the AWS region where your cluster is being created, and replace cluster-name with the name of your cluster.
aws eks update-kubeconfig --region <region-code> --name <cluster-name>
Once the cluster is created, you can view nodes by running:
kubectl get nodes -A -o wide
- Create a
ebs-scStorageClass configured with GP3 as the storage type, and set it as the default StorageClass. Milvus uses etcd as its Meta Storage and needs this StorageClass to create and manage PVCs.
cat <<EOF | kubectl apply -f -
apiVersion: storage.k8s.io/v1
kind: StorageClass
metadata:
 name: ebs-sc
 annotations:
   storageclass.kubernetes.io/is-default-class: "true"
provisioner: ebs.csi.aws.com
volumeBindingMode: WaitForFirstConsumer
parameters:
 type: gp3
EOF
Then, set the original gp2 StorageClass to non-default:
kubectl patch storageclass gp2 -p '{"metadata": {"annotations":{"storageclass.kubernetes.io/is-default-class":"false"}}}'
- Install the AWS Load Balancer Controller. We will use this controller later for the Milvus Service and Attu Ingress, so let’s install it beforehand.
- First, add the
eks-chartsrepo and update it.
helm repo add eks https://aws.github.io/eks-charts
helm repo update
- Next, install the AWS Load Balancer Controller. Replace
cluster-namewith your cluster name. The ServiceAccount namedaws-load-balancer-controllerwas already created when we created the EKS cluster in previous steps.
helm install aws-load-balancer-controller eks/aws-load-balancer-controller \
 -n kube-system \
 --set clusterName=<cluster-name> \
 --set serviceAccount.create=false \
 --set serviceAccount.name=aws-load-balancer-controller
- Verify if the controller was installed successfully.
kubectl get deployment -n kube-system aws-load-balancer-controller
- The output should look like:
NAME                           READY   UP-TO-DATE   AVAILABLE   AGE
aws-load-balancer-controller   2/2     2            2           12m
Deploying a Milvus Cluster
Milvus supports multiple deployment methods, such as Operator and Helm. Operator is simpler, but Helm is more direct and flexible. We’ll use Helm to deploy Milvus in this example.
When deploying Milvus with Helm, you can customize the configuration via the values.yaml file. Click values.yaml to view all the options. By default, Milvus creates in-cluster minio and pulsar as the Object Storage and Message Storage, respectively. We will make some configuration changes to make it more suitable for production.
- First, add the Milvus Helm repo and update it.
helm repo add milvus https://zilliztech.github.io/milvus-helm/
helm repo update
- Create a
milvus_cluster.yamlfile with the following code snippet. This code snippet customizes Milvus’s configuration, such as configuring Amazon S3 as the object storage and Amazon MSK as the message queue. We’ll provide detailed explanations and configuration guidance later.
#####################################
# Section 1
#
# Configure S3 as the Object Storage
#####################################

# Service account
# - this service account are used by External S3 access
serviceAccount:
  create: false
  name: milvus-s3-access-sa

# Close in-cluster minio
minio:
  enabled: false

# External S3
# - these configs are only used when `externalS3.enabled` is true
externalS3:
  enabled: true
  host: "s3.<region-code>.amazonaws.com"
  port: "443"
  useSSL: true
  bucketName: "<bucket-name>"
  rootPath: "<root-path>"
  useIAM: true
  cloudProvider: "aws"
  iamEndpoint: ""

#####################################
# Section 2
#
# Configure MSK as the Message Storage
#####################################

# Close in-cluster pulsar
pulsar:
  enabled: false

# External kafka
# - these configs are only used when `externalKafka.enabled` is true
externalKafka:
  enabled: true
  brokerList: "<broker-list>"
  securityProtocol: SASL_SSL
  sasl:
    mechanisms: SCRAM-SHA-512
    username: "<username>"
    password: "<password>"

#####################################
# Section 3
#
# Expose the Milvus service to be accessed from outside the cluster (LoadBalancer service).
# or access it from within the cluster (ClusterIP service). Set the service type and the port to serve it.
#####################################
service:
  type: LoadBalancer
  port: 19530
  annotations:
    service.beta.kubernetes.io/aws-load-balancer-type: external #AWS Load Balancer Controller fulfills services that has this annotation
    service.beta.kubernetes.io/aws-load-balancer-name : milvus-service #User defined name given to AWS Network Load Balancer
    service.beta.kubernetes.io/aws-load-balancer-scheme: internal # internal or internet-facing, later allowing for public access via internet
    service.beta.kubernetes.io/aws-load-balancer-nlb-target-type: ip #The Pod IPs should be used as the target IPs (rather than the node IPs)

#####################################
# Section 4
#
# Installing Attu the Milvus management GUI
#####################################
attu:
  enabled: true
  name: attu
  ingress:
    enabled: true
    annotations:
      kubernetes.io/ingress.class: alb # Annotation: set ALB ingress type
      alb.ingress.kubernetes.io/scheme: internet-facing #Places the load balancer on public subnets
      alb.ingress.kubernetes.io/target-type: ip #The Pod IPs should be used as the target IPs (rather than the node IPs)
      alb.ingress.kubernetes.io/group.name: attu # Groups multiple Ingress resources
    hosts:
      -

#####################################
# Section 5
#
# HA deployment of Milvus Core Components
#####################################
rootCoordinator:
  replicas: 2
  activeStandby:
    enabled: true  # Enable active-standby when you set multiple replicas for root coordinator
  resources:
    limits:
      cpu: 1
      memory: 2Gi
indexCoordinator:
  replicas: 2
  activeStandby:
    enabled: true  # Enable active-standby when you set multiple replicas for index coordinator
  resources:
    limits:
      cpu: "0.5"
      memory: 0.5Gi
queryCoordinator:
  replicas: 2
  activeStandby:
    enabled: true  # Enable active-standby when you set multiple replicas for query coordinator
  resources:
    limits:
      cpu: "0.5"
      memory: 0.5Gi
dataCoordinator:
  replicas: 2
  activeStandby:
    enabled: true  # Enable active-standby when you set multiple replicas for data coordinator
  resources:
    limits:
      cpu: "0.5"
      memory: 0.5Gi
proxy:
  replicas: 2
  resources:
    limits:
      cpu: 1
      memory: 4Gi

#####################################
# Section 6
#
# Milvus Resource Allocation
#####################################
queryNode:
  replicas: 1
  resources:
    limits:
      cpu: 2
      memory: 8Gi
dataNode:
  replicas: 1
  resources:
    limits:
      cpu: 1
      memory: 4Gi
indexNode:
  replicas: 1
  resources:
    limits:
      cpu: 4
      memory: 8Gi
The code contains six sections. Follow the following instructions to change the corresponding configurations.
Section 1: Configure S3 as Object Storage. The serviceAccount grants Milvus access to S3 (in this case, it is milvus-s3-access-sa, which was created when we created the EKS cluster). Make sure to replace <region-code> with the AWS region where your cluster is located. Replace <bucket-name> with the name of your S3 bucket and <root-path> with the prefix for the S3 bucket (this field can be left empty).
Section 2: Configure MSK as Message Storage. Replace <broker-list> with the endpoint addresses corresponding to the SASL/SCRAM authentication type of MSK. Replace <username> and <password> with the MSK account username and password. You can get the <broker-list> from MSK client information, as shown in the image below.
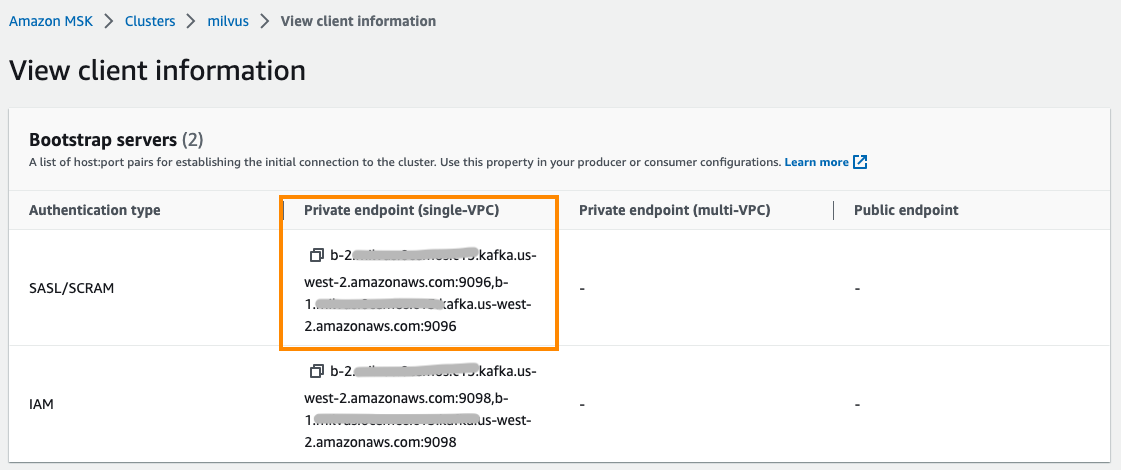 Figure 4 Configure MSK as the Message Storage of Milvus.png
Figure 4: Configure MSK as the Message Storage of Milvus
Section 3: Expose Milvus service and enable access from outside the cluster. Milvus endpoint used ClusterIP type service by default, which is only accessible within the EKS cluster. If needed, you can change it to LoadBalancer type to allow access from outside the EKS cluster. The LoadBalancer type Service uses Amazon NLB as the load balancer. According to security best practices, aws-load-balancer-scheme is configured as internal mode by default here, which means only intranet access to Milvus is allowed. Click to view the NLB configuration instructions.
Section 4: Install and configure Attu, an open-source milvus administration tool. It has an intuitive GUI that allows you to easily interact with Milvus. We enable Attu, configure ingress using AWS ALB, and set it to internet-facing type so that Attu can be accessed via the Internet. Click this document for the guide to ALB configuration.
Section 5: Enable HA deployment of Milvus Core Components. Milvus contains multiple independent and decoupled components. For example, the coordinator service acts as the control layer, handling coordination for the Root, Query, Data, and Index components. The Proxy in the access layer serves as the database access endpoint. These components default to only 1 pod replica. Deploying multiple replicas of these service components is especially necessary to improve Milvus availability.
Note: The multi-replica deployment of the Root, Query, Data, and Index coordinator components requires the activeStandby option enabled.
Section 6: Adjust resource allocation for Milvus components to meet your workloads’ requirements. The Milvus website also provides a sizing tool to generate configuration suggestions based on data volume, vector dimensions, index types, etc. It can also generate a Helm configuration file with just one click. The following configuration is the suggestion given by the tool for 1 million 1024 dimensions vectors and HNSW index type.
- Use Helm to create Milvus (deployed in namespace
milvus). Note: You can replace<demo>with a custom name.
helm install <demo> milvus/milvus -n milvus -f milvus_cluster.yaml
- Run the following command to check the deployment status.
kubectl get deployment -n milvus
The following output shows that Milvus components are all AVAILABLE, and coordination components have multiple replicas enabled.
NAME                     READY   UP-TO-DATE   AVAILABLE   AGE
demo-milvus-attu         1/1     1            1           5m27s
demo-milvus-datacoord    2/2     2            2           5m27s
demo-milvus-datanode     1/1     1            1           5m27s
demo-milvus-indexcoord   2/2     2            2           5m27s
demo-milvus-indexnode    1/1     1            1           5m27s
demo-milvus-proxy        2/2     2            2           5m27s
demo-milvus-querycoord   2/2     2            2           5m27s
demo-milvus-querynode    1/1     1            1           5m27s
demo-milvus-rootcoord    2/2     2            2           5m27s
Accessing and Managing Milvus
So far, we have successfully deployed the Milvus vector database. Now, we can access Milvus through endpoints. Milvus exposes endpoints via Kubernetes services. Attu exposes endpoints via Kubernetes Ingress.
Accessing Milvus endpoints
Run the following command to get service endpoints:
kubectl get svc -n milvus
You can view several services. Milvus supports two ports, port 19530 and port 9091:
- Port
19530is for gRPC and RESTful API. It is the default port when you connect to a Milvus server with different Milvus SDKs or HTTP clients. - Port
9091is a management port for metrics collection, pprof profiling, and health probes within Kubernetes.
The demo-milvus service provides a database access endpoint, which is used to establish a connection from clients. It uses NLB as the service load balancer. You can get the service endpoint from the EXTERNAL-IP column.
NAME                     TYPE           CLUSTER-IP       EXTERNAL-IP                                               PORT(S)                          AGE
demo-etcd                ClusterIP      172.20.103.138   <none>                                                    2379/TCP,2380/TCP                62m
demo-etcd-headless       ClusterIP      None             <none>                                                    2379/TCP,2380/TCP                62m
demo-milvus              LoadBalancer   172.20.219.33    milvus-nlb-xxxx.elb.us-west-2.amazonaws.com               19530:31201/TCP,9091:31088/TCP   62m
demo-milvus-datacoord    ClusterIP      172.20.214.106   <none>                                                    13333/TCP,9091/TCP               62m
demo-milvus-datanode     ClusterIP      None             <none>                                                    9091/TCP                         62m
demo-milvus-indexcoord   ClusterIP      172.20.106.51    <none>                                                    31000/TCP,9091/TCP               62m
demo-milvus-indexnode    ClusterIP      None             <none>                                                    9091/TCP                         62m
demo-milvus-querycoord   ClusterIP      172.20.136.213   <none>                                                    19531/TCP,9091/TCP               62m
demo-milvus-querynode    ClusterIP      None             <none>                                                    9091/TCP                         62m
demo-milvus-rootcoord    ClusterIP      172.20.173.98    <none>                                                    53100/TCP,9091/TCP               62m
Managing Milvus using Attu
As described before, we have installed Attu to manage Milvus. Run the following command to get the endpoint:
kubectl get ingress -n milvus
You can see an Ingress called demo-milvus-attu, where the ADDRESS column is the access URL.
NAME            CLASS   HOSTS   ADDRESS                                     PORTS   AGE
demo-milvus-attu   <none>   *       k8s-attu-xxxx.us-west-2.elb.amazonaws.com   80      27s
Open the Ingress address in a browser and see the following page. Click Connect to log in.
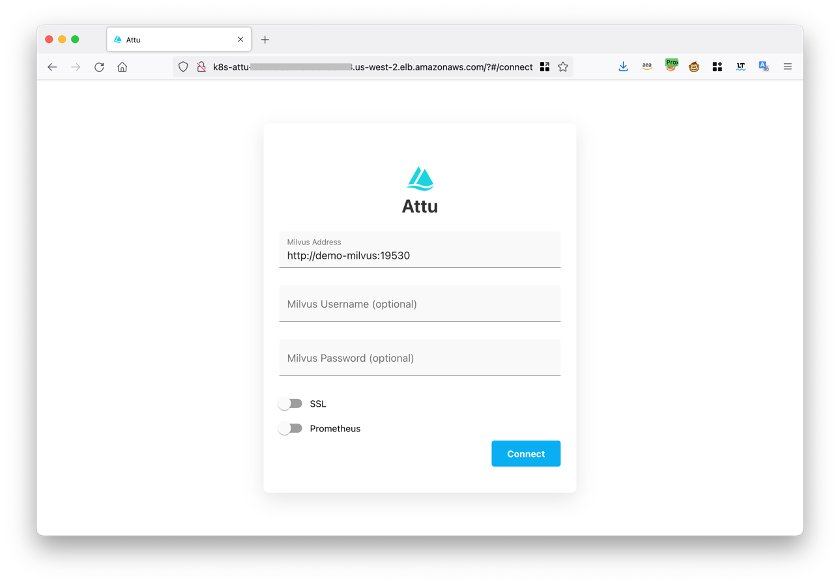 Figure 5 Log in to your Attu account.png
Figure 5: Log in to your Attu account
After logging in, you can manage Milvus databases through Attu.
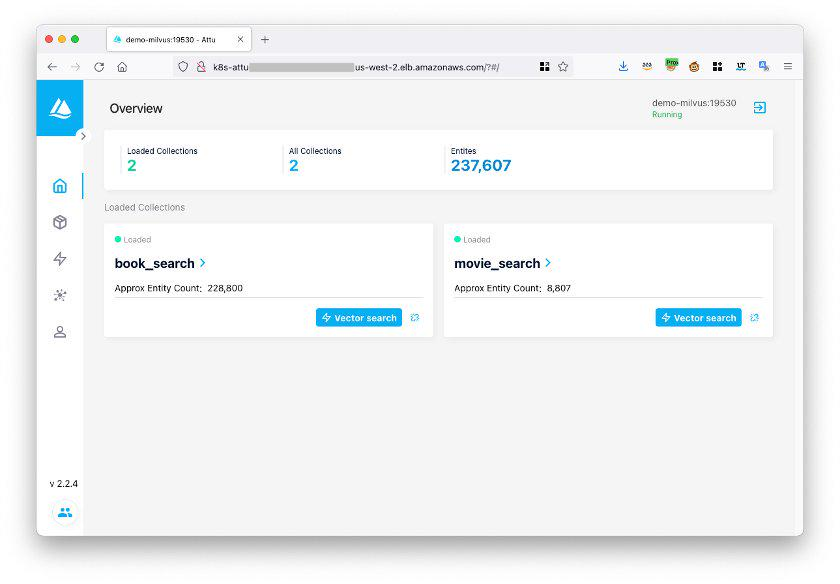 Figure 6 The Attu interface.png
Figure 6: The Attu interface
Testing the Milvus vector database
We will use the Milvus example code to test if the Milvus database is working properly. First, download the hello_milvus.py example code using the following command:
wget https://raw.githubusercontent.com/milvus-io/pymilvus/master/examples/hello_milvus.py
Modify the host in the example code to the Milvus service endpoint.
print(fmt.format("start connecting to Milvus"))
connections.connect("default", host="milvus-nlb-xxx.elb.us-west-2.amazonaws.com", port="19530")
Run the code:
python3 hello_milvus.py
If the system returns the following result, then it indicates that Milvus is running normally.
=== start connecting to Milvus     ===
Does collection hello_milvus exist in Milvus: False
=== Create collection `hello_milvus` ===
=== Start inserting entities       ===
Number of entities in Milvus: 3000
=== Start Creating index IVF_FLAT  ===
=== Start loading                  ===
Conclusion
This post introduces Milvus, one of the most popular open-source vector databases, and provides a guide on deploying Milvus on AWS using managed services such as Amazon EKS, S3, MSK, and ELB to achieve greater elasticity and reliability.
As a core component of various GenAI systems, particularly Retrieval Augmented Generation (RAG), Milvus supports and integrates with a variety of mainstream GenAI models and frameworks, including Amazon Sagemaker, PyTorch, HuggingFace, LlamaIndex, and LangChain. Start your GenAI innovation journey with Milvus today!
References
- An Overview of Vector Embeddings and Vector Databases
- What is Milvus?
- Deploying Milvus on AWS EKS
- Testing the Milvus vector database
- Conclusion
- References
On This Page
Try Managed Milvus for Free
Zilliz Cloud is hassle-free, powered by Milvus and 10x faster.
Get StartedLike the article? Spread the word