

Create an External CollectionCompatible with Milvus 3.0.x
An external collection is a type of data collection in Milvus that accesses data from external storage systems or database tables such as AWS S3 and Iceberg without copying it into Milvus. It acts as a query layer over data lakes while maintaining compatibility with Milvus query interfaces.
Overview
In a typical AI data pipeline, users may already have stored their data in Parquet or other formats on their storage system, such as AWS S3. To make Milvus consume this externally stored data, users usually need to import it into Milvus’ own storage using Extract-Transform-Load (ETL) pipelines.
This bring-your-data-to-Milvus workflow creates redundant data that is hard to synchronize and adds to the engineering maintenance burden to ensure data consistency.
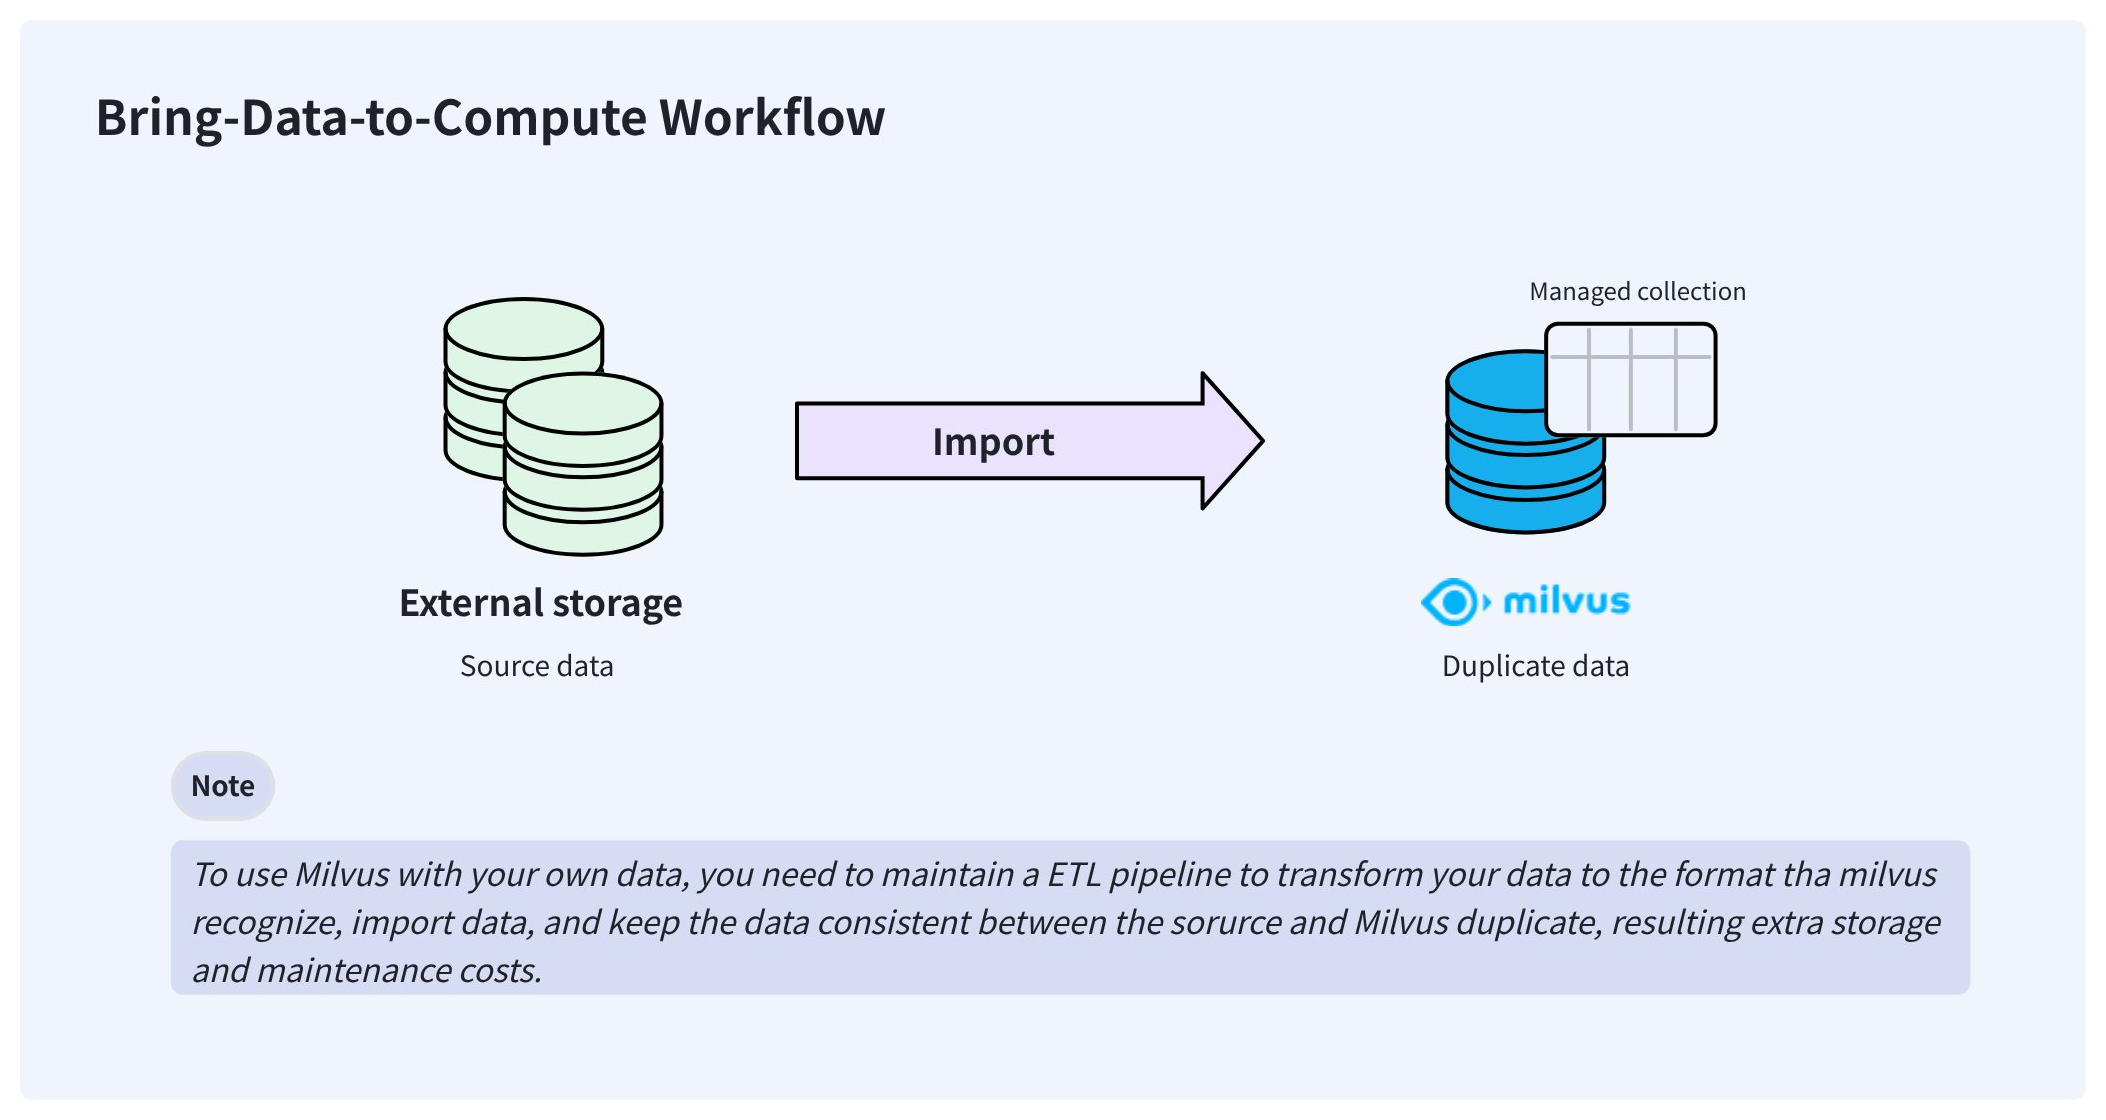 Bring data to compute workflow
To resolve these issues, Milvus delivers external collections that let you access your externally stored data from Milvus without worrying about data synchronization and ETL pipelines.
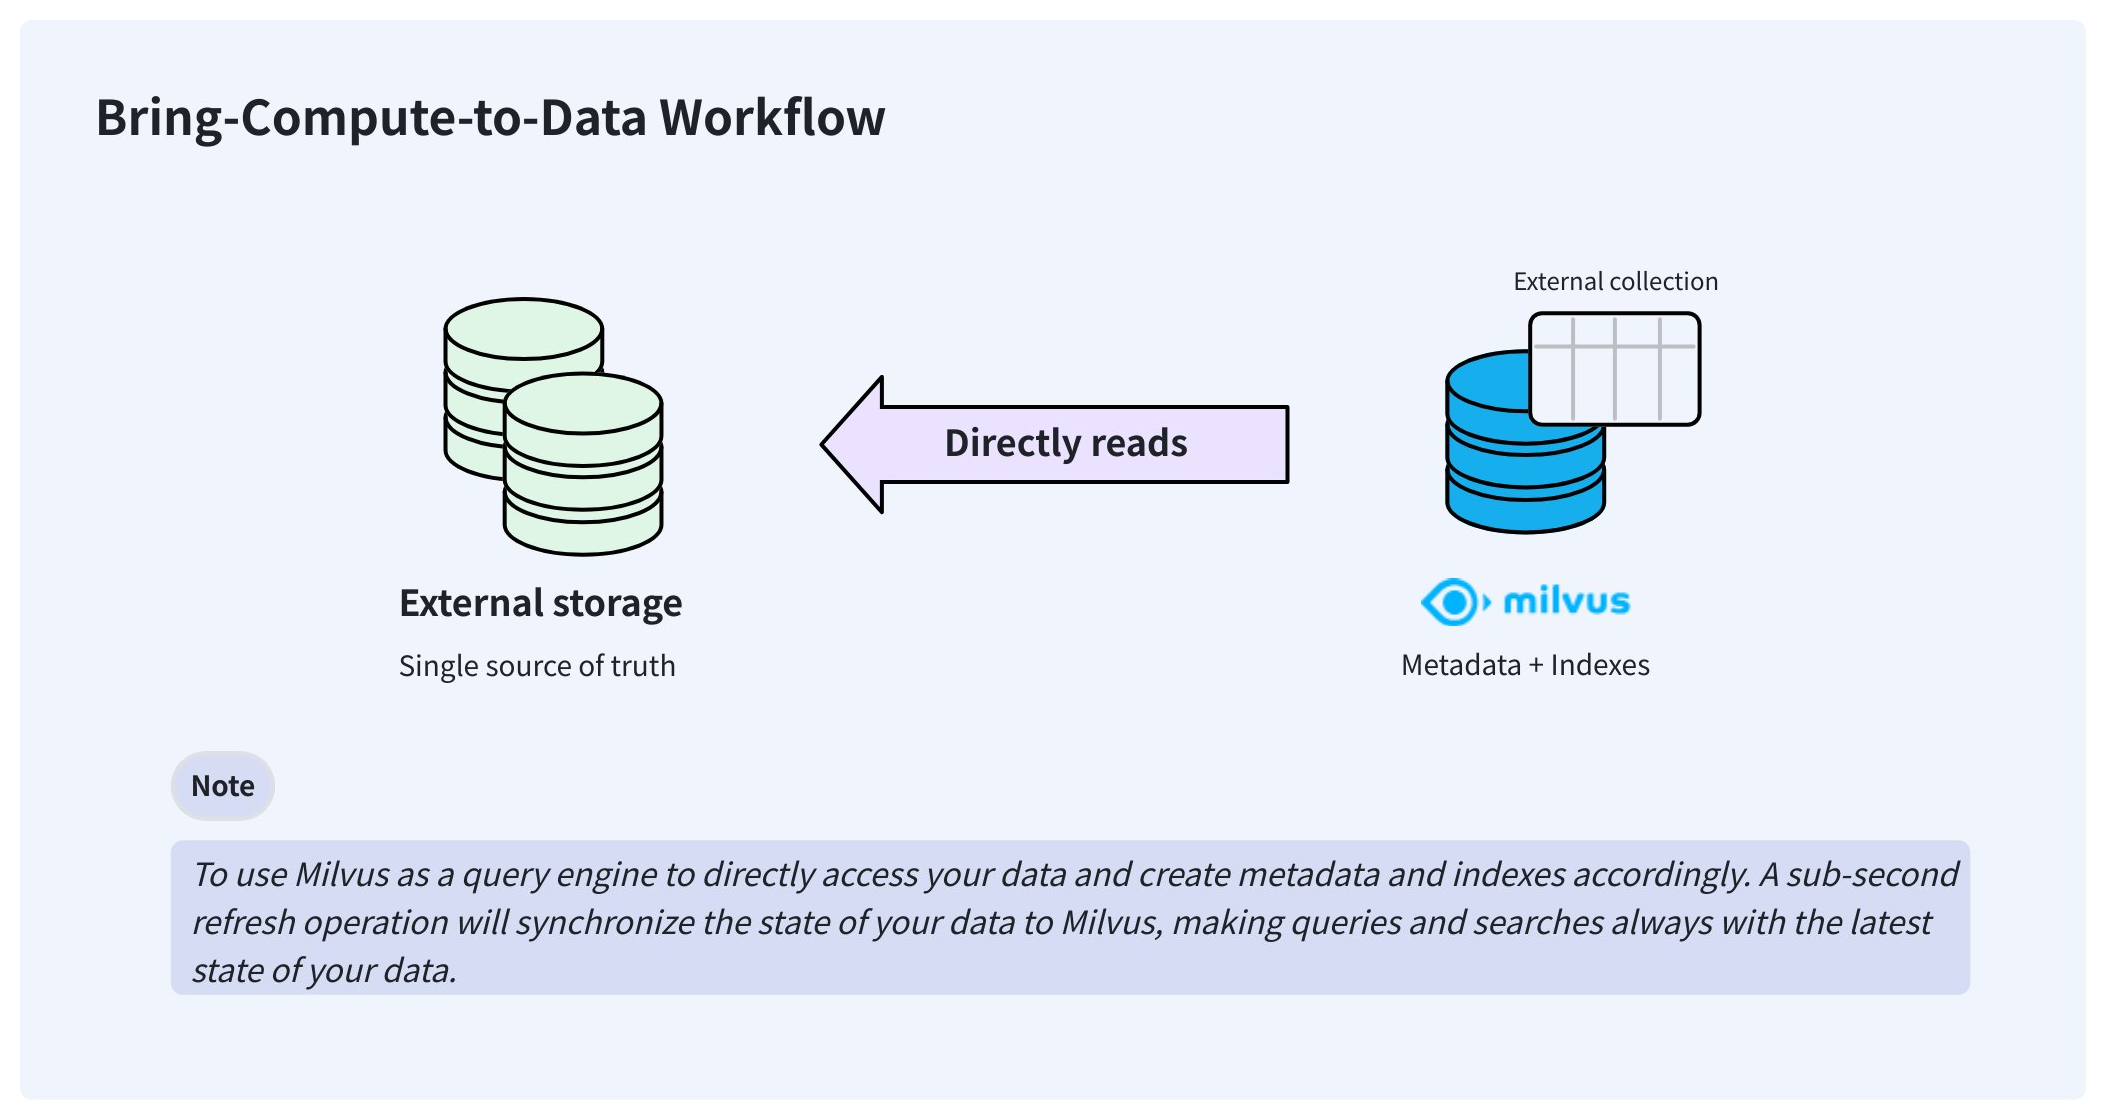 Bring compute to data workflow
Once created, an external collection can access your data directly and keep it in the same place where you store it. In the background, Milvus creates manifest files to record the mappings between the Milvus metadata and the rows in external data files. After the manifest files are ready, you can create indexes in the external collection as you would in any managed collection.
When your data changes, manually triggering a sub-second refresh updates the metadata, keeping Milvus always up to date.
Step 1: Create schema
As with creating a managed collection, you also need to create a schema before creating an external collection. However, the schema is slightly different from that of a managed collection.
from pymilvus import MilvusClient, DataType

schema = MilvusClient.create_schema(
    external_source='s3://s3.<region-id>.amazonaws.com/<bucket>/',
    external_spec='{
        "format": "parquet",
        "extfs": {
            ...
        }
    }'
)
import com.google.gson.JsonObject;
import io.milvus.v2.service.collection.request.CreateCollectionReq;

JsonObject externalSpec = new JsonObject();
externalSpec.addProperty("format", "parquet");
externalSpec.add("extfs", new JsonObject());

CreateCollectionReq.CollectionSchema schema = CreateCollectionReq.CollectionSchema.builder()
        .externalSource("s3://s3.<region-id>.amazonaws.com/<bucket>/")
        .externalSpec(externalSpec)
        .build();
import (
    "github.com/milvus-io/milvus/client/v2/entity"
    client "github.com/milvus-io/milvus/client/v2/milvusclient"
)

schema := entity.NewSchema().
    WithName("product_embeddings").
    WithExternalSource("s3://my-bucket/embeddings/").
    WithExternalSpec(`{"format": "parquet", "extfs": { ... }}`)
// node
export fields='[
        {
            "fieldName": "product_id",
            "dataType": "Int64",
            "isPrimary": true
        },
        {
            "fieldName": "embedding",
            "dataType": "FloatVector",
            "elementTypeParams": {
                "dim": "768"
            }
        },
        {
            "fieldName": "product_name",
            "dataType": "VarChar",
            "elementTypeParams": {
                "max_length": 512
            }
        }
    ]'
To create the schema for an external collection, you need to specify the source data URI, the data format, and authentication settings.
Parameter Name |
Parameter Description |
Example Value |
|---|---|---|
|
Format of the target source data files. |
|
|
A valid Iceberg table snapshot ID. This parameter applies only when you set |
|
|
External file system settings in a stringified JSON structure. |
-- |
You have the following options to set the authentication settings:
Use AWS AK/SK
This option applies to self-hosted MinIO or the scenario where you have AK/SK for work.
{
    "format": "...",
    "extfs": {
        "access_key_id":     "AKIA..",
        "access_key_value":  "u4Lh...",
        "region":            "us-west-2",
        "cloud_provider":    "aws",
        "use_ssl":           "true",
        "use_virtual_host":  "true"
    }
}
Parameter Name |
Parameter Description |
Example Value |
|---|---|---|
|
Access key ID |
|
|
Access key value |
|
|
Cloud region ID |
|
|
Cloud provider ID |
|
|
Whether SSL is used to establish connections. |
|
|
Whether to use virtual hosting for access to your bucket. For details, refer to this article. |
|
Use AWS IAM
This option applies to the scenario where Milvus runs on an EC2 instance or an EKS cluster. In this case, you do not need to hardcode the AK/SK.
{
    "format": "...",
    "extfs": {
        "use_iam":           "true",
        "iam_endpoint":      "https://sts.<region>.amazonaws.com",
        "region":            "us-west-2",
        "cloud_provider":    "aws",
        "use_ssl":           "true"
    }
}
Parameter Name |
Parameter Description |
Example Value |
|---|---|---|
|
Whether to use AWS IAM. Set this to |
|
|
A valid AWS STS endpoint. For details, refer to this article. |
|
|
Cloud region ID |
|
|
Cloud provider ID |
|
|
Whether SSL is used to establish connections. |
|
Use Milvus global credentials
This option applies when you store external data in the Milvus bucket, and the global MinIO settings specified in milvus.yaml can be used directly to access the data.
{
    "format": "...",
    "extfs": {
        "storage_type": "remote"
    }
}
Use IAM Role ARN
This option applies when your organization uses different AWS accounts to manage the Milvus cluster and the bucket that holds the target data files.
In this case, the bucket owner should create an IAM role that
Attaches
AmazonS3FullAccessor a more fine-grained policy for bucket access.Includes a self-defined
sts:ExternalIdin the Condition field of the role’s Trust Policy.
Then, the bucket owner should provide you with the IAM role ARN and the External ID so you can call sts:AssumeRole with those values to assume the IAM Role.
The following is an example permission policy to be attached to the IAM role with the allowed permissions. You can adjust this to meet your requirements.
{
    "Version": "2012-10-17",
    "Statement": [
        {
            "Effect": "Allow",
            "Action": [
                "s3:ListBucket",
                "s3:GetBucketLocation"
            ],
            "Resource": "arn:aws:s3:::SOURCE-DATA-BUCKET"
        },
        {
            "Effect": "Allow",
            "Action": [
                "s3:GetObject",
                "s3:PutObject",
                "s3:DeleteObject"
            ],
            "Resource": "arn:aws:s3:::SOURCE-DATA-BUCKET/*"
        }
    ]
}
And the trust policy associated with the IAM role defines who is allowed to assume it.
{
  "Version": "2012-10-17",
  "Statement": [
    {
      "Effect": "Allow",
      "Principal": {
        "AWS": "arn:aws:iam::ACCOUNT_RUNNING_MILVUS:root"
      },
      "Action": "sts:AssumeRole",
      "Condition": {
        "StringEquals": {
          "sts:ExternalId": "YOUR_UNIQUE_EXTERNAL_ID"
        }
      }
    }
  ]
}
Once you have obtained the IAM Role ARN and the External ID, you can set up the external_spec parameter as follows:
{
    "format": "...",
    "extfs": {
        "cloud_provider": "aws",
        "region": "us-west-2",
        "storage_type": "remote",
        "use_ssl": "true",
        "use_iam": "true",
        "role_arn": "arn:aws:iam::306787000000:role/lentitude-bucket-role",
        "external_id": "YOUR_UNIQUE_EXTERNAL_ID",
        "load_frequency": "900"
    }
}
Parameter Name |
Parameter Description |
Example Value |
|---|---|---|
|
Cloud provider ID |
|
|
Cloud region ID |
|
|
Whether SSL is used to establish connections. |
|
|
Whether to use AWS IAM. Set this to |
|
|
IAM Role ARN obtained from the bucket owner. |
|
|
External ID obtained from the bucket owner. |
-- |
|
Interval at which Milvus retrieves temporary authentication credentials in seconds. |
|
Step 2: Add fields
Once the schema is ready, you can add fields as follows:
schema.add_field(
    field_name="product_id",
    datatype=DataType.INT64,
    # highlight-next
    external_field="id" # field name in the external data file
)
schema.add_field(
    field_name="product_name",
    datatype=DataType.VARCHAR,
    max_length=512,
    # highlight-next
    external_field="name"
)
schema.add_field(
    field_name="embedding",
    datatype=DataType.FLOAT_VECTOR,
    dim=768,
    # highlight-next
    external_field="vector"
)
import io.milvus.v2.common.DataType;
import io.milvus.v2.service.collection.request.AddFieldReq;

schema.addField(AddFieldReq.builder()
        .fieldName("product_id")
        .dataType(DataType.Int64)
        .externalField("id")
        .build());
schema.addField(AddFieldReq.builder()
        .fieldName("product_name")
        .dataType(DataType.VarChar)
        .maxLength(512)
        .externalField("name")
        .build());
schema.addField(AddFieldReq.builder()
        .fieldName("embedding")
        .dataType(DataType.FloatVector)
        .dimension(768)
        .externalField("vector")
        .build());
import (
    "github.com/milvus-io/milvus/client/v2/entity"
    client "github.com/milvus-io/milvus/client/v2/milvusclient"
)

schema = schema.
    WithField(
        entity.NewField().
            WithName("product_id").
            WithDataType(entity.FieldTypeInt64).
            WithExternalField("id"),
    ).
    WithField(
        entity.NewField().
            WithName("product_name").
            WithDataType(entity.FieldTypeVarChar).
            WithMaxLength(512).
            WithExternalField("name"),
    ).
    WithField(
        entity.NewField().
            WithName("embedding").
            WithDataType(entity.FieldTypeFloatVector).
            WithDim(768).
            WithExternalField("vector"),
    )
// node
export schema="{
    \"externalSource\": \"volume://my_volume/path/to/a/folder\",
    \"externalSpec\": \"{\\\"format\\\": \\\"parquet\\\"}\",
    \"fields\": $fields
}"
Step 3: Create a collection
After adding all the fields to the schema, you can create the external collection.
client = MilvusClient(
    uri="http://localhost:19530",
    token="root:Milvus"
)

client.create_collection(
    collection_name="test_collection",
    schema=schema
)
import io.milvus.v2.client.ConnectConfig;
import io.milvus.v2.client.MilvusClientV2;

ConnectConfig connectConfig = ConnectConfig.builder()
        .uri("http://localhost:19530")
        .token("root:Milvus")
        .build();

MilvusClientV2 client = new MilvusClientV2(connectConfig);

CreateCollectionReq createReq = CreateCollectionReq.builder()
        .collectionName("test_collection")
        .collectionSchema(schema)
        .build();
client.createCollection(createReq);
import (
    "github.com/milvus-io/milvus/client/v2/entity"
    client "github.com/milvus-io/milvus/client/v2/milvusclient"
)

ctx, cancel := context.WithCancel(context.Background())
defer cancel()

milvusAddr := "http://localhost:19530"
token := "root:Milvus"

client, err := milvusclient.New(ctx, &milvusclient.ClientConfig{
    Address: milvusAddr,
    APIKey: token
})

err = client.CreateCollection(ctx, milvusclient.NewCreateCollectionOption("test_collection", schema))

if err != nil {
    fmt.Println(err.Error())
    // handle error
}
// node
curl --request POST \
--url "${PROJECT_ENDPOINT}/v2/vectordb/collections/create" \
--header "Authorization: Bearer ${TOKEN}" \
--header "Content-Type: application/json" \
--header "Request-Timeout: 10" \
-d "{
    \"dbName\": \"my_database\",
    \"collectionName\": \"test_collection\",
    \"schema\": $schema
}"
Step 4: Create indexes
You can create indexes for external collection columns as you do in managed collections.
index_params = client.prepare_index_params()
# Add indexes
index_params.add_index(
    field_name="embedding",
    index_type="AUTOINDEX",
    metric_type="COSINE"
)
index_params.add_index(
    field_name="product_name",
    index_type="AUTOINDEX"
)
client.create_index(
    db_name="my_database",
    collection_name="test_collection",
    index_params=index_params
)
import io.milvus.v2.common.IndexParam;
import io.milvus.v2.service.index.request.CreateIndexReq;
import java.util.*;

IndexParam indexParamForIdField = IndexParam.builder()
        .fieldName("product_name")
        .indexType(IndexParam.IndexType.AUTOINDEX)
        .build();
IndexParam indexParamForVectorField = IndexParam.builder()
        .fieldName("embedding")
        .indexType(IndexParam.IndexType.AUTOINDEX)
        .metricType(IndexParam.MetricType.COSINE)
        .build();
List<IndexParam> indexParams = new ArrayList<>();
indexParams.add(indexParamForIdField);
indexParams.add(indexParamForVectorField);
CreateIndexReq createIndexReq = CreateIndexReq.builder()
        .dbName("my_database")
        .collectionName("test_collection")
        .indexParams(indexParams)
        .build();
client.createIndex(createIndexReq);
import (
    "github.com/milvus-io/milvus/client/v2/entity"
    "github.com/milvus-io/milvus/client/v2/index"
    "github.com/milvus-io/milvus/client/v2/milvusclient"
)

collectionName := "test_collection"
indexOptions := []milvusclient.CreateIndexOption{
    milvusclient.NewCreateIndexOption(collectionName, "embedding", index.NewAutoIndex(entity.COSINE)),
    milvusclient.NewCreateIndexOption(collectionName, "product_name", index.NewAutoIndex(index.AUTOINDEX)),
}
indexTask, err := client.CreateIndex(ctx, indexOptions)
if err != nil {
    // handler err
}
err = indexTask.Await(ctx)
if err != nil {
    // handler err
}
client.createIndex({
    db_name: "my_database",
    collection_name: "test_collection",
    field_name: "product_name",
    index_type: "AUTOINDEX"
})
client.createIndex({
    db_name: "my_database",
    collection_name: "test_collection",
    field_name: "embedding",
    index_type: "AUTOINDEX",
    metric_type: "COSINE"
})
export indexParams='[
        {
            "fieldName": "embedding",
            "indexName": "my_vector",
            "indexType": "AUTOINDEX"
        },
        {
            "fieldName": "product_name",
            "indexName": "my_id",
            "indexType": "AUTOINDEX"
        }
    ]'

curl --request POST \
--url "${PROJECT_ENDPOINT}/v2/vectordb/indexes/create" \
--header "Authorization: Bearer ${TOKEN}" \
--header "Content-Type: application/json" \
--header "Request-Timeout: 10" \
-d "{
    \"dbName\": \"my_database\",
    \"collectionName\": \"test_collection\",
    \"indexParams\": $indexParams
}"
Step 5: Refresh data
Once the collection is ready, refresh it to create the metadata and indexes for your data.
job_id = client.refresh_external_collection(
    db_name="my_database",
    collection_name="test_collection"
)
while True:
    progress = client.get_refresh_external_collection_progress(job_id=job_id)
    print(f"  {progress.state}: {progress.progress}%")
    if progress.state == "RefreshCompleted":
        elapsed = progress.end_time - progress.start_time
        print(f"  Completed in {elapsed}ms")
        break
    elif progress.state == "RefreshFailed":
        print(f"  Failed: {progress.reason}")
        break
    time.sleep(2)
import io.milvus.v2.service.utility.request.GetRefreshExternalCollectionProgressReq;
import io.milvus.v2.service.utility.request.ListRefreshExternalCollectionJobsReq;
import io.milvus.v2.service.utility.request.RefreshExternalCollectionReq;
import io.milvus.v2.service.utility.response.GetRefreshExternalCollectionProgressResp;
import io.milvus.v2.service.utility.response.ListRefreshExternalCollectionJobsResp;
import io.milvus.v2.service.utility.response.RefreshExternalCollectionJobInfo;
import io.milvus.v2.service.utility.response.RefreshExternalCollectionResp;

while (true) {
    GetRefreshExternalCollectionProgressResp resp = client.getRefreshExternalCollectionProgress(
            GetRefreshExternalCollectionProgressReq.builder()
                    .jobId(jobId)
                    .build());
    RefreshExternalCollectionJobInfo jobInfo = resp.getJobInfo();
    if ("RefreshCompleted".equals(jobInfo.getState())) {
        long elapsed = jobInfo.getEndTime() - jobInfo.getStartTime();
        System.out.printf("  Refresh completed in %dms%n", elapsed);
        break;
    } else if ("RefreshFailed".equals(jobInfo.getState())) {
        System.out.printf("  Refresh failed: %s%n", jobInfo.getReason());
    }
    TimeUnit.SECONDS.sleep(2);
}
refreshResult, err := client.RefreshExternalCollection(ctx,
    client.NewRefreshExternalCollectionOption("test_collection"))
jobID := refreshResult.JobID
for {
    progress, _ := client.GetRefreshExternalCollectionProgress(ctx,
        client.NewGetRefreshExternalCollectionProgressOption(jobID))
    fmt.Printf("State: %s\n", progress.State)
    if progress.State == entity.RefreshStateCompleted {
        fmt.Println("Refresh completed!")
        break
    }
    if progress.State == entity.RefreshStateFailed {
        fmt.Printf("Refresh failed: %s\n", progress.Reason)
        break
    }
    time.Sleep(2 * time.Second)
}
// node
curl --request POST \
--url "${PROJECT_ENDPOINT}/v2/vectordb/jobs/external_collection/refresh" \
--header "Authorization: Bearer ${TOKEN}" \
--header "Content-Type: application/json" \
--header "Request-Timeout: 10" \
-d "{
    \"dbName\": \"my_database\",
    \"collectionName\": \"test_collection\",
    \"externalSource\": \"volume://my_volume/path/to/a/folder\",
    \"externalSpec\": \"{\\\"format\\\": \\\"parquet\\\"}\"
}"
The refresh operation is asynchronous, so you need to set up an iteration to monitor its progress.
The refresh operation scans the metadata of the data files and generates the manifest files accordingly. It usually takes 150-250 ms.
The manifest files record the mapping between the metadata in Milvus and the rows in external files.
If there is an update to your source data, you need to manually call refresh again to keep Milvus up to date.
A refresh that requires removing all active metadata without any insertions results in a denial.
Follow-ups
Once you have refreshed the external collection, you can load and release the collection and perform similarity searches and queries in the external collection as you would in any managed collection, except that collections in a database for on-demand computing must be attached to an on-demand cluster for searches and queries.
Before conducting DQL operations, such as search, query, get, and hybrid search, you need to create a session to attach the compute resources of an on-demand cluster.